

Archive for the '68 Katy' Category
68K Free Run
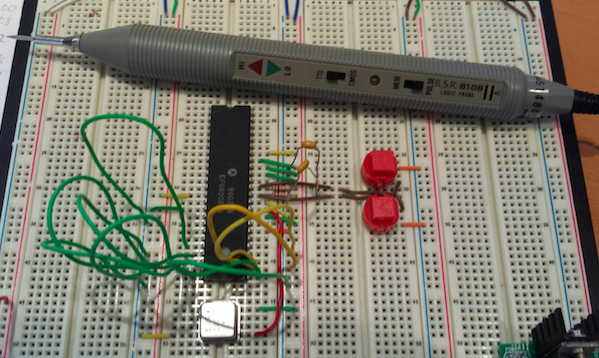
Some small progress on the 68K single board computer: I have a 68008 working in “free run” mode on a breadboard. Free run isn’t really a processor mode, it’s just what happens when you connect all the CPU data lines to ground, hardwire the control signals to default states, and connect a clock oscillator. The 68K acts like there’s a device present that spans the entire address space and is filled entirely with zeroes, so it initializes the program counter to 0 and starts executing a long series of instruction 0x0000, which happens to be the 68K opcode for ORI.B #0,D0. As the PC advances through the address space, the CPU address bus counts up from zero. By connecting an LED or a logic probe to one of the higher address lines, you can see it blink as proof that the processor is alive.
OK, maybe it’s not very exciting, but it’s a fun little experiment you can do with just a naked 68K CPU and a clock oscillator. No RAM or ROM or other hardware is needed. I recently discovered a similar free run demo for Brian Benchoff’s 68K-based single-board computer for Hackaday, although that project appears to have stalled out afterwards. It seems that blinking an LED in free run mode is a rite of passage for 68K projects.
Along the way to this demo, I discovered that reset handling for the 68K is annoyingly complicated. You might think there’s just a /RESET input to the CPU, and you could force /RESET low to reset the processor, but that’s not how it works. The 68K has a /RESET and a /HALT, and to reset the processor you need to drive both of them low. But these pins are actually bidirectional I/Os, and sometimes the CPU itself will drive one of them low! For example /HALT will be driven low after a double bus fault. So the external reset circuitry can’t actively drive these signals high without causing damage, it can only actively drive them low or let them be passively pulled high by a pull-up resistor.
This makes it impossible to design a simple reset circuit where /RESET and /HALT are both driven low when a single button is pushed. The single “master reset” signal would have to be connected to both /RESET and /HALT, effectively tying those signals together. If the CPU later drove /HALT low due to a fault, that would cause it to see /RESET low too, and so the CPU would reset itself. What a mess. After thinking in circles for a while, I concluded the only solution is to use an open collector buffer like 74LS07, or discrete transistors, so each signal can be independently pulled low in response to a single master reset signal, then allowed to float high. I don’t have any of those parts handy, so my breadboard circuit has two separate push buttons, and both must be pushed at the same time to force a CPU reset.
Read 11 comments and join the conversationDesigning a 68K Single Board Computer

Hackers of a certain age love the 68000 family of CPUs, and I’ve begun sketching out designs for a 68K-based single board computer. Take a vintage off-the-shelf CPU, add ROM and RAM and an SD card and some type of I/O, and Bob’s your uncle! I plan to start with bare metal programming to test out the hardware and peripherals, then try to get text mode Linux running. I/O will probably be exclusively through a serial port, but I hope to also include a USB controller to see what I can make happen through Linux. For inspiration and direction, I’m drawing heavily from Simon Ferber’s (Kiwi) and Luis Alves’ 68K-based homebrew designs. Here we go!
CPU
I have an old MC68008P8 CPU gathering dust in a drawer that would be perfect. The P8 version is rated for 8 MHz, and the 68008 is essentially a 68000 with an 8-bit data bus instead of the standard 16-bit bus. That means its memory throughput is only half the 68000’s, and since it has no cache and most instructions require a memory access, its performance is only slightly better than half that of a 68000 at the same clock speed. But what it lacks in speed, it makes up in simplicity. The 68000 requires twice as many data lines to be routed, and either twice as many RAM and ROM chips, or physically larger chips with 16-bit interfaces.
Luis Alves’ machine used a regular 68000 at 20 MHz, and got decent performance running ucLinux. An 8 MHz 68008 will only have about 20-25% of the performance of that system, which might be a problem. Maybe I should look into the availability of suitable 16-bit ROM and RAM chips before making a final decision.
ROM and RAM
Speaking of ROM and RAM, there’s not much to say here beyond the question of bus width. Pretty much any Flash ROM and SRAM should be more than fast enough to keep up with this CPU. Something like a few MB of ROM and 4-16 MB of RAM should be OK. Thinking ahead to Linux, if I can store the kernel and other programs in ROM and execute the code from there, I can reduce the amount of RAM I’ll need. As a size reference, the kernel for my Raspberry Pi is just over 3 MB, so that’s not unreasonable to put in a ROM. There’s something called XIP (execute in place) that’s supposed to make this possible, but I have no idea how difficult it might be to get working.
It’s probably safer to assume a bootloader will copy the kernel into RAM and it will execute from there, but in that case I might as well write a slightly smarter bootloader that copies the kernel from SD card to RAM instead. Perhaps ROM only needs to be large enough for a minimal bootloader – a bootloader loader – say 512 KB or less.
I’ve been assuming the RAM will be SRAM, because it’s easy to work with and it’s what I’ve used for all my past projects. I know DRAM isn’t that complicated, but every time I read about RAS and CAS and DRAM refresh, my eyes glaze over and I just pay $2 more to buy SRAM. That’s fine for smaller RAM sizes, but if I end up going as high as 8 or 16 MB, it could become a space and cost problem. Large capacity SRAMs are rare, and fitting 8 or 16 smaller SRAM chips on the board would be painful.
Serial Port
The serial connection could be a simple UART, but something like one of FTDI’s common USB-to-serial converters probably makes more sense. Or a USB-to-serial/parallel converter like the FTDI 245, which has a USB interface to the PC and appears as a virtual serial port, but presents a parallel interface to the 68K CPU. That should be a little easier to work with, and faster when transferring large amounts of data. The ‘245 also has a decent-size buffer and hardware flow control, which an old-school UART might lack.
CPLD or FPGA
Something’s got to decode memory addresses to determine which RAM or ROM or other chip to enable for a particular memory access. If that were the only requirement, address decoding could be hard-wired using a few 7400-series logic chips. But by doing the decoding in a large CPLD or small FPGA instead, other glue logic functions could be consolidated as well. These include things like reset handling, simple timers, interrupts, GPIOs for buttons and LEDs, and SPI/I2C conversion for peripherals.
A CPLD is strongly preferred over an FPGA, because the CPLD’s configuration is held in its internal non-volatile memory. An FPGA’s configuration is RAM-based, so it would require something else to configure it every time the board boots up. And if the FPGA functioned as the CPU’s address decoder, the CPU would be non-functional during this time, and couldn’t do the boot-time FPGA configuration. Some other device like an on-board microcontroller would have to do the job, adding to the system complexity. CPLD’s are much simpler in this respect, but are limited in the amount of logic they can implement. My combined address decoder / reset handler / timer / interrupt controller / GPIO / SPI / I2C monster may be too complex to fit in a CPLD.
SD Card
While external storage isn’t required, especially for experimental bare metal programs stored in ROM, some kind of external storage for Linux is a practical necessity. Fortunately the hardware interface to SD memory cards is very simple, and I’ve done it before as part of my Floppy Emu project. All that’s needed is a few pins to connect an SPI interface, and the rest happens in software. The 68K CPU doesn’t have an SPI interface, of course, but the CPLD/FPGA can easily implement a byte-wide parallel to SPI interface.
Ethernet
Ethernet isn’t really required either, but what fun is a Linux installation without a network connection? The Microchip ENC28J60 is a popular and well-supported chip for creating a wired ethernet connection. It uses an SPI interface for talking to the CPU, and there’s Arduino example code available for it, which I could probably decipher. There’s also driver support in newer versions of the Linux kernel. For ease of use, Sparkfun and other suppliers sell a small module based on the ENC28J60 that also includes the required caps, resistors, and inductors, as well as the ethernet jack.
USB
The Maxim MAX3421E is a USB Host controller chip with an SPI interface. It’s the basis of several Arduino USB Host shields, and I could use the associated Arduino libraries for examples of how to get it working. It looks like Linux kernel support was just recently added, in kernel 3.16. I’m not sure I could actually get this working, but it would be cool if I could directly hook up a USB keyboard or thumb drive or other peripheral.
SPI Performance
It might seem that using SPI-based solutions for external storage, ethernet, and USB would be a performance bottleneck, since SPI data is transferred one bit at a time in serial fashion. If you check the math, however, the 20 MHz SPI speeds of these devices is still enough to keep up with an 8 MHz 68008. A 20 MHz SPI connection can theoretically transfer 20 million bits/second, or 2.5 million bytes/second. An 8 MHz 68008 needs 4 clock cycles for a single byte-wide memory transfer, giving it a theoretical max of 2 million bytes/second – less than the SPI limit. But it’s actually even worse than that, when you consider the two memory transfers (8 clock cycles) needed to load the 16-bit CPU instruction that performs the SPI transfer. So even an unrolled loop writing a constant value to SPI could do no better than one byte sent per 12 clock cycles, or 667Kbps. In practice, the overhead of serializing and unserializing data for SPI will never be a bottleneck on this system.
Level Conversion
With a mix of old and new hardware in the system, 5V to 3.3V level conversion will need to be performed somewhere. The fewer places, the better. The 68008 is a 5V part, and the ROM and RAM can probably be found in either 5V or 3.3V varieties. The CPLD or FPGA will run at 3.3V, but may have 5V tolerant inputs depending on the specific part used. The ethernet and serial chips are 3.3V with 5V tolerant inputs, and I think the USB chip is too. SD cards are 3.3V devices and not 5V tolerant, so conversion will be needed there. If all the 3.3V devices are connected to the CPLD instead of directly to the CPU, and the CPLD is 5V tolerant, then it can serve as the system level converter instead of requiring dedicated level conversion chips. Unfortunately I think few CPLDs are 5V tolerant, and even fewer FPGAs, and the ones that are tend to be old and obsolete.
Misc
How does the Flash ROM get programmed? Once the system is working, I think a bootloader can copy itself from ROM to RAM, then run from RAM while it updates the ROM contents. But for initial board setup, the ROM will need to be initialized with a external programmer hardware.
How does the CPLD get configured? I don’t think there’s any way the CPU can do this, so the board will need a JTAG header and a Xilinx/Altera programming cable to update the CPLD configuration.
A few pushbuttons would be useful: at least one for reset, and one to trigger an interrupt. Maybe a run/stop slide switch too – though I’m not sure how I’d use it. Some status LEDs or a 7 segment LED display would be helpful for debugging initial hardware setup, but probably useless after that.
It’s probably a good idea to include some expansion headers, for things I didn’t consider originally. If the header provides access to the entire data bus, some lower bits of the address bus, the CPU read/write control signals, and a few unused CPLD pins, that should be enough to support some extra external hardware.
Read 25 comments and join the conversationMore Thoughts on Homebrew CPU Linux
The other day I wrote about designing a new homebrew CPU, and getting Linux running on it. After looking deeper into the idea, it’s just not realistic to port Linux to a CPU that I built myself, even a low-end version like ucLinux. At a minimum the CPU would need 16-bit registers (or is it 32-bit?) and hardware support for supervisor and user modes. To get usable performance (typical Linux command line programs running at interactive speeds) it would probably also need a larger number of registers, things like hardware multiply and divide instructions, and at least a small amount of cache. None of that’s impossible, but it would add lots of additional chips and interconnects, and it’s probably out of range of what I can expect to build from a handful of discrete logic chips. My BMOW1 CPU was nowhere near that capable, yet was definitely pushing the upper limits of what I have the time and desire to build by hand.
I could design my CPU in VHDL or a hardware description language, and program it into an FPGA, similar to what I did with my Tiny CPU. That holds much less interest for me, though. There are already lots of FPGA-based CPU soft cores, including ones from the FPGA vendors themselves, and it’s a path that just doesn’t excite me very much.
What about a simpler OS? ELKS is a minimal Linux-derivative originally designed for 8086 computers and should have very modest requirements. It looks nearly abandoned, though, and would probably be difficult to find information and support to help get it going. There’s also Minix, which should run on very low-end systems. It seems better supported than ELKS, but there’s still not much info available about it, and the latest Minix 3.0 appears aimed towards higher-end CPUs. FreeRTOS looks very lightweight and could probably run on a very simple CPU. But from what I can tell it’s not really an operating system at all, it’s just a thread scheduling library. There are no included applications nor even a command shell.
When it comes down to it, I just don’t want to spend the time and energy it would take to create a CPU capable of running any of these. Maybe someday, but not now.
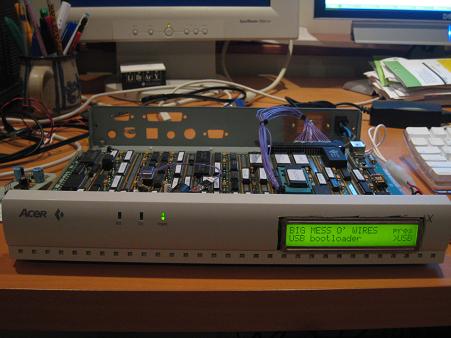
That still leaves me with a couple of related projects that would be interesting to pursue. The first is constructing a single board computer using an old commercially-available CPU, and getting Linux running on that. A great example is this homebrew 68000 system built on a breadboard and running ucLinux. That could be a fun project – complicated, but not overwhelming. I even have a couple of DIP 68000 CPUs in a box somewhere that I could use. Perhaps this could even further the goals of my long-dormant Plus Too project. Or maybe try using a simple ARM CPU, or even an ARM-based microcontroller with some extra external memory. This would be an interesting hardware exercise as well as a deep dive into Linux internals and Linux porting.
The second path is extending an existing C compiler (likely gcc or llvm) to support a homebrew CPU, either one of my existing CPU designs or a new one. The BMOW1 CPU is maybe almost capable enough to handle simple C programs. A few additional registers and instructions, and I think it would be there. It would be predominantly a software project related to how compilers work. This interests me too, though less so. I see the creation of a cross-compiler more as a means to supporting a CPU project, rather than as a fun project in itself.
So many ideas, so little time!
Read 6 comments and join the conversationPorting Linux to a Homemade CPU
Wouldn’t it be cool to create a homebrew CPU architecture, then port Linux to it? I realize that single sentence probably implies a couple years’ worth of work, but that’s OK. A real, full-fledged OS running on a totally custom piece of hardware would be awesome! I’ve already designed and built homebrew CPUs several times before, though only one had anything that could charitably be called an “operating system”, and none of them were anywhere capable enough to run something as complex as Linux. What kind of minimum specs would a homebrew processor need to be capable of running a bare-bones text mode Linux? Core speed? Number and size of internal registers? Supervisor/user mode? MMU? How much RAM? What else?
There’s so much I don’t know, I don’t even know what I don’t know. That’s what makes it exciting. I’m perfectly comfortable as a Linux /user/, with a variety of random Unix-world experience going back 20 years to Sun Sparcstations. But I know next to nothing about how Linux (or other Unix flavors) are put together underneath – what exactly is the bootloader, the kernel, what is init, and all these other fun terms I hear tossed around. How do you go about porting Linux to a new board, a new CPU architecture?
Based on 2 minutes of exhaustive research, I’m looking at ucLinux as a starting point, rather than any regular desktop Linux. ucLinux is aimed at very low-end CPUs with no MMU, and “low end” will doubtless describe whatever I end up building. The related ucSimm module is a 16 MHz Dragonball CPU with 2MB of ROM and 8MB of RAM, so that already gives me an idea of where I need to aim for CPU specs. If I can get away with less, great. Bill Buzbee’s homemade Magic-1 runs Minix on a 4MHz custom 16-bit CPU with 4MB RAM.
To be candid, I’m a lot less excited about designing a 4th homemade CPU architecture than I am about porting an operating system to it. So as a starting point (and maybe a finishing point), it might make more sense to try porting Linux to an existing but obscure CPU or development board. That would get me familiar with the details and requirements of the porting process, which would help inform what features would be most valuable when I design my own CPU/board.
Assuming I do go forward with a homebrew CPU (or maybe try to augment the BMOW1 CPU), I’m still unclear where to even begin with porting Linux to it. The Linux kernel is available as source code, so presumably one of the first steps would be to modify and compile this code for the new CPU. That implies using a cross-compiler that runs on an x86 PC but outputs NewCPU code. So how do I make such a cross-compiler?
A few years back, I took a brief look at adding support for a new CPU architecture to gcc, but quickly gave up. It looked complicated and confusing, and I really had no idea what I was doing. Unfortunately, that’s probably where I need to start, since I’ll probably need a cross-compiling gcc to compile the kernel sources. Alternatively I could compile gcc from its own source code, using a different compiler, but then where would I get that other compiler? I had some limited success porting the Small C compiler to BMOW a few years ago, so perhaps I could start there, but that compiler was so limited and simple that it’s probably useless. Given that, it seems a reasonable place to start would be deeper investigation into what’s required for extending gcc to support a new and novel type of CPU. Whee!
Read 9 comments and join the conversation