

Archive for the 'Backwoods Logger' Category
Weather Logger with Losant and Amazon Alexa
Like a million other people on the Internet, I’ve been experimenting with home weather logging. I roll my eyes at the phrase “Internet of Things”, but it’s hard to deny the potential of cheap networked sensors and switches, and a weather logging system is like this field’s Hello World application. Back in June I posted about my initial experiments in ESP8266 weather logging. Since then I’ve finalized the hardware setup, installed multiple nodes around the house, organized a nice web page to analyze all the data, and integrated everything with Amazon Alexa. Time for an update.
Hardware
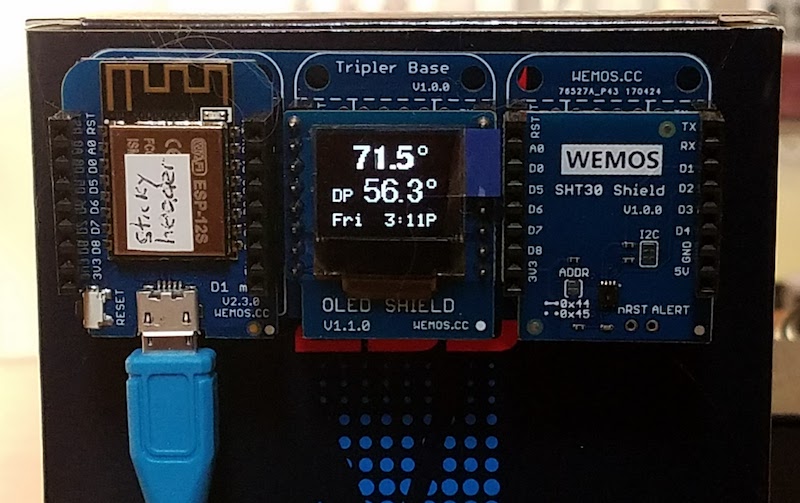
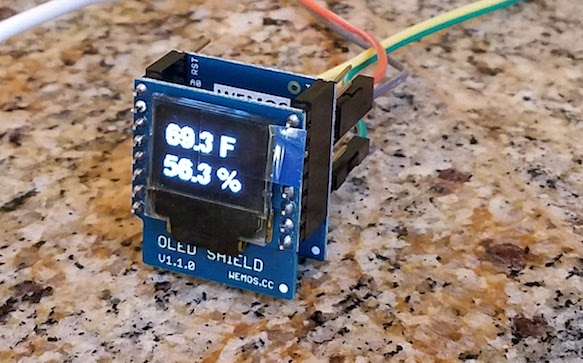
I’ve placed four sensor nodes around the house. At the heart of each one is a Wemos D1 Mini, a $4 Arduino-compatible ESP8266 microcontroller board with built-in WiFi. A Wemos OLED shield is used to display live stats at each node, and a Wemos SHT30 sensor shield collects temperature and humidity data.
My original prototype stacked the three modules on top of each other, but I found that this configuration caused the heat from the Wemos D1 Mini to skew the temperature readings from the SHT30 sensor. The final hardware setup uses a Wemos tripler base to mount the three modules side-by-side. The module is powered by a standard USB cable connected to a power adapter scavenged from some other long-forgotten device. The total hardware cost for the entire node is about $10, which seems amazingly inexpensive.
Three of the nodes are indoors. The fourth is outside on a patio, plugged into an outdoor electric outlet and protected from the elements by a sheet of cardboard. This node doesn’t have any OLED display (nobody is there to see it), and it uses a BMP085 sensor that measures temperature and air pressure instead of temperature and humidity. The outdoor node is unfortunately prone to crazy temperature readings when the direct sun hits its cardboard shield. The cardboard quickly warms in the sunlight, creating an oven effect that boosts the temperature readings to over 100 F, even when there are many holes in the cardboard to encourage airflow. I need to design a better enclosure for the outdoor sensor that’s not as sensitive to the sun.
This hardware setup works nicely where WiFi and electric outlets are easily available. For sensor nodes “in the field” outside WiFi range and requiring battery power, something like a Moteino may be more appropriate.
Software
The software running on each node is very simple: it’s little more than a combination of standard Arduino libraries for each of the modules. There are standard libraries for the SHT30 and BMP085 sensors, for the Wemos D1 Mini’s built-in WiFi, for the OLED display, and for the Losant data logging service. For anyone who’s done much Arduino programming, the glue code that’s needed to tie everything together is simple and can be written in an hour. See my example code.
When first powered on, the node software connects to the local WiFi network using a hard-coded SSID and password. It then connects to the data logging server, as well as an NNTP server to get the current date and time. Once that’s done, it polls the sensor every 15 seconds to get the latest data. The data is displayed on the OLED, and also transmitted to the logging server. Easy peasy.
Logging and Analysis
Displaying live data is nice, but the most interesting part of a weather logger is analyzing the collected data. By examining data over time, and comparing data from multiple nodes, it’s possible to answer burning questions like:
- When it’s slightly warmer outside than in, will opening the windows cool the house by creating a breeze, or warm the house by admitting warmer air?
- Does kitchen cooking have a measurable effect on indoor humidity?
- How slowly or quickly does indoor temperature change in response to outdoor changes?
- Is it always cooler downstairs than upstairs?
- What’s the effect of opening specific windows around the house?
After experimenting with many different data logging and display services, I settled on Losant. Their web page looks very business-oriented and intimidating, so I initially thought it would be a poor match for my needs, but I was wrong. The system is easy to use, and is free as long as you don’t have a crazy number of nodes or data records.
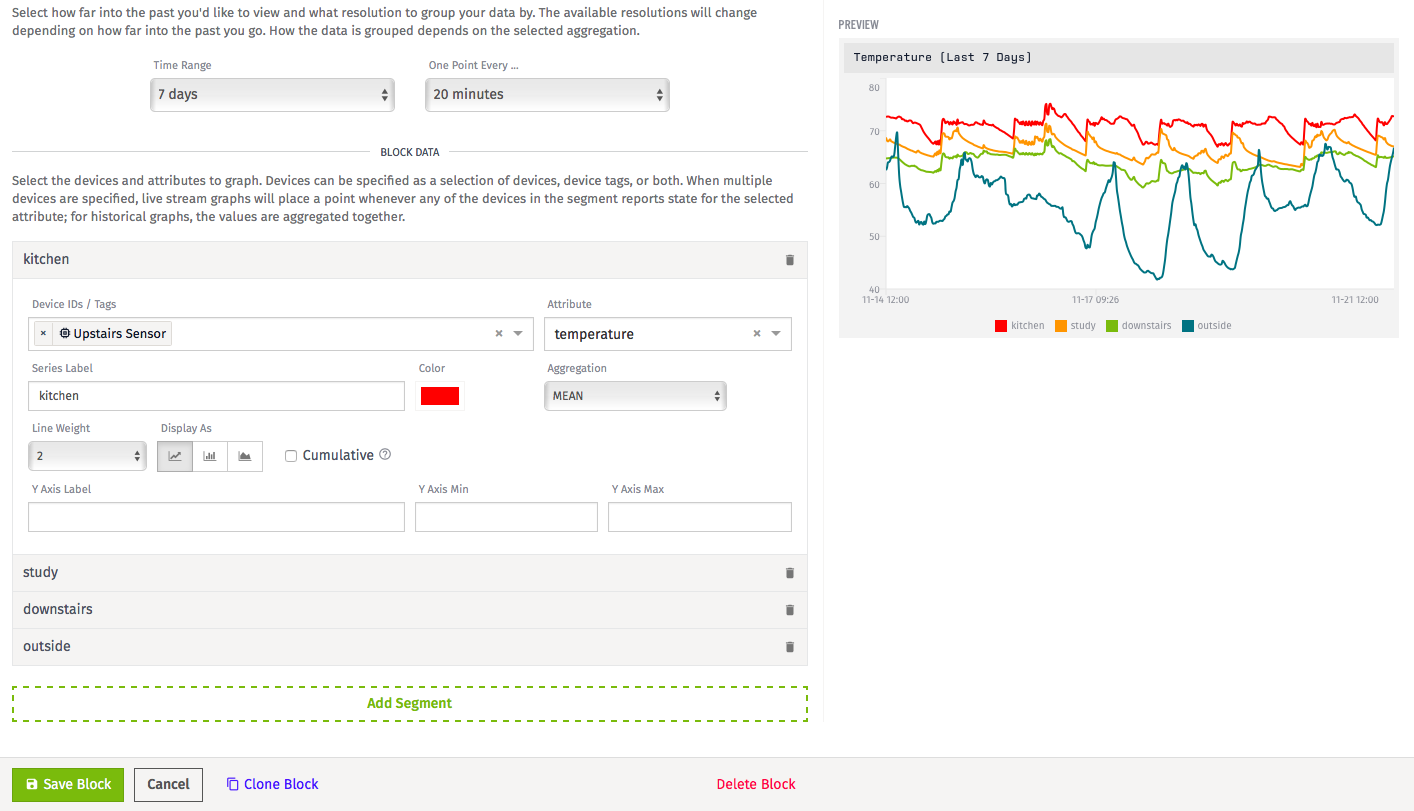
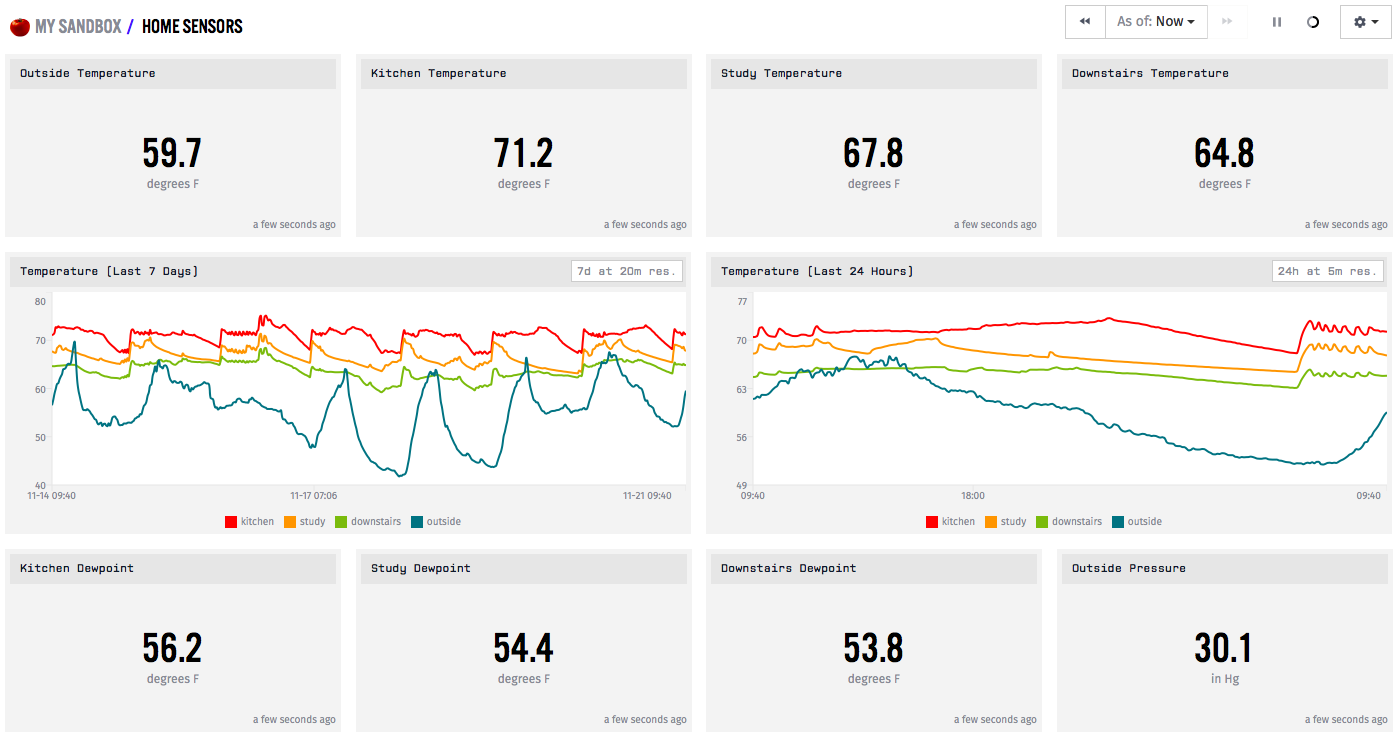
Losant powers a custom web dashboard with a mix of graphs and other widgets. The layout, size, and data details are highly configurable, and a single widget can do more than simply displaying the latest sensor reading. For example, it can display the average, min, or max reading from a sensor over a window of time, or compute an aggregate value from several sensors.
My dashboard shows live data from the four nodes, as well as temperature, dewpoint, and atmospheric pressure graphs for the past 24 hours and past 7 days. I learned that downstairs is reliably cooler than upstairs, and that opening those windows really does create a cooling breeze. I found that a person entering a closed room for a few minutes can substantially raise its humidity (all that exhaling). My furnace has a cycle time of 20 minutes, visible in the ripple of the 24 hour temperature graph shown above. The kitchen temperature often shoots up around 4 PM when the afternoon sun comes in the windows. Outdoor low temperature was 51.9 F, reached at 7:15 AM this morning. Saturday’s outdoor low was 41.7 F at 5:40 AM. Lots of interesting stuff.
Amazon Alexa Integration
One of the most interesting features of Losant is its webhook integration. In addition to logging and displaying data, it can also interact with 3rd-party web services. A data update from a sensor node can trigger some related web request, or a web request to Losant’s servers can retrieve stored data, or even trigger a command to the sensors. There are some powerful options, and it’s all configured through a visual programming interface that Losant calls a workflow.
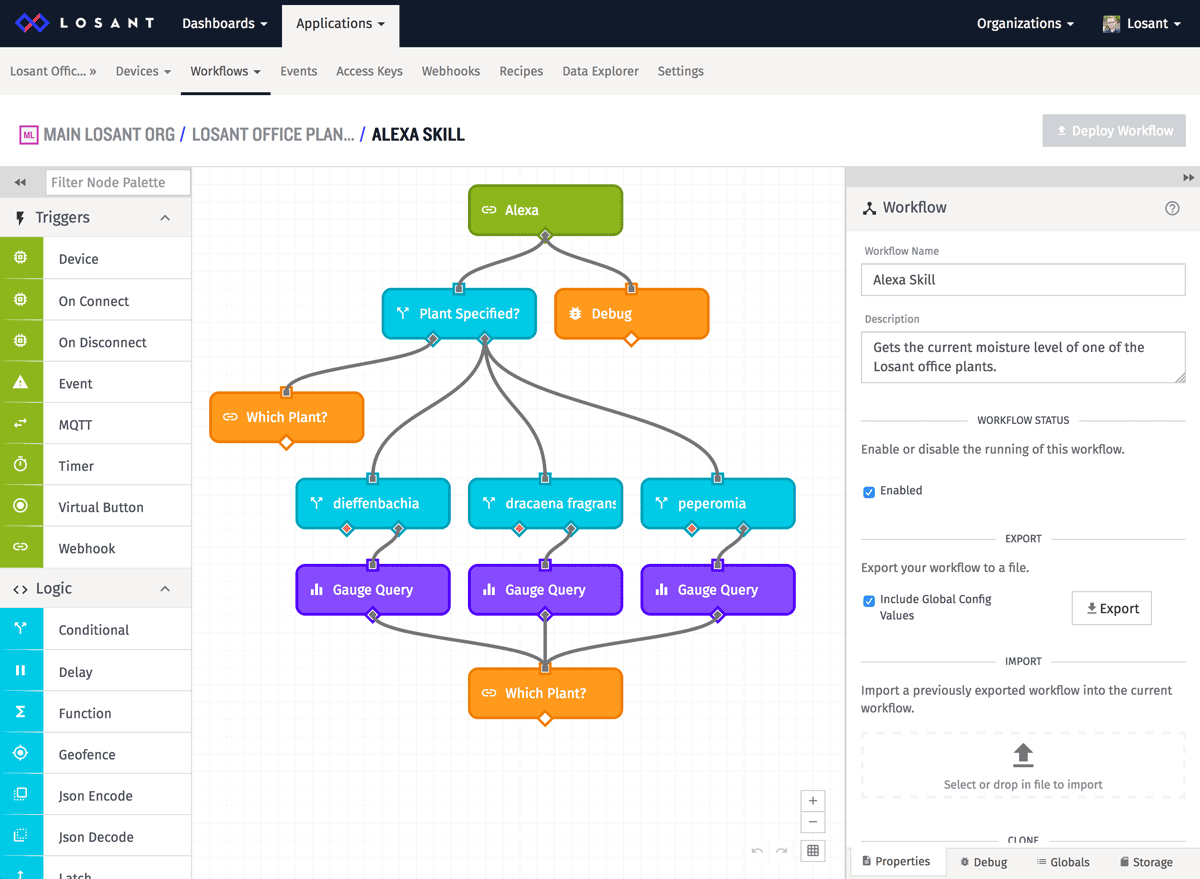
Using this tutorial, I created an Amazon Alexa skill for querying my weather logging nodes. The setup was a bit complex, but the tutorial does a good job of explaining the skill configuration that’s required in the Amazon developer admin interface, and the Losant workflow design. Within an afternoon of fiddling it was all working great. I can ask for the temperature or dewpoint of a specific weather node, using generic language like “temperature” or “how warm is it”. I can also make a general inquiry and have Alexa prompt me for necessary details:
“Which station? You can say kitchen, study, downstairs, or outside.”
“Outside”
“The current outside temperature is 63.1 degrees.”
Most of the interesting configuration work is done in the Amazon admin interface. This is where the various “intents” are defined (specific actions or requests that can be made by the user), and the vocabulary words related to each intent. It’s also where the Alexa skill is given a name, which in my example is “the house”. By beginning a request with “ask the house”, Amazon knows to process the rest of the sentence through my skill template instead of its built-in response templates. Once it determines what I’m asking for, Amazon’s server makes a web request to Losant. The Losant server looks up the desired data and returns it to Amazon, who sends it back to my Echo to be articulated as a spoken reply. Asking for the dewpoint in the kitchen may be pointless, but feels almost like conversing with the Star Trek computer. The future is here!
Read 4 comments and join the conversationESP8266, Freeboard.io, Blynk, and IoT
The ESP8266 has exploded in popularity since its introduction a few years ago. With easy to use Arduino-compatible modules like the Wemos D1 Mini, it’s like having an Arduino that’s 5-10x faster, has 128x more memory, and has built-in WiFi, all for the ridiculously cheap price of $4. It’s pretty amazing stuff, really.
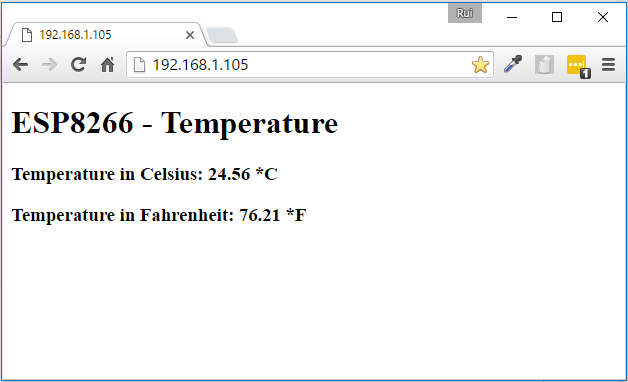
Like everyone else, I began my ESP8266 adventures with a temperature logging application. Using the D1 Mini, an OLED display shield, and an SHT30 temperature/humidity sensor shield, I was able to create a working temperature monitor in about 15 minutes. It shows the current temperature and humidity on the display, and also runs a basic web server for remote viewing of the data. The only hiccup was the heat generated by the ESP8266, which was enough to raise the temperature about 10 degrees F above ambient temperature when the SHT30 shield was plugged directly into the D1 Mini base. Separating the modules with hookup wires solved that problem. The result was something like this:
Logging and Displaying IoT Data
That’s great for a few minutes of work, but how can I make a single page that shows data from many sensors? Or historical data showing the temperature trend over the past 24 hours? Or a more attractive visualization UI than plain text? Or bidirectional control – the ability to switch some equipment at the sensor on/off? This is the realm of IoT data logging and display dashboard solutions, and there are many options.
One approach is to run a local server to do the job, like a Raspberry Pi or an old PC. There are lots of options for software packages you can install on the server, which will log the data and serve up nice-looking pages to visualize it. I didn’t explore this route, because I was too lazy. I also dislike the idea of connecting to a random 192.168.1.8 server address that changes every time my home network reassigns the address through DHCP. I’m sure there’s a way to give it a fixed address and name like “weather-info.local”, but I didn’t look into it.
There exist a dizzying number of cloud-based logging and visualization solutions. My ideal solution would would have a nice-looking historical graph of the data, with an adjustable time scale, like the example below from Weather Underground. And of course it would be easy to integrate into my ESP8266 software, and cheap or free to use.

I’ve yet to find any solution that I love. Here’s a quick run-down of the cloud-based options that I investigated.
Dweet.io and Freeboard.io
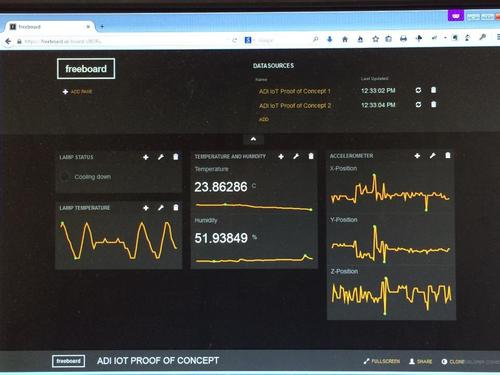
Dweet.io is the data logging service, and Freeboard.io is the dashboard display service. Judging from how frequently they’re mentioned in tutorials and instructables, they’re quite popular. You can also install Freeboard on a local server if you prefer. This setup is for data visualization only, and doesn’t allow for control over the sensor device.
The combination of Dweet plus Freeboard is easy to use, and it looks nice. It would be a great solution except for one shortcoming: there’s no real support for historical data. Freeboard can display sparklines, which are a sort of mini-chart where nothing is labeled and the history is retained in the chart widget itself. Close the web page and re-open it, and your history is gone.
There is an option for a Historical Graph Widget in Freeboard, but it requires upgrading to a paid Dweet Pro account for data storage. That’s only $2/month, but as far as I can tell it means you need to pay before you can try out the historical graph to see if it’s any good. From the screenshots I’ve seen of it, the time axis isn’t labeled and the time scale can’t be modified. It also appears designed to graph a fixed range of historical data, like June 10, rather than a window like past 24 hours.
Freeboard can be extended with plugins, and there are several attractive graphing plugins available. However, all of them appear to function like the sparkline, with the history retained in the graph widget instead of coming from the data source. There may be a solution to do what I need with Freeboard, but I couldn’t find it.
Blynk
Blynk combines the data logging and dashboard display into a single service. It also provides support for control over devices, in addition to displaying data received from them. Along with Freeboard, it seems to be one of the most popular IoT visualization solutions. It’s easy to use, and attractive.
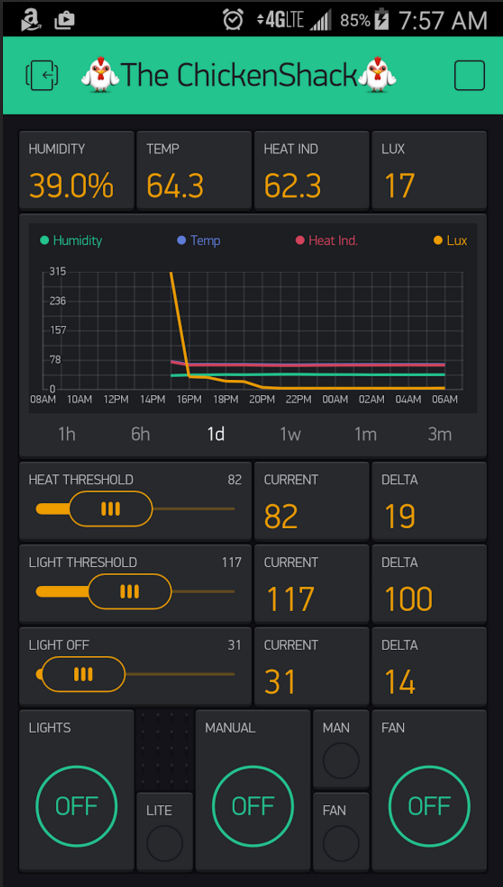
My biggest complaint about Blynk is that visualization and control is accomplished entirely through mobile apps. There is no facility for viewing your data in a web page – everything happens on your phone or tablet. For some people that might be fine, but I strongly prefer a regular computer with a larger screen and easier control over a complex UI.
The Blynk historical graph widget does almost exactly what I want, with an adjustable timescale showing anywhere from the past 1 hour to past 3 months. But the graph is tiny, and can’t be zoomed or enlarged. It also lacks a cursor feature to display the exact value from some time in the past – you have to eyeball the graph and estimate it. When the whole point of the temperature logger dashboard is to dig into the historical data, it’s disappointing.
Blynk uses an “energy” metaphor that I find to be confusing and silly. Each type of widget added to your dashboard requires a different amount of energy, which must be paid for with an in-app purchase. I would prefer a more straightforward monthly subscription model, with the cost based on things like the number of dashboards and amount of data stored. Charging 2x the energy for a data field display with units vs one without units has no correlation to the developer’s actual costs, and makes me feel like I’m playing Farmville.
Adafruit.IO
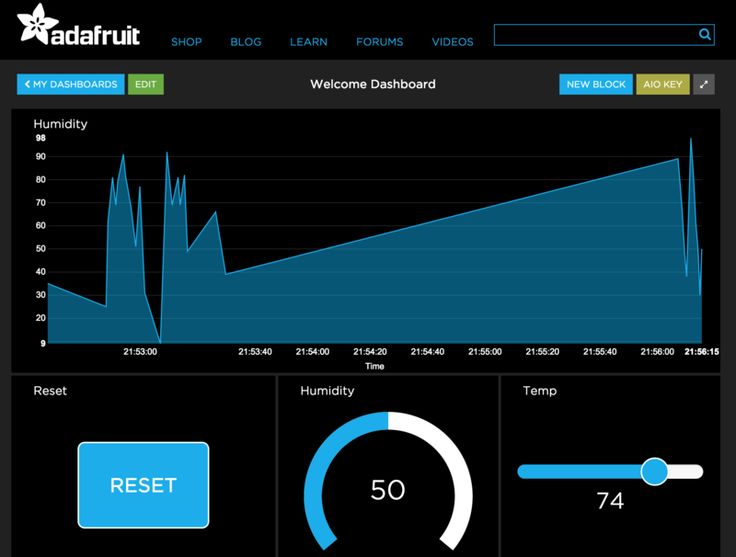
Adafruit.IO is technically still in beta, although it’s open to everyone and has been around for a couple of years. Like Blynk it combines data logging and display, and provides support for both data display and device control. But like Freeboard it’s web-based rather than mobile. Could this be the perfect solution?
From my limited testing it looks promising. The historical graph widget works as expected, and my only gripe is that the time scale must be chosen when the graph is created, so you can make a “past 60 minutes” graph or a “past 24 hours” graph, but not a single graph with an adjustable time scale.
I’m uncertain what the future holds for Adafruit.IO, or whether it’s still being actively developed and maintained. Since the service is completely free, and has been in beta for over two years, it has the feel of a project that was created with great enthusiasm but was left to languish when the developers moved on to something new. Assuming it doesn’t unexpectedly break or get shut down, it looks like a nice solution.
Cayenne
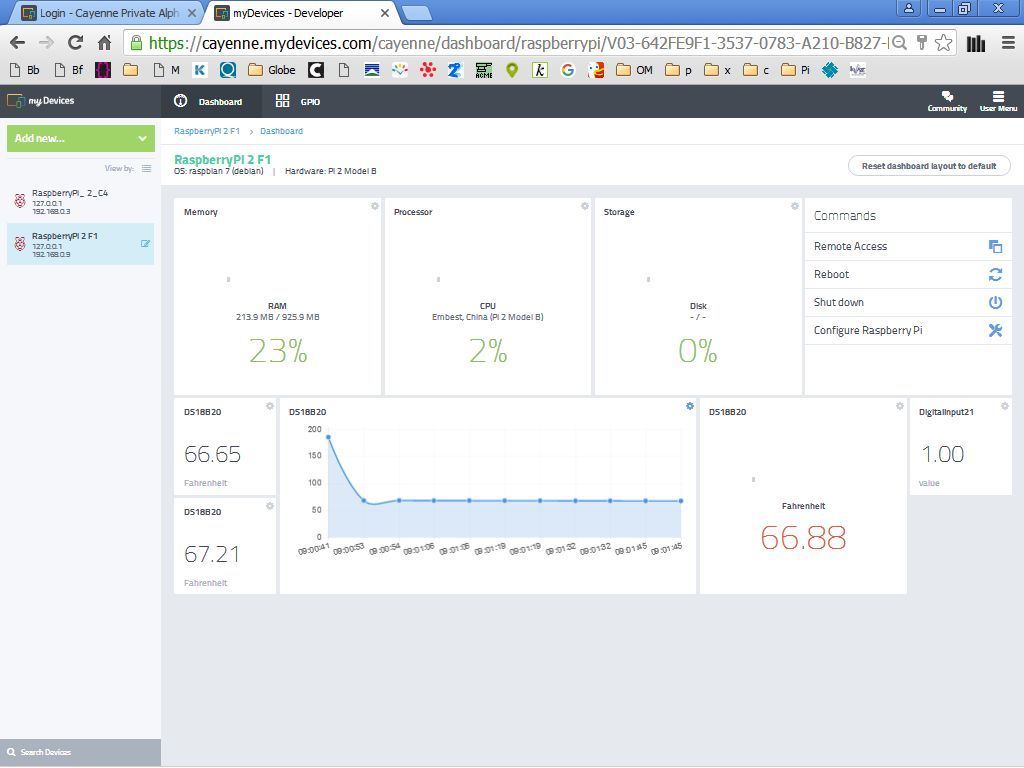
Cayenne is another web-based logger and dashboard like Adafruit.IO. It was recommended in a recent Sparkfun blog post, but I couldn’t find many examples of people using it. Unlike the other services I’ve mentioned, Cayenne appears to be an “app builder” whose goal is to avoid needing to write any code. Instead you use a web GUI to define what type of microcontroller you’re using, what kinds of sensors, and how they’re connected, and then it spits out a complete sketch you can paste into the Arduino IDE. You can probably guess that I’m not too enthusiastic about this approach. Under the hood, the auto-generated code appears to use something very similar to the Blynk API for communicating with the Cayenne server.
I stopped short after reading some Cayenne docs and videos, and never actually tried to integrate it. Maybe I should give it another try, as screenshots of its graphing functions look quite nice. If I can ignore the app builder and auto-generated code, and just use it as a normal API, it might be OK.
A few other alternatives I looked at only very briefly:
Thingspeak – Somehow related to MATLAB, and geared towards doing extensive analysis of the collected data. Might be OK? Most of the references I found were several years old, and I have the impression it’s been eclipsed by some of the newer alternatives.
Emoncms – Looks somewhat promising, but I think it’s only for local server installs and doesn’t have a cloud service.
Losant – Appears geared towards large scale businesses, not makers and home temperature loggers.
Easy IOT – Didn’t make a great first impression – many typos in documentation, complicated setup compared to the other options.
Analog.io – Minimal information on the web page, links to a Hackaday project that hasn’t been updated in a couple of years.
Have you ever used these tools or others like them? I’d love to hear from you – leave a note in the comments.
Read 11 comments and join the conversationBackwoods Logger Battery Life
I finally had to replace the CR2032 battery in my Backwoods Logger Classic yesterday. The nominal 3.0V voltage had fallen to about 2.7V, and while the software appeared to be functioning, the LCD display no longer worked reliably. The battery was new in June 2011 when I built the first Logger prototype, so that’s two years of battery life while doing continuous logging the whole time! In a post back then, I measured the average current draw at around 20 uA and estimated a battery life of “more than a year”, which proved to be pretty accurate.
The Logger Mini is more of a battery hog due to its OLED display – its AAA battery will last for several months of continuous logging. So the Classic is still king when it comes to long-term data collection.
Read 1 comment and join the conversationBackwoods Logger, Available Now
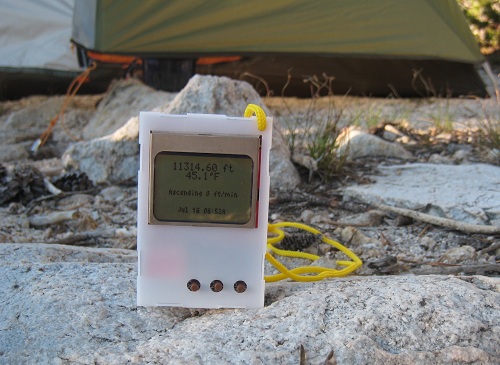
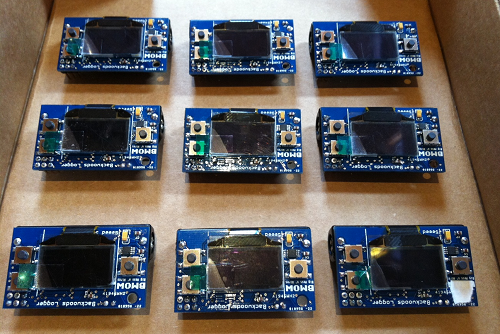
The Backwoods Logger is a programmable graphing altimeter / thermometer, originally developed here at BMOW and now an open hardware project. Interested in the Logger, but don’t want to build it yourself? Assembled Backwoods Logger Mini units, BLsync adapters, and blank Logger Mini PCBs are now available for purchase! Get one for yourself, or as a gift for your favorite outdoorsy nerd. I brought the first prototype with me on the John Muir Trail this past summer, and it was awesome.
What’s it all about, you ask? The Backwoods Logger is a programmable device for measuring and graphing temperature, air pressure, and altitude. It’s designed for hikers, backpackers, climbers, skiers, trail runners, cyclists, kayakers, snowmobilers, horseback riders, and other outdoorsy people interested in environmental data logging over timescales from an hour to a few weeks. The Logger Mini’s features are:
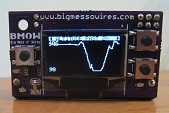
- Graphs of temperature, pressure, and altitude over time
- Three graph time scales: past 2 hours, past 10 hours, past 2.5 days
- Current rate of ascent/descent
- Estimated time of arrival at a user-defined altitude
- Weather forecast
- Station pressure and pressure at sea level
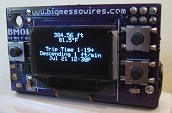
- Snapshot feature – make a permanent record of date, time, altitude, temperature, and pressure at important waypoints
- Current date and time display
- Imperial or metric units option
- Battery voltage indicator
- Sound on/off control
- 3 to 6 month battery life, depending on usage
- Temperature measurements in 0.5 degree steps, from -10F to 117.5F (-23C to 48C)
- Air pressure measurements in 0.01 in-Hg steps, from 5.9 to 36.12 in-Hg (170 to 1250 millibars)
- Altitude (calculated from air pressure) measurements in 2 ft steps, from -1384 ft to 14999 ft (-300 to 4500 meters)
- Download graph data to your PC using the optional BLsync adapter
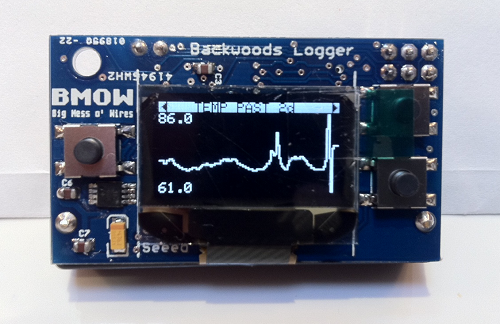
- 128 x 64 bright white OLED display
- 1.9 x 1.1 x 0.7 inches (48 x 28 x 17 mm) – very small!
- only 0.7 ounces (19g) including AAA battery – very lightweight!
For more details, join the discussion mailing list, check out the user guide, and watch this demonstation video (using the older Logger Classic hardware).
I’ve spent a lot of time getting very familiar with my soldering tools over the past week so that I could bring you these. My hope is that by seeding the community with some pre-assembled Loggers, it will kick-off some firmware hacks and hardware improvements, and take the Backwoods Logger project in exciting new directions.
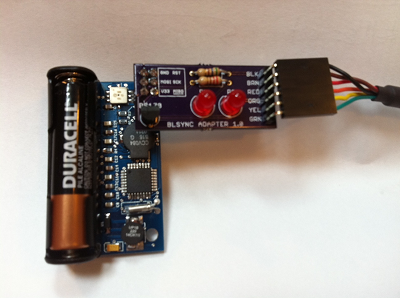
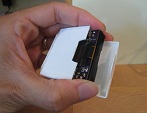
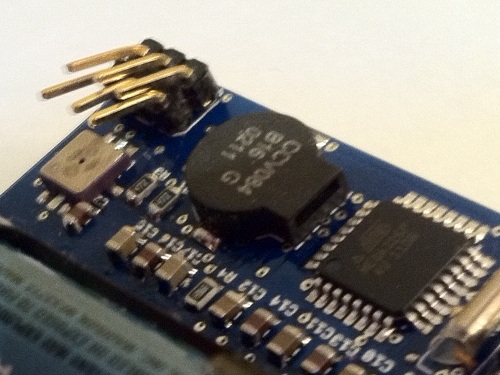
I’ve also built some blsync adapter boards. Blsync is optional and isn’t required for using the Logger, but it’s a handy tool if you want to do detailed analysis of your graph data. Using the blsync adapter along with an FTDI USB-to-serial converter, you can download graph data from the Logger to your PC, and analyze it using Excel or other tools. The adapter plugs into the ISP connector on the rear of the Backwoods Logger, as shown here.
You can also build your own blsync adapter using the schematic on the project web site, if you prefer.
The price for the Logger Mini is $59, and the BLsync adapter board is $6. Blank Logger Mini PCBs are $3. Shipping in the United States by US Postal Service priority mail is a flat $5.20. If you prefer another shipping method or need shipping outside the US, that can be arranged too.
Please email me if you want to purchase a Logger Mini or other parts. I also have one “factory second” Logger Mini, sold for half price at $29, with some dead pixels in the corner of the screen but otherwise working normally. More details available upon request.
Happy logging!
![]()
Extreme Product Testing
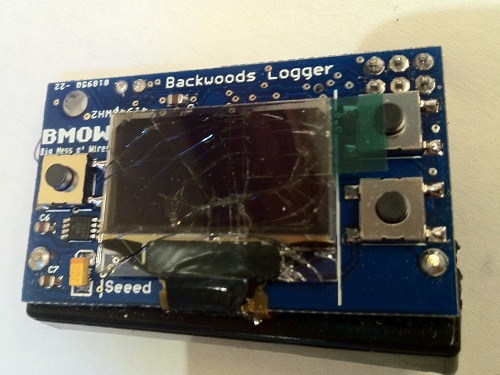
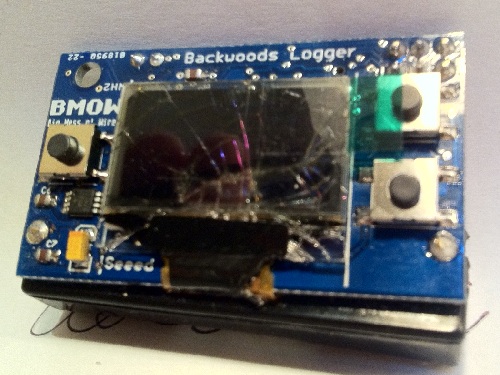
Have you always wondered what would happen to a Backwoods Logger Mini if it were crushed under your own body? No, neither have I, but today I found out anyway. I took out one of the newly-assembled Mini prototypes for a trail run, stored securely in a plastic case in my hip pocket. I wish I could say I was chased down a cliff by a mountain lion or something equally exciting, but the truth is that I tripped on a sidewalk crack before I even made it to the trail. I was running downhill and moving pretty fast, so I went skidding and bumping down the sidewalk with pieces of my hands, knees, elbow, and hip left behind on the concrete. As I hobbled back home, I heard some ominous rattling noises in my pocket. Not good…
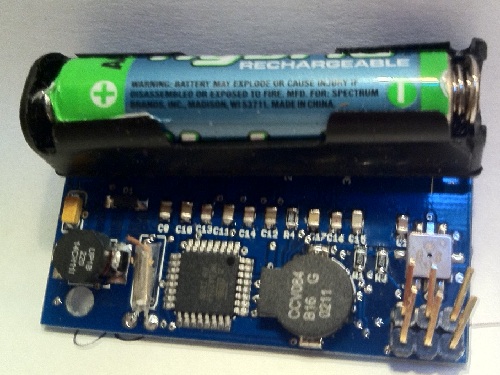
Further examination releaved the sad truth: the Mini took a direct hit when I fell, with all my body weight coming down on it, crushing it between my hip bone and the concrete. The plastic case was completely destroyed and smashed to pieces. The OLED glass was crushed, and part of the ribbon connector ripped off. The NEXT button was flattened and the spring mechanism killed. On the back of the Mini, the header pins were bent nearly 90 degrees over, the negative battery terminal was ripped straight off the board, and a bit of wood got stuck in the RTC crystal.
No, it does not still work.
I’m upset at having lost a prototype, since they take considerable time to assemble and the parts aren’t cheap. At least this makes a more interesting story than losing a prototype to a soldering error!


BLsync
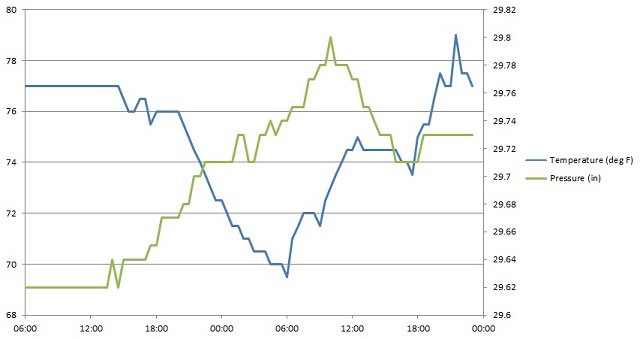
My newest design is a PC downloader utility called blsync, created as part of the Backwoods Logger project. BLsync is a command line program with a corresponding hardware adapter, and it enables snapshot lists and temperature / altitude / pressure graphs to be transferred from the Logger to a PC. Above is a quick graph I put together in Excel from blsync data, showing temperature and air pressure in my home over a 40 hour period. If I’d been hiking recently, I’d show a nice altitude over time graph too.
The Backwoods Logger is a programmable graphing altimeter / thermometer, developed as an open hardware project. It’s designed for backpackers, runners, environmental scientists, and other people interested in environmental data logging over timescales from an hour to a few weeks. The Logger design is based on an Atmel ATmega328 microcontroller and Bosch BMP085 pressure / temperature sensor. You can build your own Logger following the published instructions, or purchase a pre-assembled Logger prototype. For additional details visit the project home page, or join the public discussion mailing list.
Bit Bang Serial
The Backwoods Logger wasn’t designed with a PC download function in mind, so retrofitting one after the fact was a challenge. The only external connector on the Logger is the 6-pin ISP port, used for programming the microcontroller firmware. After programming is complete, the pins MOSI, MISO, and SCK can be used as general-purpose I/Os or as an SPI interface. (The other three pins are VCC, GND, and RESET.) So what’s the simplest way to build a PC communication interface using those three pins?
I’m not aware of any straightforward way to build a PC interface using SPI, so my solution was to design a serial interface. Unfortunately the built-in USART that’s normally used for ATmega serial communication is hard-wired to use specific pins, and those pins aren’t connected to the ISP port. Instead of using the built-in USART, then, I wrote a pure-software serial port driver that works over the MOSI and MISO pins. It manually performs all the start bit and bit-to-bit timing functions necessary for a bidirectional serial connection. In order to reliably get the right serial baud rate, I also added some code to calibrate the internal RC oscillator using the external 32768 Hz crystal as a reference. It was all a little painful, but it works.
The Backwoods Logger comes in two versions that run at different clock speeds, which complicated the software serial driver a bit. The Logger Mini runs at 8 MHz, which provides 208 clock cycles between each bit at 38400 bps. That’s a fairly healthy amount of time to react to each bit and decide what to do with it. However, the Logger Classic runs at 1 MHz to minimize its power consumption, which provides only 26 clock cycles between bits. That’s not very much time for processing, and it means I wasn’t able to implement simultaneous two-way serial communication. At any given moment the Logger can either be receiving or sending serial data, but not both. There also needs to be a delay of about 200 microseconds between received bytes, in order to provide the Logger with sufficient time to process a byte before the next one arrives. There’s no receive buffer, so if the PC sends bytes with too short a byte-to-byte delay, data will be lost. The blsync program inserts the necessary delays when sending command bytes to the Logger. Since most of the data flow is in the other direction, this doesn’t impose any noticeable speed penalty. The complete set of graphs can be transferred from the Logger in about 300 milliseconds.
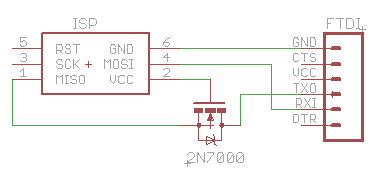
Physically, the blsync adapter is just a passive converter from the 3 x 2 ISP header to a 1 x 6 serial header, with RX connected to MOSI and TX connected to MISO. A MOSFET is used to perform level conversion (thanks Erik!), so either a 5V or 3.3V USB-Serial device can be used. If you know you’ll always be using a 3.3V USB-Serial device, you can omit the MOSFET and connect TX to MISO directly. The 1 x 6 header is designed to work with common USB-Serial devices such as the Adafruit FTDI Friend or Sparkfun FTDI Cable 3.3V.
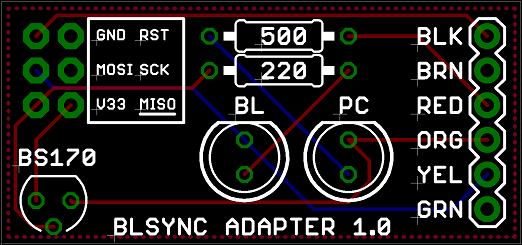
I also designed a simple blsync adapter board, for a more rugged and permanent solution. It adds a pair of LEDs to indicate Logger and PC activity, but is otherwise the same as the circuit shown above.
Using BLsync
The blsync utility program can retrieve the Logger’s firmware version number, temperature / altitude / pressure graphs, and snapshot list. Data can be saved in CSV format for importing into Excel, or as raw binary.
The blsync utility is configured using command line options:
Usage: blsync -p port [-b speed] [-v] [-c] [-r] [-g filename] [-s filename]
    -p port       Port to use for Logger communication, such as COM1.
    -b speed      Bit rate for communication. Default is 38400.
    -v            Display the Logger firmware version number.
    -c            Save files in CSV format. This is the default.
    -r            Save files in raw binary format instead of CSV.
    -g filename   Sync the graph data, and save it to the named file.
    -s filename   Sync the snapshot data, and save it to the named file.
For example, to sync the temperature, altitude, and pressure graphs from the Logger connected to COM3, and save them in CSV format to the file graphs.csv, the command line would be:
blsync.exe -p COM3 -c -g graphs.csv
By importing the CSV file into your favorite spreadsheet or other analysis program, you can perform whatever analysis you desire on the collected Logger data. A hiker might create a graph showing his friends how high he climbed or how cold it was. A conservationist might use several Loggers to collect data for a study of temperature and pressure at multiple locations within a habitat, and how they relate to observed species observations. Through hardware and software extensions, humidity or other custom sensor data could be collected as well. Because the Backwoods Logger is an open source, open hardware project, the sky’s the limit on what data might be collected and what interesting things might be done with it.
Read 1 comment and join the conversation