

Designing a Laser-Cut Enclosure
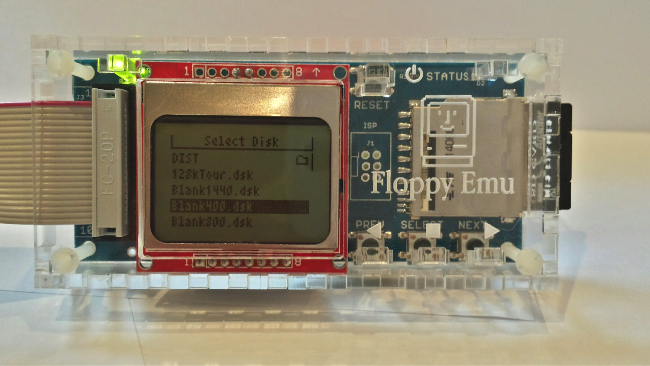
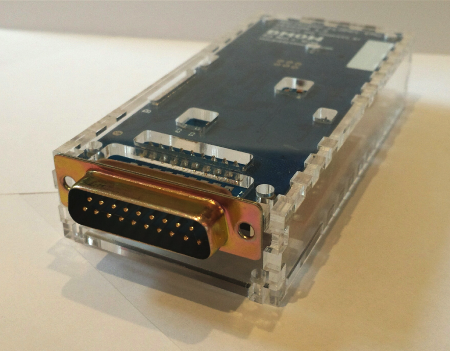
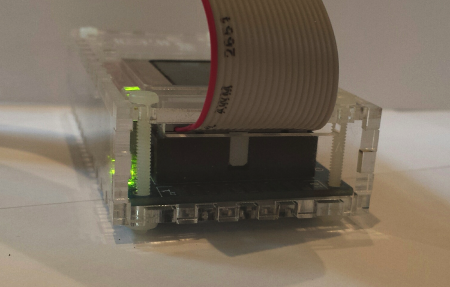
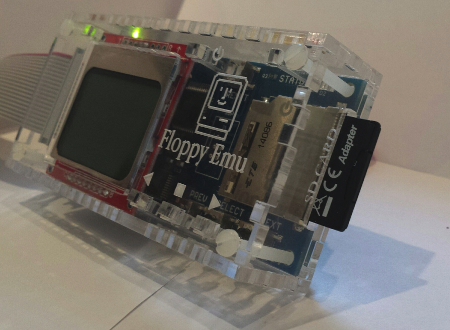
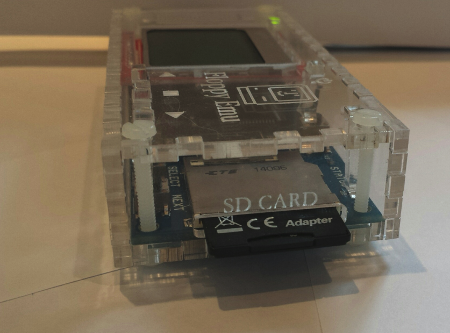
An official laser-cut case for Floppy Emu has finally arrived! It took a lot of prototyping and fiddling with tiny parts, but I hope you’ll agree the result was worth it. The case is only 6mm larger than the board itself, accommodates boards with the extension floppy connector or the built-in connector, and features light pipes to channel the LED’s to the outside of the case. The whole thing is cut from a single sheet of 3mm acrylic, and assembles like a 3D jigsaw puzzle.
I hope to offer these cases for sale soon, but I need help determining how many to make and in what colors. If you might be interested in a case, drop me an email or leave a comment below, and mention your color preference. Cases will probably be $19, and the color will be either clear or black.
Case Design
I was surprised how challenging it was to make a “simple box” case. My first plan was to design a 3D printed case, but I quickly abandoned that idea once I realized how expensive it would be. 3D printing is an impressive technology, but home 3D printers don’t really have the necessary reliability or speed for consistent manufacturing, and the material cost is significant. Online 3D printing services like Shapeways are another option, but they’re even more expensive. I also doubted I had the necessary 3D modeling skills to design a workable 3D case, so the idea never got very far.
The best alternative seemed to be a laser cut case, constructed of multiple flat pieces assembled into a box shape. Adafruit’s laser-cut enclosure design tutorial was a big help, as was the web-based design tool MakerCase. Before I knew it, I’d designed a basic six-sided box of the proper dimensions, with finger joints at the edges to hold it together. But would it work? Designing a case using finger joints this way requires compensating for the kerf – the thickness of the laser cut. Assume a zero sized kerf, and the box won’t hold together. A 5mm wide tab will end up closer to 4.8mm wide after cutting, while a 5mm wide slot will end up closer to 5.2mm, and the tabs will sit loose in the slots. To compensate, the tabs in the design file should be slightly wider than the desired finished size, and the slots slightly narrower, but not too much. Overestimate the kerf, and the finished tabs will end up wider than the slots, preventing the parts from fitting together at all.
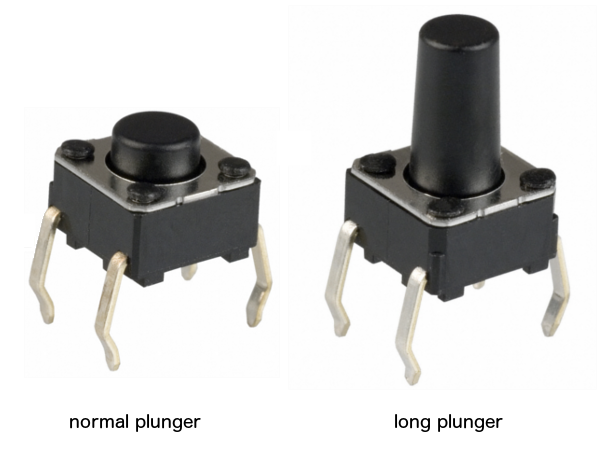
Next I added holes for case screws, the SD card slot, and the extension cable. Easy enough. But what about the buttons? Floppy Emu has four pushbuttons that are needed to operate it, so I couldn’t just seal them up inside the case. I could have cut a big finger-sized hole in the case lid above each button, so you could reach in and press it, but that seemed ugly and awkward. I could also have left the area above the buttons entirely uncovered, but that seemed even less appealing. If I were designing a product that was *always* in a case, I could have switched to a different type of push button with a long plunger that extended outside the case. But I’m not, and that would be goofy for everyone using a Floppy Emu without a case.
The Stick
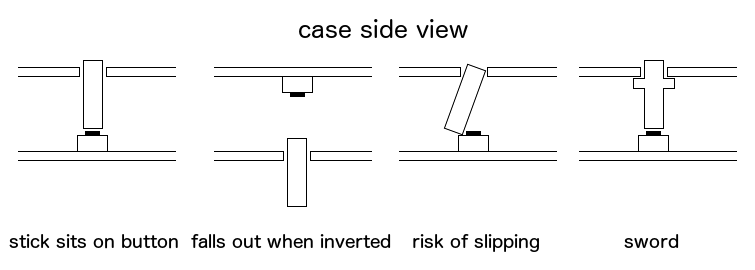
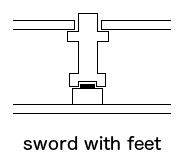
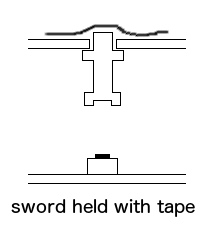
I finally concluded the only decent solution was to use some kind of stick to poke through a small hole in the top cover, and press the push button inside the case. This proved to be tricky to get right. If the stick were just a straight shaft, it would fall out if the case were turned upside down. And there was no positive force holding the bottom end of the stick onto the push button. It might wobble around or even slide off the button entirely, causing the whole stick to fall down inside the case. My solution was to add a crossbar to the stick to prevent it from falling out, turning the stick into a sword, and hoping that a tight fit between the sword and the hole would prevent it from sliding around. The light tubes used the same sword design, but modified in size to fit on top of an LED instead of a button. Voila! A finished design.
I sent the design file off to Ponoko for manufacturing, and about a week later I received the laser cut parts in the mail. With eager anticipation I separated the parts, fit them together, and bzzzzt! I had overestimated the kerf, and the parts didn’t fit together at all. Total failure. I went back to the design file, reduced the kerf estimate by half and made a few other mods, and sent revision 2 off to Ponoko. Another week passed. Finally I got the new parts, and it worked! Sort of.
The rev 2 case fit together, and the Floppy Emu board fit inside of it, so that much was looking good. But the swords had big-time slippage problems. They were too loose, and were constantly wobbling around or slipping down inside the case. For revision 3, I made the swords a bit thicker relative to the holes, so they’d fit more tightly and have less room to wobble. I also added “feet” to the swords, to help keep them centered on the buttons and LEDs.
Another week went by, and when the rev 3 case parts arrived, everything looked pretty good. The button swords still wobbled a bit, but not far enough to cause problems or fall off the button. The LED swords were more problematic, and sometimes wobbled off the LED’s centers, but generally stayed close enough to continue working as light pipes. Before offering these cases for sale I’ll probably do a rev 4 design to tighten everything up a little more, but rev 3 is definitely useable. Hooray!
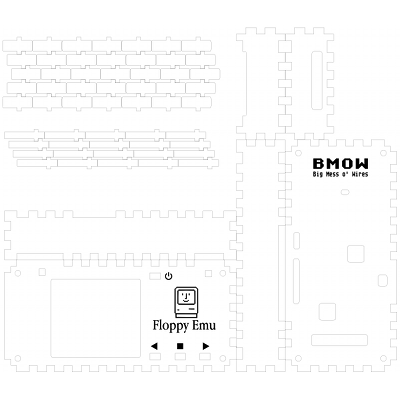
Rev 3 also includes two alternate versions of the base and left side pieces: one for boards with a built-in floppy connector, and one for boards using the extension connector. That makes eight total side pieces, of which you’ll use six.
Sword Assembly
The only aspect of the design I’m not thrilled with is handling of the swords during assembly. How do you get those little buggers in there and aligned correctly, before you put the top on the case? You can’t just balance the swords on the buttons and then lower the top plate onto them – the swords won’t balance by themselves. One option is to assemble everything upside down: put the top plate upside-down on the table, then place the swords into the holes in the top plate, and finally lower the inverted Floppy Emu board onto the whole assembly. That works, but it’s pretty awkward.
The best solution I’ve found is to do assembly right-side up, and use tape to temporarily hold the swords in the top plate. You assemble the bottom and side pieces normally, and place the Floppy Emu board inside. Then you loosely cover all the top plate holes with tape, and push the swords up from underneath until their top surfaces touch the tape. Now you’ll be holding a top plate with all the swords dangling down under it. Finally, you lower this whole package onto the rest of the assembly, add the case screws, and then remove the tape. It’s not the most elegant system, but it works.
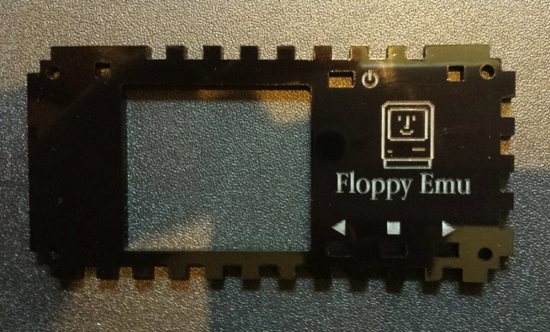
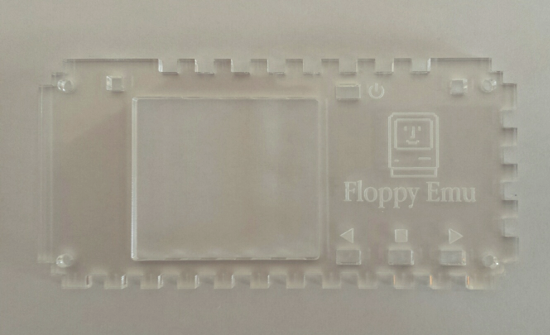
Colors
I originally planned to design the case in black, to give the final product a sleek iPhone-style appearance. But when I did a prototype in clear acrylic, my wife loved it and predicted it would be much more popular than black. One big advantage of a clear case is that it won’t need light pipes at all, since you can see the LEDs inside. The material is also a bit cheaper. But the etching on a clear case is difficult to see from some angles, and the final result with its exposed internals looks more like a science fair project than a professional product. What do you think? Which would you prefer?
12 Comments so far
Leave a reply. For customer support issues, please use the Customer Support link instead of writing comments.
hey buddy… how about the long plunger then a sword, but hollowed out at the center so it goes right over the long plunger . These technical details are interesting… Proof as to how much goes into making a product. you are a real trooper. a one man army.
Could you put a tiny drop of glue on the button before fitting the sword? Then, the sword would be glued to the button and would not slip off. But that would mean finding a strong enough glue, and possibly one that’s a tiny bit flexible too. Or, could you make all three swords as one piece, with very thin supporting webs between them? Thin enough to be flexible? That way, the one being pressed would flex the webs like a parallelogram. The other two swords would help to support the one that’s moving. The tricky bit would probably be determining how thin to make the webs, but if you’ve already calibrated your kerf width, you’re part-way there.
I like the light-pipe technique!
@Charles – the laser cutting all happens in 2D, so I can’t make a truly hollowed out center to slip over the plunger. The best I can do is a notch or groove, kind of like I did by adding feet.
@John – a flexible supporting web could help – I’ll give it a try. The minimum recommended feature width is 1.0 mm though, which I think may be too rigid and will cause all the buttons to get pushed if you push any of them. Ponoko doesn’t recommend going below 1.0 mm since thin acryclic can easily crack.
I’ve been looking at ideas for getting the swords to stay put in their holes, so this business with temporary tape isn’t needed for assembly.
The first adds tiny nubs near the end of the sword’s handle. This makes it initially difficult to push the sword through from the bottom, but once in, it should stay put. Getting the size of the nubs just right would probably take a lot of experimenting, with a fine balance between them not helping vs them making it impossible to insert the sword at all.
The second idea extends the first by adding a narrow slot in the sword handle. This allows it to flex slightly when pushing the sword up from the bottom, so the exact size of the nubs isn’t as critical. But it might not be aesthetically pleasing to have a slot in the top of the button sword, where your finger pushes it.
The third idea is like the second one turned upside down, and the sword would be pushed down from the top. This avoids having a slot in the pushable button surface. But it requires shrinking the size of the sword hilt, which might cause more wobbliness.
I like either, but think I prefer black.
I’m glad you made accommodation for the version with the built in floppy connector (which I have) but which I primarily use with the extension cable.
I don’t know if I have a strong preference on color, but if pressed to choose I’d go with black.
To quote Fry from “Futurama”: Shut up and take my money! 🙂
Awesome! As for color, I think i’d prefer a color that matches my Mac 512k. So Pantone 453 (PMS 453) would be my choice.
Great work Steve!
I wanted to vote for translucent until the idea comes to my mind that… Beige! They should match with the Macs and looked like something from the 80s 😀
Hey Steve could you emulate a mac SCSI drive enclosure I would totally buy that!
Beige or platinum to match a classic Mac would be neat, but isn’t possible at the moment. I think those Mac enclosures were made of ABS, and they have a textured matte finish. The laser cutting supplier uses acrylic, which has a smooth shiny finish, so even if the color were a match it still wouldn’t look right. But they don’t have any similar colors anyway.
Yesterday I ordered a few more prototypes in clear, black, and two kinds of wood. I’ll post photos when they arrive!
what i meant was the actual hard drive so say you put in a sd card and your mac sees it as a SCSI hard drive. Or is that impossible to do ?
I would definitely buy a case for each of my FloppyEmu boards. I can’t decide between clear and black, so I’d get one of both. Clear if you were going to only make one color, though.
How did you make the swords?