

Reset Debouncing Gives Me Ulcers
Who knew that getting a decent /RESET signal could be so difficult? I’ve been working on a scaled-down breadboard version of my 68000 system design. It mostly works so far, running a simple program that echoes serial port bytes. (More details soon, I promise.) But I noticed that every time I hit the reset button, it would vomit some garbage characters out the serial port, so I decided to investigate. Poking about with the scope, I discovered that my /RESET signal looked bad, really bad. Convinced that it was something to do with the 68000, I duplicated the reset debounce circuit on a separate breadboard. It’s just a switch connected to ground in parallel with a 10 uF capacitor, and a 10K ohm pull-up resistor to 5V.
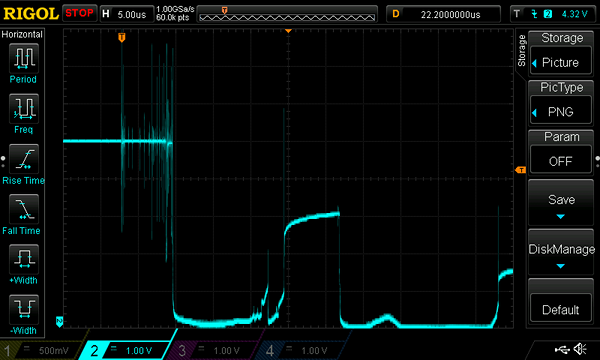
The screenshot above shows what happens when I press the reset button. Oh ye gods! That is just horrible. What the heck is going on? First we’ve got the signal jumping up (??) to nearly 8 volts. How on earth does that happen? In other tests, I’ve seen it jump even higher, as high as 10V. Then at the end of all this bouncing switch noise (which the cap was supposed to smooth out), there’s about 12 microseconds of quiet where the signal sits near 0 volts. But then it jumps up to 2.5V near instantly. That should be impossible, as the RC time constant in this circuit is 10^4 * 10^-5, which is 10^-1 seconds or 100 ms (probably much bigger than I need). It shouldn’t be possible for the capacitor to charge that quickly. Something strange and unexpected is happening here.
I know there are better debounce circuits than this – I could use a double-throw switch, or add in a buffer with a Schmitt trigger input, or use a reset IC. But before I first understand what’s going wrong here, I don’t think I’d trust an alternative solution.
Read 12 comments and join the conversation12 Comments so far
Leave a reply. For customer support issues, please use the Customer Support link instead of writing comments.
Make sure you have solid capacitor on your supply lines. When the 68k resets, it may draw a significant amount of current, and bring the ground voltage above zero volts, giving you high scope readings. I would add a resistor between your cap and reset line, then monitor before and after the resistor. Any changes, and you know reset is driving. (Although that shouldn’t happen if it is open collector, I would check it anyway).
I suspected something like that, which is why I moved the whole experiment to a separate breadboard and power supply. No 68K or other components beyond a switch, resistor, and capacitor, yet I still get that crazy scope trace.
Is this circuit on a solderless breadboard? If so, are you sure it’s all making good contact? Maybe it’s worth trying a soldered-up version of the circuit, since it’s so very simple. BTW, the horizontal scale of the scope image is 5us/div, yes? As shown by the little “H” at the top?
Yes on the solderless breadboard and the 5 us/div. I think you may be on the right track – the only explanation I can think of for the voltage jumping far above 5V is stray inductance in the wires and the switch itself. The scope trace looks a bit like what I’d expect to see if switching a high-inductance load like a motor on and off rapidly. The switch bouncing open and closed sure isn’t helping things, but by itself I wouldn’t have thought that would be enough to cause the odd behavior here.
I tried replacing the switch with a different one, and it’s much better behaved. I think that’s because the new switch bounces much less, but I’m not sure. There are still occasional big spikes like in the scope trace shown above, but they’re much rarer, and usually there’s only one instead of a whole series of them.
The cap it is good for sure? There is no excuse for those fast spikes. I suspect some kind of setup/measurement error.
The breadboard, has only the cap, the R, and the switch right?
Add a 10-100uf ecap to the breadboard power rails.
How is the scope probe grounded?
Use a short wire connected hopefully to the probe body to the said ecap neg terminal.
ah yes breadboard, bouncing switch + capacitor and you have a mini boost converter in there
The cap is good, and when the switch is released, the voltage slowly climbs back up to 5V as you’d expect. And the scope probe is grounded. But I actually don’t have a decoupling cap across the power rails – maybe that’s a factor? Although I’d expect that to cause a sudden drop in the measured voltage as the supply droops or gnd is pulled up, not an increase in the measured voltage to 8-10V. I suspect rasz_pl is right and I’ve accidentally created a boost converter or something similar, but I don’t quite understand why it behaves that way. The switch I’m using now behaves much better than the one shown in that scope trace above, but for my final circuit I may still use a dedicated reset chip of some kind.
You need those ecaps. Looking at your breadboard, I’d put 10uf on each breadboard rail. Normally on a board layout, you put one right where the power supply wiring enters the board. Then .1 or .01 near all the chips.
Put your scope on the power line, then add the ecap. I’ll bet you will be surprised how noisy it was an how quiet it gets. Think like an RLC filter: the wires have small resistance, inductance and capacitance. Adding the larger cap swamps out the RL effects.
I’m curious what solution you finally came up with here…. I’m doing my own 68k SBC at home and have been studying what you did here for inspiration and information (I’m a software engineer by trade, and no next to nothing about either EE or electronics).
I know in the end you moved the reset logic to your CPLD, but did you ever solve the breadboard mystery? I’m wondering if a resistor between the caps and reset/halt lines would smooth things out, as the first commenter suggested. In Jack Ganssle’s enjoyable article on debouncing, he says such a component is critical: http://www.ganssle.com/debouncing-pt2.htm
PS: I really enjoyed the 68katy series; great job!
On the breadboard, I substituted a different pushbutton that had a cleaner open/close behavior, and the problems went away. I don’t remember for sure, but I don’t think I tried the proposed resistor solution. It sounds worth a shot!
Why not use a Dallas DS1811 or equivalent supervisor IC? They also will assert reset if voltages drop below 4.7V or so.
You should NOT put a capacitor and a switch in parallel. By closing the switch, you short-circuit the capacitor, leading to a very high current. That current represents magnetic energy which spreads around your circuit in funny ways.
The switch in parallel with the capacitor has a VERY low RC constant, as the resistor in your circuit is bypassed by the switch. R=0 -> RC approaches zero. At such low RC values, LC values due to parasitic inductances become dominant, e.g. the oscillations repsented by the spiky fuzz on your scope just before the signal drops.
There must be a resistor between the switch and the capacitor, as shown in fig 2 in http://www.ganssle.com/debouncing-pt2.htm. That way you get a nice slope on your reset signal. However, that slope will not be fast enough for a reset signal, thus the need for a schmidt-trigger buffer as shown by Jack.