

Apple II Firmware and Mods
Judging from the Apple II questions I’ve received, my commentary has left a lot of people confused. Sorry everyone! Here’s a recap of Apple II disk support for Floppy Emu. I’ll try to clarify the current status of Floppy Emu disk emulation, and the plans for the future.
As of today, there are two separate firmwares available. One supports the Macintosh and Lisa (floppy and hard disk), and the other supports the Apple II. Both will work on any Floppy Emu board, and can be downloaded from the product description page. Installing new firmware only takes a few minutes – just copy two files to the SD card, and press a few buttons. You can switch between the two firmwares as often as you’d like.
The Apple II firmware will eventually emulate three kinds of disks:
- 5 1/4 inch (140K) disks, for any Apple II machine
- 3 1/2 inch (800K) disks, primarily for the Apple IIGS
- Smartport hard disks (32MB), primarily for the Apple IIGS and some models of Apple IIc
5 1/4 and 3 1/2 inch disk emulation is finished and working in the current Apple II firmware. Download it now and go crazy! Work on Smartport hard disk emulation hasn’t started yet, but it’s next on my “to do” list.
Hardware Connections
The Floppy Emu board can be connected to an Apple II system in two different ways, depending on your needs. Most people will use the 19-pin disk port. The Apple IIGS and IIc have built-in disk controller circuitry, with a 19-pin disk port on the back of the machine. The Apple 5.25 Drive controller card has the same 19-pin disk port, and will fit in any model of Apple II with slots. The Floppy Emu board can connect to this 19-pin disk port. If you have the Emu with built-in floppy connector, then the board will plug directly into the disk port, and hang off the back of the machine. Or if you have the Emu with convertible extension cable, the adapter at the end of the cable will plug into the 19-pin disk port.
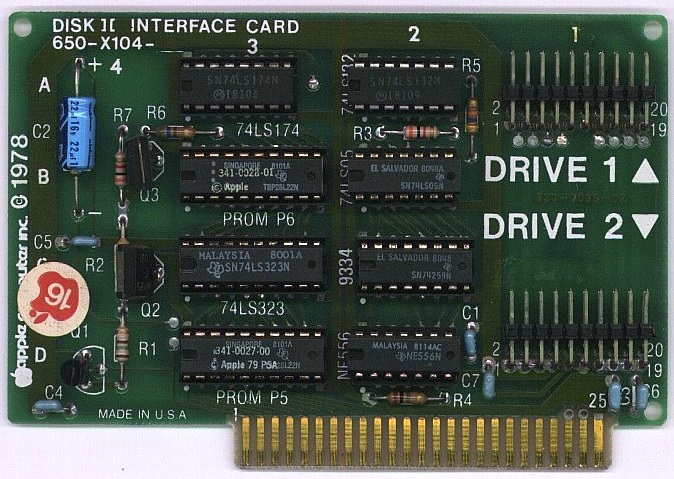
If you have an older Apple II with the Disk II controller card instead of a 19-pin disk port, you can also connect the Emu to one of the 20-pin headers on the Disk II controller card. Use the ribbon cable that came with the Emu convertible extension cable, or borrow a ribbon cable from a Disk II drive. All Emu boards have a 20-pin shrouded header where the cable will plug in. Be careful to orient the other end of the cable correctly, since the controller card’s 20-pin header isn’t keyed or shrouded, so it’s easy to accidentally connect the cable offset or backwards. The red stripe on the cable should go to the pin marked “1” on the 20-pin header.
Hardware Mods
During development of the firmware for 5 1/4 inch and 3 1/2 inch Apple II disk emulation, I discovered that some Apple II setups can’t be supported through firmware changes alone. In addition to new firmware, these setups also require some external hardware modifications for the Floppy Emu board. The easiest way to handle this is with an Apple II adapter board that connects inline between the Floppy Emu and the Apple II computer. Something that looks roughly like this:

I plan to offer an Apple II adapter board as a new product, probably beginning this summer. I’m intentionally going slowly, postponing manufacturing of the adapter boards until the Smartport hard disk work is finished, and I’ve done enough testing to be confident there are no other issues that require hardware modifications. Once it’s ready, the Apple II adapter will be available as a separate item, or bundled with an Emu board for new customers.
As pictured above, the Apple II adapter board is a 19-pin to 20-pin adapter. This will be fine for most Apple II customers, but will be useless for customers using the Disk II controller card, since it doesn’t have a 19-pin disk port. I’m undecided whether to add a second 20-pin header to the existing adapter board design (increasing the size and cost for everyone), or make a different version of the adapter board (more product fragmentation), or something else.
Not every Apple II user needs an adapter board – only the “some setups” that I mentioned. But for those who want a simple and fool-proof path to Apple II disk emulation, the adapter board will be the way to go. For power users willing to read the fine print, they may find that an adapter board isn’t necessary for them. The current landscape looks like this:
5 1/4 disk emulation – Reading from a disk image works without the adapter. Writing to the disk image also works without the adapter on the IIGS and IIc with built-in disk controller. The adapter is required when writing to the disk image using a separate disk controller card, like the Disk 5.25 or Disk II controller cards.
3 1/2 disk emulation – Reading and writing to a disk image works without the adapter, on the IIGS ROM version 1 (the most common version), when the computer is booted from the emulated disk. The adapter is required for the IIGS ROM version 3, or for any Apple II model when the computer is booted from a different floppy or hard disk.
DIY
Rather than wait for an adapter board, some people may want to make hardware modifications themselves. There are two separate modifications: one for 5 1/4 disk emulation and one for 3 1/2. The 5 1/4 inch modification is relatively easy for anyone who’s comfortable with a soldering iron, but the 3 1/2 modification is a bigger challenge.
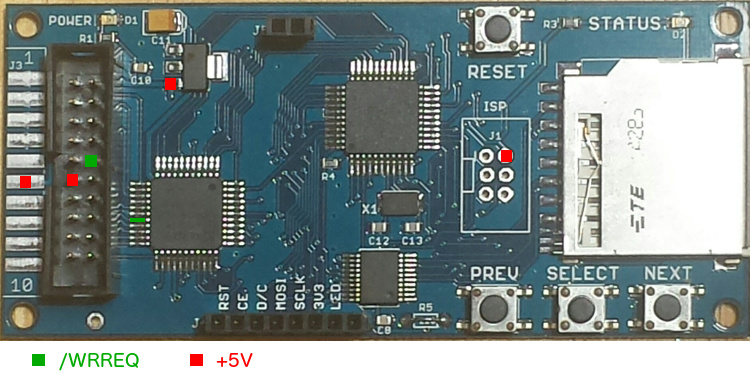
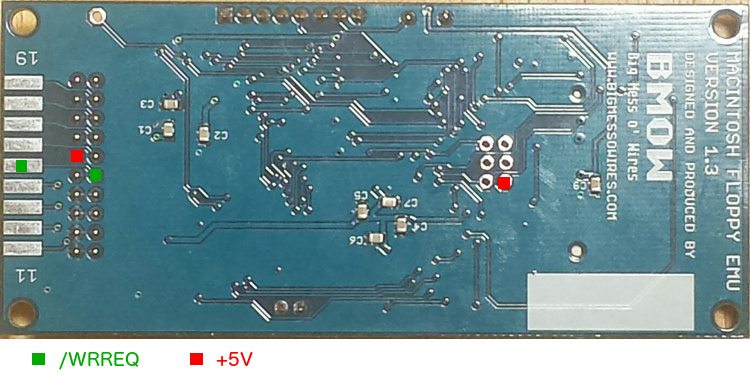
The 5 1/4 inch modification requires only a single 10K ohm pull-up resistor, connected between /WRREQ and +5V. This won’t interfere with 3 1/2 disk emulation, or Mac/Lisa disk emulation, so it’s fine to leave permanently installed. You can make this connection anywhere on the board that’s convenient. The easiest spot is on the bottom of the board, near the disk connector. But a resistor added here will add a little bump that prevents the board from fitting properly in the standard case. If that’s a concern, the pull-up resistor can also be added on the top of the board, using 30 AWG patch wire to reach the finely-spaced pins of the CPLD chip. Using these photos as a guide, connect a 10K resistor between any pair of /WRREQ and +5V pads:
The 3 1/2 inch modification requires adding additional chips, inserted inline between the Floppy Emu board and the Apple II. A schematic is shown here. Unlike the 5 1/4 inch modification, this change is only appropriate for emulation of 3 1/2 inch Apple II disks. You’ll probably want to add a switch to disable the additional circuitry when emulating other types of Apple II disks, or Macintosh/Lisa disks.
Don’t Forget to RTFM
Remember, many Apple II setups don’t require any hardware modifications at the Emu board – they’re just plug and go. Before you heat up your soldering iron, or cry over the wait for an Apple II adapter board, read the details above and see if you actually need one. If in doubt, try it first and see. You won’t hurt anything, and the worst case is that it simply won’t work. If 5 1/4 inch writes cause the Emu to freeze, or 3 1/2 inch I/O causes the Apple II to freeze while booting or report strange boot-up errors, then you’ll know it didn’t work. Everyone should at least be able to do 5 1/4 inch disk read emulation, which means you can boot up your favorite games like Castle Wolfenstein straight from the SD card. Have fun!
Be the first to comment!No comments yet. Be the first.
Leave a reply. For customer support issues, please use the Customer Support link instead of writing comments.