

Laser-Cut Case Experiments
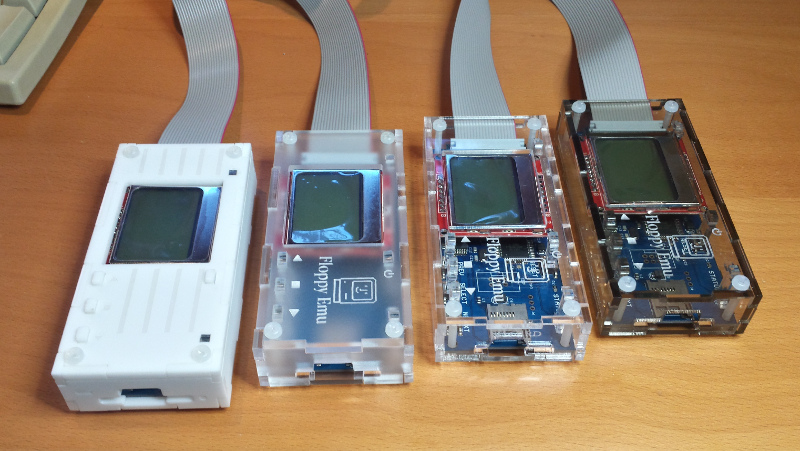
While I continue experimenting with 3D-printed case designs for Floppy Emu, I’ve also been working on revisions to the existing laser-cut case design. These new laser-cut cases retain the same overall mechanical “box” as the original, but use a variety of materials, engraving, and opening cuts to give them new styles. Maybe one of these will become the new standard case, or an optional alternative. I’m interested to hear from readers about their opinions on these, so please leave a note in the comments below.
First, let’s review the existing case design that’s included in the Floppy Emu “deluxe bundle”. It’s transparent acrylic, and is great if you want to showcase the Emu’s inner chips and circuits. It looks like something an electronics fan would use with an Arduino or Raspberry Pi. The opening for the SD card is rounded, so you can reach in with your thumb and index finger to extract the micro SD card. The overall style is pretty spiffy, if I do say so myself.


One drawback of the clear acrylic case is that it’s practically invisible. It’s 100% transparent, like looking through glass, so the etchings on the case appear superimposed on the contents inside, creating a visual mash-up that’s sometimes hard on the eyes. It’s not a huge problem, but maybe a modestly-tinted acrylic case would be better than full transparent. This one is about 25% gray tinted, which is fairly subtle. The tint is obvious when it’s placed side-by-side with the clear case, but less noticeable when viewed by itself. The opening for the SD card on the tinted case is also slightly different, with a more squared-off look.


The clear and tinted cases both have a gloss finish, giving them a sort of future-tech look. Unfortunately the gloss finish also makes fingerprints stand out clearly, which is a bit annoying. But even if you don’t mind a few fingerprints, not everyone loves the see-through look. If you enjoy showing off the geeky internals, it’s great, but some people prefer a functional case that looks more like a standard peripheral than a science exhibit. To that end, I made two more case designs using matte acrylic that’s mostly or completely opaque.
The first of these is built from a “matte clear” material, which really isn’t clear at all. It’s like frosted glass, and you can vaguely see a blur of color through it, but no details. If hiding the internals is what you’re after, this will do it. The matte material has a very pleasing texture, and doesn’t show fingerprints at all, so the case always looks clean. This case uses the same squared-off opening for the SD card.


The final case is built from a matte white material, and is my attempt to create something that looks more like a miniature Apple disk drive, using Apple’s “Snow White” design cues. It has a series of parallel grooves on the top plate, like the Apple IIc and IIGS and the Apple 3.5 inch external drive. The front opening even has a fake status LED and disk eject hole engraved in it, to make it resemble the front face of a real external floppy drive. The squared-off opening for the SD card is intended to give the feeling of the drive door from a 5 1/4 inch drive. This matte white case does a pretty good job of matching the style of the 3D-printed cases I posted last time, but is much faster and cheaper to make.

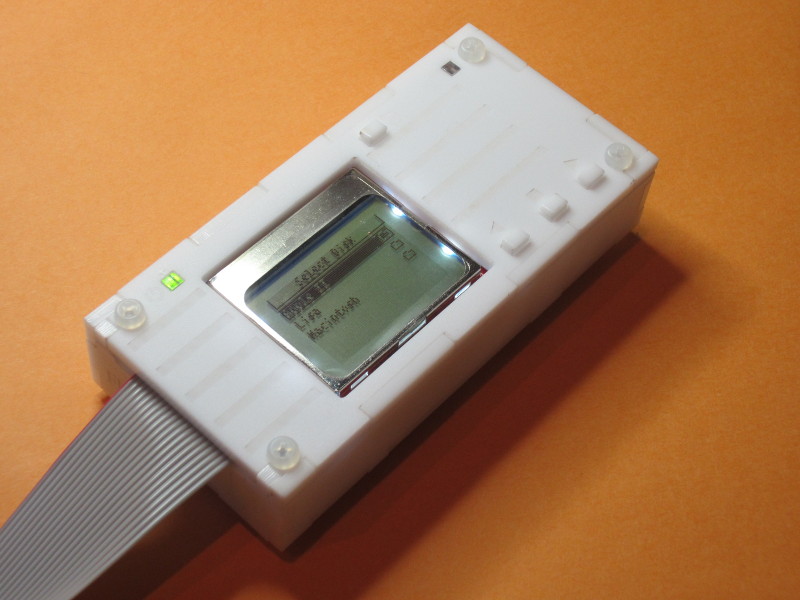

The major drawback of the matte white case is that the engraved areas are difficult to see. It’s white engraving on a slightly different shade of white background. You can see from the photos how subtle the grooves and other engraved details are. Depending on the angle of the light, they may be slightly more or less visible, but they never really stand out. The title photo displaying all four cases was actually photoshopped to make the top grooves stand out better, but the other images of the matte white case were not retouched. Overall I think it’s still a direction worth pursuing, but I definitely wish there were a way to give those engraved areas more contrast.
An alternative that just occurred to me is to actually cut the grooves and fake front details all the way through the material, instead of engraving them. This would certainly make them visible, but then you’d be able to see through to the Emu board inside. That’s not really accurate – you can’t see the Apple IIc logic board through the grooves in its case, for example, because there’s a second layer of plastic under each groove. Hmmm.
Read 7 comments and join the conversation7 Comments so far
Leave a reply. For customer support issues, please use the Customer Support link instead of writing comments.
I like the frosted case best.
The white case seems to be angular and show up the section joins and I doubt is something Jobs would have allowed, whereas the frosty case doesn’t seems as jarring as it is not trying to live up to the Apple white case expectations
The grey-tinted one gets my vote.
You could cut trough the top plate of the white case and add like a grey plastic sheet on the inside. Like that you would have have the exact contrast you wish for.
My complaint with the case wasn’t the appearance, which is quite nice, as are all of the designs you present. My complaint was with it’s difficulty in assembly. I couldn’t get it to work with the buttons and stay together. It was an exercise in frustration. Now I just let the buttons jingle inside and use a small screwdriver to push the buttons. I like the matte cloudy one best, but I would vote for any design that has better buttons.
With acrylic, I would try an even darker grey. The intent would be:
* only give a hint at what’s inside and
* better contrast for the engraving and LEDs.
There are a couple of important of things to consider with the vintage Apple look and feel.
* Color: Beige, Snow White, or Platinum? The problem with authentic beige is the likelihood of the yellowed systems that a Floppy Emu is connected to.
* Rounded edges are mandatory
If you use 3D printing, please make the button arms a different color than the rest of the case. Maybe keep the button arms acrylic.
@ianold
Being an occasional plastic model builder, I used solvent to hold most of the case together. The top piece has the light arms and the bottom piece has the 4 sides.
I tied a single strand of wire around the top of a loose button arm to keep it in place. It’s a bit tight; I should have used a smaller gauge.
What if you used the white/beige one and had some nice labels printed up to stick on the top? Then you could even do it in full color if you so desired. Probably best on a plastic base rather than paper so it doesn’t deteriorate though.
Or…put a label on the clear ones too. Make it a clear plastic base, and you could have it printed with whatever colors (probably some/most white) to make it look nice on a clear/smoke/frosted case…though you would probably need a version for those and a different version for the white…