

Baby Steps with uClinux
What you see above is my first attempt to boot a uClinux 2.0 kernel on the 68 Katy prototype hardware, the result of several days of work. It doesn’t look like much, but the fact that it even begins to boot up and print kernel messages is great! In the space of a few weeks, I’ve gone from knowing virtually nothing about the Linux kernel or Linux porting, to having a general idea how it should be done, to now having an actual build candidate that runs on the hardware. There’s still more work and more debugging to do, but I’m beginning to see the light at the end of the tunnel.
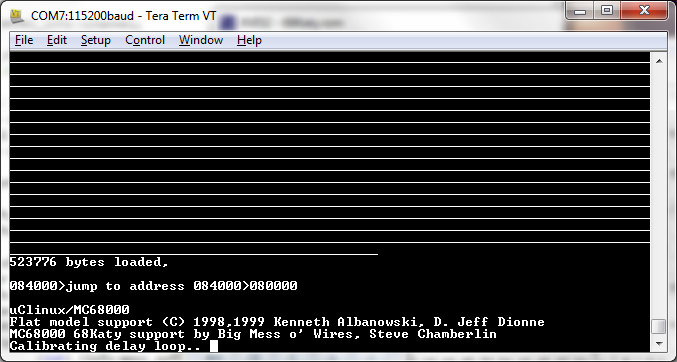
The boot process stalls at “calibrating delay loop..” because it’s trying to make a bogomips measurement, but there’s no timer interrupt. The CPU’s interrupt pins aren’t connected to any timer sources yet! One step at a time, and hopefully it’ll all still fit on the breadboard.
To reach this point, I had to get the uClinux 2.0 kernel source building with an existing board config (detailed in my previous post), then use that config as a template to make a new one for my hardware. It seems like that should have been fairly simple, since it only required changing the serial driver, memory layout, and a few config settings, but I found it challenging. Creating a serial driver was… interesting, and I probably did it all wrong. Then I used the Weiss SM2010 board as a template, which in hindsight may have been a poor choice. It’s the only board defined for the 68000 platform under kernel 2.0, so the line between 68000 platform generic code and SM2010 specific code is sometimes fuzzy. The result is something that’s more hackish than I’d like, but since I’m never going to merge these changes back, that’s probably OK.
I never found a detailed guide to porting, so I just had to search through hundreds of files to see which ones had been modified for SM2010, and then understand what they were doing and whether I should modify the code for my own board. If I were a nice guy, I’d write up a detailed how-to in order to save work for the next person who does this, but since it’s based on 10+ year old Linux source, it’s unlikely there ever will be a next person. Let’s just say there were dozens of little mysteries that had to be solved one-by-one, that I’m too tired to describe just now. 🙂 If anyone’s really curious, I’ll send you my notes.
Operating System, Meet Hardware
The final uClinux image is 829K, which is a problem given that the prototype machine only has 512K of ROM. So I did what any worthy hacker would do, and just truncated the file! That guarantees it will never boot correctly, but because the truncated portion was part of the rom-based filesystem image and not actual kernel code, it should at least boot to the point where it mounts the filesystem and tries to access it. When it gets that far, I have some ideas about how to shrink it down, hopefully to under 512K. I’m not sure how much RAM will be needed for a successful boot, or whether the 512K of RAM in the prototype will be enough. It looks like there’s about 35K of initialized data and 85K of uninitialized data (.bss segment). With the code itself stored in ROM, that still leaves 392K of RAM for dynamic allocations.
Did I say the code was stored in ROM? It will be, but for ease of testing I’m putting everything in RAM right now. I’ve got a simple monitor/bootloader in ROM, which in the screenshot above you can see performing the uClinux image transfer and initial jump. That makes it quick and easy to test new uClinux images, as compared to reprogramming the ROM chip for each test. But now that I think about it, there will never be enough RAM if I have to fit all the kernel code and data in there together. I’m going to have to burn a new ROM for each test. I might be able to improve things a little by giving the monitor program the ability to do in-system reprogramming of the ROM, instead of physically pulling the ROM chip from the board each time. Of course the monitor would have to avoid overwriting itself in the process.
The last major hardware task is interrupts, and there are a couple of challenges I’ll need to face. On the 68000, it’s not enough to just pull an IRQ pin low to start interrupt processing. When the pin is pulled low, the 68000 performs an interrupt acknowledge cycle, during which the interrupting peripheral is supposed to drive the vector number of its interrupt handler onto the bus. I have no circuitry to do that. The alternative is something called autovectoring, in which the vector number is determined automatically from the interrupt number. But I would still need some circuitry to assert the necessary control signals to request autovectoring during the acknowledge cycle.
The second interrupt challenge is clearing the interrupt. With the FT245 serial chip, this will happen automatically – the chip’s RXF signal will be deasserted after the CPU reads a byte from the FIFO. But for the timer, I’ll need to build a mechanism to explicitly clear the timer interrupt flag after the interrupt is processed. That normally wouldn’t be difficult, but I’m so low on board space and glue logic resources that I’m not sure how I’ll make it happen. It’s going to take some creativity to squeeze it all in there!
Read 10 comments and join the conversation
10 Comments so far
Leave a reply. For customer support issues, please use the Customer Support link instead of writing comments.
It looks like you aren’t supposed to assert /VPA at the same time as /DTACK, so you can’t use autovectoring if /DTACK’s grounded. However, it occurs to me that if you arrange your memory map so that the RAM is decoded at the top of the memory map, you could load your vector numbers into the last 16 locations (actually, the last 8 odd). The chip select logic could then ignore FC0-FC2 and then the RAM would respond normally for data read/write and code read, but it would also respond for the interrupt acknowledge cycle with whatever vector numbers your software had stored in advance.
You’d still have to deal with the logic to clear the interrupt requests, but this would at least get you the interrupt acknowledge logic for free.
That’s a good idea! I’ll give it a try. I also already have a gate computing the CPU’s function code bits and-ed together, F0*F1*F2. They’re all 1’s only during an interrupt acknowledge cycle. So I could do /DTACK = F0*F1*F2 and /VPA = //DTACK.
Could you share the resources used to start with uClinux? I mean, did you go just from the source code or some webpage/tutorial? I do not have experience at all with kernel/linux/OS booting.
By the way excellent work you done here.
Iuri, this post from last week describes the steps I went through to build uClinux from source code. http://www.bigmessowires.com/2014/11/06/building-uclinux-for-a-68000-target/ Until recently I had no real experience with kernel/linux either.
Didn’t saw that before. I have a lot learn in that subject. Your work certainly points a start point, thank you for sharing!
Cool project. Many moons ago, I designed 68k boards from 68008 all the way up to 68040 and dealt with lots of the things you seem to be finding. On the subject of resets, my personal preference is lots of bypass caps of varying values (moves the resonances around) and using a dedicated driver (low impedance fast transitions) to get a solid dependable reset. I’ll try to find my 68008 schematics. Most people underestimate the value of a solid ground with adequate bypassing. This is not a criticism but the use of ace breadboards at MHz frequencies can, not always, introduce lots of unintended stuff and nearly all of those are complex impedances. ie, weird stuff happens. The ulinux effort is interesting but I cannot shed much light. My own experience was writing my own rtos for all the various 68k chips using a mixture of sds 7.2 c and asm. That got used in literally hundreds of machine controllers. The init and context switch for the various 68k types have lots of differences but the datasheets are pretty good. Implementing semaphores and stuff was much easier. They are packed away right now but I still have nearly all the 68k datasheets, books, and appnotes. If you have questions I might can answer, feel free to ask. Good luck. 🙂
Steve, in this article you mentioned “…as this was a 10year old kernel… there wouldn’t be a next guy” I’m the next guy! I’ve found your other blog posts useful but in this.post you mentioned having other notes on amending the SM2010 board config. Is there more than you have already shared? If there is in what ever state I’d appreciate your notes.
I’m sorry I’ve long since forgotten the details. I think the best path would be to download the VM image with the build tree, and look at the board config files there, and compare them to the stock board config files in the original uClinux image. As I vaguely recall, it’s mainly a matter of modifying the config sections that define the memory addresses for I/O, and the memory sizes.
Thanks Steve. I can make the build but your files in /vendor are not utf8 or are corrupted. file -I guesses iso-8859-1 but converting them to that also results in garbage. It’s the sane fir your serial driver. Any thoughts appreciated. I realise this is long ago for you.
Ignore me. It’s was a issue that I’d opened the file in my host system which was 64bit. It’s fine opening it in the vm sorry to bother you