

Inching Forward
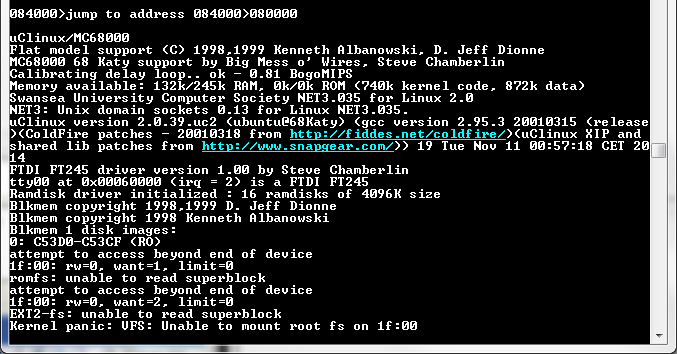
So close to a successful boot, yet so far away! I’m continuing to work on porting uClinux to my 68000 protoboard computer. Since my last post, I’ve added hardware to support timer and serial interrupts, and shrunk the linux boot image down to a petite 417K. The image is supposed to be ROM-resident, but because it takes so long to reprogram a Flash ROM, I’m using my monitor program to load the image into RAM and execute it from there. This requires editing the kernel linker script to assemble everything to RAM addresses, but it seems to work OK, and the result is shown above. Almost there!
Something goes wrong when it tries to mount the filesystem: either it’s using the wrong address (C53D0-C53CF looks suspiciously wrong), or there’s not actually enough RAM to hold the boot image plus .bss segment plus dynamic RAM allocations (why 16 ramdisks?). Probably it’s just out of RAM. Encouraged that it got so far in an all-RAM boot, I changed the linker script back to assemble code to ROM addresses, rebuilt the kernel, and burned a combined monitor+linux image to the Flash ROM. But when I try to boot uClinux from ROM, it does nothing. No output, no signs of life. I can use the monitor program to disassemble the code to make sure the addresses look right, and trace through the first few instructions, but that’s all. The monitor doesn’t support breakpoints, and even if it did, there’s no way to set breakpoints in ROM for the 68000. So I’m reduced to just staring at the code, trying to guess what went wrong. Discouraging.
If staring at the code doesn’t reveal the problem, the only other approach I can think of is a tedious one. I can add instructions to set the debug LEDs at various points in the linux boot code, then burn a new ROM and watch what the LEDs do when I try to start the kernel. That should work, but every time I need to add more debug instructions to narrow down the problem, it’ll be a 15 minute cycle of rebuilding the kernel image, pulling the ROM chip from the protoboard, burning the new image, and replacing the chip. Ugh.
Read 5 comments and join the conversation5 Comments so far
Leave a reply. For customer support issues, please use the Customer Support link instead of writing comments.
Stupid question: Is it even remotely feasible to put together a daughterboard that presents the ROM pinouts on one side and is writable by an external source on the other?
Massive overkill on this project, but if you keep using the same ROM parts in other projects you can amortize the work…
Can you put the ROM into the address space of the RAM, and see if it works then?
I was driving my car when I suddenly realized why it doesn’t work from ROM. Doh! I forgot that only 256K of my 512K ROM chip is mapped into the CPU’s address space. The 68008 only supports 1 MB address space, which I’ve configured as 256K ROM, 256K devices, and 512K RAM. So I burned the 417K uClinux image to ROM, but a big chunk of it isn’t visible to the CPU. No wonder it doesn’t work.
256K for devices is way overkill – they really only need 4 bytes! But I can’t create such a fine-grained address map without involving many more address pins in the decoding, which would require a bunch more glue logic that I don’t have space for. I might be able to shrink the device space to 128K, but it’s starting to get ugly in there.
Another thing I can try is a hybrid ROM/RAM boot. I could create a special linker script to put some stuff in ROM, and some in RAM, and load the RAM part with the monitor program. That’s an ugly solution for general purpose booting, but would be OK for a one time proof that it works.
The other thing I could try is altering the memory map to be 512K ROM, 256K devices, 256K RAM. I don’t know how much RAM it actually needs a runtime.
If you don’t want to burn your EEPROM each time, you should consider using an EPROM emulator.
You can also build one on your own with an SRAM. It’s a very useful tool. For this purpose, you don’t need ultra fast speed between your PC and the emulator, so it can be simple. There are also some kits sold on Internet.
Leon – French hobbyist
Hi Steve, I have just stumbled upon this project. Amazeballs! I’ve been working on something similar, very on and off, primarily to learn Verilog and tinker with FPGA’s. It’s the 68k from Minimig on an Altera DE1 with all my own custom support logic (VGA, RS232, I2C, 4 chan sound, PIT etc). Tried porting uClinux about a year ago to it but RL got in the way and I never got back to it as it was a royal PITA and I’m not a Linux kernel expert (I just ended up rolling my own x-compile toolchain). If I get anywhere with mine I’ll put up a blog and work on the graphics side as I’m also very interested in creating some form of 3d triangle rasteriser for it! Thanks for putting this up, it has inspired me to get back on with mine 🙂