

68 Katy PCB, Dead on Arrival
A few weeks ago I designed a PCB for 68 Katy, and yesterday the boards arrived in the mail. While I had originally imagined the PCB version of 68 Katy would include all sorts of new and exciting features, what I designed was almost a straight copy of the breadboard version of 68 Katy. I knew I couldn’t keep that breadboard prototype intact forever, because sooner or later I’d need the breadboard for something else, or my cat would jump on the desk and knock something loose. The PCB became mainly a way to preserve the existing 68 Katy design in a more permanent form. The only significant change from the breadboard version was the replacement of the PAL and all the 7400 glue logic with a single Xilinx XC9572XL CPLD.
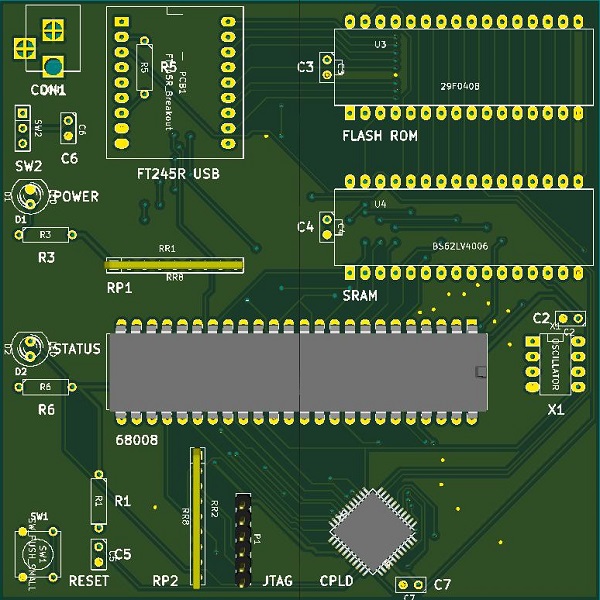
When the PCB arrived, I took one look at it and realized it wouldn’t work. Check out the rendered image above, and see if you can guess why. Hint: I forgot to include a component that wasn’t needed in the breadboard version, but is needed here.
This is a 5V design, intended to be powered by an externally regulated 5V supply. The CPLD that I selected has 5V tolerant I/O, but it needs a 3.3V supply voltage. So where’s the 3.3V power source? Oops, there isn’t one. I connected the CPLD supply pins to 5V, which will toast the chip.
I can add a 3.3V regulator to the board, and fix up the few traces that are affected, but I’m annoyed with myself for wasting three weeks and $40 to discover a problem I could have caught just by looking at my schematic. I wonder what other errors I made?
This PCB was made with KiCad, and it was my first time using that program to create a real board. Looking at the finished PCB, it appears that many of the footprints I used have what I’d consider to be abnormally small plated rings around the drill holes for through-hole components. They should still work, but it will be more difficult to hand-solder the components and get a good solder contact with the board, so I’ll probably resize all those too when I make the board revisions.
I wish there were more things I could test on this PCB, to help catch other hidden problems, but unfortunately it will be completely non-functional without a CPLD. I think my goof with the power supply for the CPLD is beyond anything I can fix with some cutting and jumper wires, since it needs a 3.3V supply, but there isn’t one anywhere on the board.
Read 19 comments and join the conversation19 Comments so far
Leave a reply. For customer support issues, please use the Customer Support link instead of writing comments.
This is so sweet! I can’t wait to see this thing in action and buy one. What a cool way to learn about the internals of Linux. I want a 68 Katy in a LEGO case!
You’ll make your custom kernel available, right?
PS: My website is down at the moment, due to a bad HDD. I will bring it up soon, so everyone can see my LEGO PC’s.
All you need is a 7833 inline with the 5V supply right? I don’t know how hard it will be to cut all the power traces, but you can just super glue a little regulator to the bottom of the board. Or will the 68K run on 3.3V too?
could you make it usb powered? would 500ma @ 5v be enough? ( its gotta be hooked to a serial port anyways : )
Still… i think its awesome you made a PCB of Katy !!!!!!!!!!!
Assuming you can get by with fewer macrocells, the 5V XC9536 is pin-compatible with the XC9572XL. While it is a discontinued part, it seems readily available on ebay (even in VQFP-44).
Two Things I always do when designing a new pcb …
1) Compare each trace to schematic and mark up.
2) Print out image of pcb, cut out on board outline. Spray mount to a scrap of styrofoam, lay or perforate to mount through hole components.
this allows you to check clearances.
The boards you ordered you can use to confirm the next revision of your pcb is correct. just wire up a 3.3v supply
Great site by the way !!
Regards, JRock
Lots of great suggestions, thanks! Using a XC9536 (non-XL version) may solve the problem, since it’s a true 5V part. I’ll need to write the Verilog equations for address decoding and other stuff to be sure, but I think it probably should fit in this smaller CPLD. I only chose the XC9572XL initially because I had some of them in hand.
If that doesn’t work, murdock’s idea of gluing a 3.3V regulator onto the board might be workable too. It would need extra input and output capacitors for the regulator as well. I think it would require two or three trace cuts, and maybe half a dozen wires.
Powering the whole thing from USB makes a lot of sense – I don’t know why I didn’t think of it before. I guess I’d imagined I might want to use the board sometimes when the USB wasn’t connected to anything, but since its only I/O is the USB serial port, that doesn’t make sense. The breadboard version uses about 300 mA, and the PCB version should use less, so it will definitely be under 500 mA.
I should check the datasheet again, but I’m pretty sure the 68008 won’t work at 3.3V. The other parts probably do, however.
Hmm, I don’t see anything in the 68008 datasheet that mentions the supply voltage range. It does give a maximum rating of -0.3V to 7.0V, but that’s to avoid damage, not to actually operate the CPU. http://www.datasheetcatalog.com/datasheets_pdf/M/C/6/8/MC68008.shtml Anyway, I think 5V is the way to go in this case.
If everything else works at 3.3v, why not wire 5V power to the 68008’s rails, disconnect that line, and run everything else at 3.3 with a little glued-on regulator module? it’s a bodge job, sure, but it could work.
Also, from that spec sheet, it looks like the logic high cutover is at 2V – entirely possible the 68008 will run on 3.3V. Worth a shot? May need to reduce clock speed?
After I submit a board to be manufactured, I make a copy of the files and bump their revision number up. When I receive the board, I make silkscreen notes in the new revision’s PCB file on changes I need and want to make.
I like having the changed noted in the PCB file so that any time I open it, I know what I need to do. Before I would keep a separate list, but would sometimes forget to double check it before submitting rev2 to the fab.
Comparing this PCB to the breadboard version of the 68Katy, it looks like you completely replaced the 74xx glue logic and the GAL with the single CPLD. Am I right?
XC9536 is a winner! Assuming my equations for address decoding and other CPLD functions are correct, it only needs 29 of 36 available macrocells. Since the XC9536 is pin-compatible with the CPLD I’d originally planned for, but is a true 5V chip, I can use it on this board without needing a voltage regulator or jumper wires. Now to order the other parts, and get busy assembling…
Are you planning to increase the clock speed too, or maybe try that in a subsequent rev of the board? With a PCB it seems like you should be able to push it up.
And is a full 16-bit design next, maybe with an ‘010? 🙂
that is good news steve 🙂
Yes, I’ll try a few different clock oscillators to see how fast it can go.
so sticking with the 68008, and keeping it 8bit. Single Ram / Single Rom
keeps its simple, there is beauty in simplicity.
IF anything , it can be used as a really cool 68k educational tool.
I have a hunch, with katy’s current design, lots of really cool apps/games can still be enjoyed.
i guess really, the only thing that is still really needed, to keep it minimal. Would be an SD card, or at least a flash chip
on there for some storage 🙂
If you want an 8 bit data buss machine, you can always use a 68030 and wire it that way. You get lots more address space, and almost as simple an interface. Then you can add other interfaces and expand the ram big time.
Just a thought.
I think that might be a good followup project, say for someone who has been reading the 68 Katy series. 🙂
(The ‘030 is a nigh-perfect CPU in many ways… It’s part of the reason I still have a Mac IIci.)