

Reflow Soldering Fail
I’ve long wanted to try reflow soldering of surface mount components, using solder paste and hot air or a hot skillet, and I recently had an opportunity to try. Unfortunately the results were very poor, and I was left wondering what I did wrong. Compared to my normal method of drag-soldering surface mount chips with a standard iron and liberal amounts of flux, the reflow method with solder paste took more than twice as long and led to worse results overall.
My test case was the ROM-inator II SIMM, which has a couple of chips with a 0.5 mm pin spacing. With my normal soldering iron, I can tack down a few corner pins, drag solder the rest of the pins, and then use desoldering braid to clean up the inevitable solder bridges that sometimes occur between adjacent pins. It’s something of a slow and tedious method, but it works.
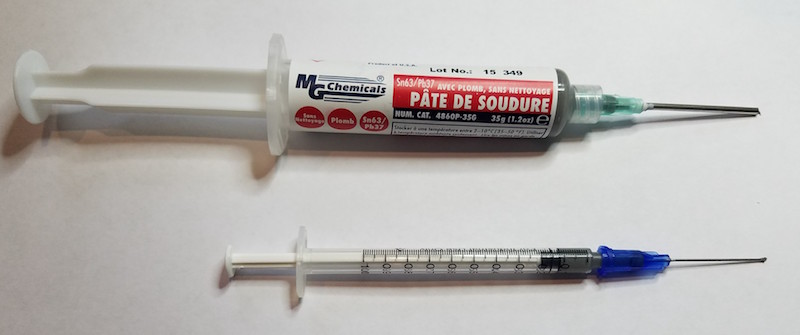
For this reflow experiment, I used a syringe of MG Chemicals Leaded Solder Paste. The needle on the MG syringe is quite large, and the bead of solder paste it dispenses is far too wide for detailed surface mount work. I dispensed about 0.1 mL of the solder paste into a second 1 mL syringe with a 22 gauge needle, which allowed me to create a nice narrow line of paste with very little finger pressure on the syringe’s plunger.
Solder paste has a limited shelf life, and you’re supposed to keep it refrigerated to help preserve it. I believe the flux in the solder paste evaporates more slowly at low temperatures. I made a conscious choice not to refrigerate, accepting that the paste would spoil faster than normal, because I wasn’t excited about keeping leaded solder where I keep my food. For this test, the solder paste was just one week old, and should still have been quite fresh.
I didn’t use a PCB stencil, because I didn’t have one, and because I was skeptical I could hand-position a stencil to sub-millimeter accuracy anyway. I also wasn’t excited about the mess created by squeegeeing solder paste across a stencil. Instead, following some advice from a tutorial, I used the syringe to dispense a very narrow bead of solder paste straight down the line of pads on the PCB. While it might seem that this would cause all the pins to be soldered to their neighbors instead of to the pads, the magic of flux and solder surface tension should have made it work OK.
Using tweezers, I positioned the chips on the pads, aligning them as accurately as I could. The MG solder paste had a nice amount of stickiness to it, holding each chip steadily in place after I’d positioned it. That magic surface tension of solder should have helped here too, causing the chip to “snap” into perfect alignment with the pads once the solder began to melt.
I used a hot air rework station to heat the pads, and before long the solder paste melted into a silvery and shiny color. I let it go for a few more seconds to ensure everything was fully melted, then removed the hot air and let the board cool.
Results
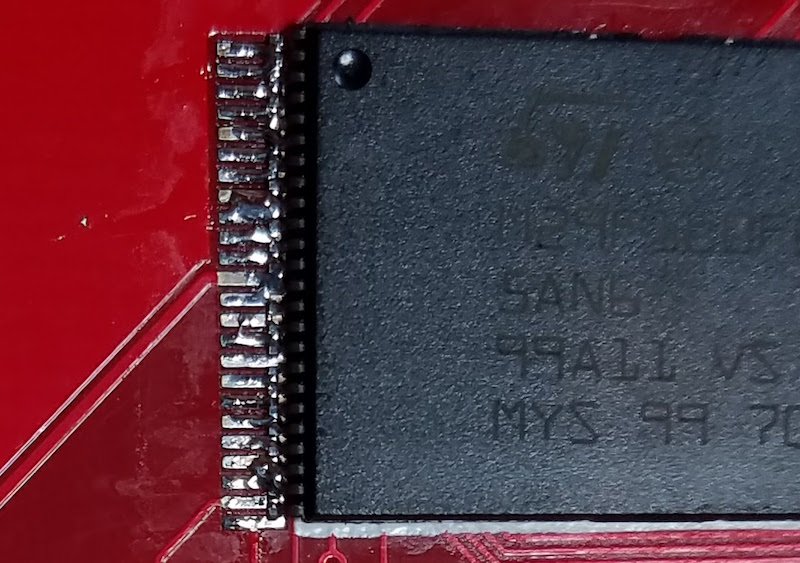
Despite having put down a very narrow bead of paste, many of the pins were bridged together. In this respect it was as bad or worse than my hand-soldering efforts, which was disappointing. But while some pins became bridged to their neighbors, other pins had too little solder, or looked completely dry. Overall I’d say the row of pins looked like it had too little solder rather than too much, so I don’t think the bridged pins were due to applying too large a bead of solder paste.
A second and more serious problem was the positioning of the chip. When hand soldering with an iron I can usually align those 0.5 mm pins with their pads fairly accurately, but the gray solder paste made the task more difficult this time. After dispensing the solder paste and placing the chip, but before melting the solder, the row of pins looked like a silver and gray blur. It was very tough to see if it was positioned accurately. The result was that two of my chips were positioned with the pins misaligned far enough from the pads to create a mess I was never able to fix. It only takes about 0.2 mm of misalignment to create a major problem with pins this closely spaced.
Even when the chips were aligned properly, I still had to go back and forth over each row of pins with the iron and flux, to fix the solder bridges and flow more solder onto pads that had too little. In effect, I had to drag solder the chip after having already reflow soldered it. Definitely not an improvement over the old method.
I built four ROM-inator II SIMMS this way, refining my technique each time in the hopes that the results would improve, but they never really did. Two of the four SIMMs couldn’t be salvaged, and had to be scrapped.
The title photo above shows one of those reject SIMMs, with a poorly aligned chip, after I’d made about 50 passes with an iron, flux, and desoldering braid trying to clean it up. It’s a mess, which is why I like the photo, but don’t take the photo as being a literal example of the results immediately after reflowing. I should have thought to take some photos after the reflow process, but before I’d touched any pins with an iron. It looked much cleaner and nicer then, but was misaligned and had many solder bridges and many pads with low or no visible solder.
Explanation
Why did this work so poorly? I don’t think it was the absence of a stencil. Attempting to position the chip smeared the solder paste around, so even if I’d had a stencil and used it perfectly, I still would have had smeared paste between the pads anyway.
I also don’t think my hand-dispensed solder paste bead was the problem. Using the 1 mL syringe, I was able to dispense a nice and even bead that was about as wide as a single pad, roughly 0.3 mm or so. Given the occasional low- and no-solder pads I observed, I probably had too little solder if anything, not too much.
Maybe 0.5 mm spaced pins are simply too small and close to be reflow soldered using this method? For comparison, I used the same reflow method to solder some 0805 sized SMD capacitors on this PCB, and it worked perfectly every time. No doubt larger sized components are easier to solder correctly, but I’m dubious that 0.5 mm pin spacing is beyond some threshold that can’t be reflow soldered using this method.
Maybe the temperature profile during reflow was far enough off to cause major problems? A real reflow process in a commercial oven would have a preheat phase about 4 minutes long, then an actual reflow time (above the solder’s melting point) of 60-90 seconds. My hot air method was much faster than that: point the hot air tool at the pads, wait maybe ~30 seconds for the solder paste to melt, wait another ~10 seconds to make sure it’s completely melted and reflowed everywhere, then remove the hot air.
Maybe the solder paste had already gone bad after a week at room temperature. That seems hard to believe, but it would explain the apparently poor wetting that I observed, with frequent solder bridges at the same time as other pins were dry, and the failure of the chip to snap into the proper alignment when the solder melted. The MG Chemicals syringe doesn’t have a date on it, but it’s marked with lot code 15-349 and was purchased new last week. If 15-349 means it was made in 2015 (on the 349th day perhaps), and the syringe has been stored at room temperature in an Amazon warehouse since then, that would certainly be a problem.
Maybe the way I heated the pads with the hot air gun caused a problem? This seems plausible. The heat was localized to a small area, so I would reflow the pins on one side of the chip, then reflow the other side 20 seconds later. Perhaps if the entire PCB had reached reflow temperature at the same time, using an oven or skillet, I might have had better results.
Any other good theories?
Read 12 comments and join the conversation12 Comments so far
Leave a reply. For customer support issues, please use the Customer Support link instead of writing comments.
I am not an expert, but I’ve had good luck with generally heating all the pins on the chip before focusing on a single set of pins. I see a significant difference when using a stencil (oshstencils) vs trying to put on the paste by hand.
Mooooore flux! Always more flux. If you’re not flooding the area with a flux pen before putting down solder and before reflowing, you’re making things way harder than they have to be.
Also, use a slightly wider nozzle on your reflow pencil with a lower airflow rate. Helps a bit. You want to try to reflow the whole chip at the same time.
I made a reflow oven using a halogen oven and home brew controller board, and *totally* failed to solder anything well using solder paste. People told me to try putting a tiny amount of ordinary solder on each pad instead before putting the components down, and that worked really well for me. (I drown th ething in liquid flux too!).
It does mean that it takes much longer that using paste might but at least it works, and makes soldering some kinds of things practical that wouldn’t be “by hand”
The solder paste that I used (linked above) is a mix of solder and no-clean flux. Should I be applying more flux beyond that?
My goal is to assemble medium numbers of boards (say a few dozen) faster than I can with drag soldering by hand. Even if I could get better reflow results, I’m starting to question whether this technique would be that much faster than drag soldering. I’ll try timing it. Doing multiple boards at once on a hot plate would help.
My expectations for this method with 0.5 mm pitch parts may just be unrealistic. After reading a few more tutorials, most of them say that you’ll be left with a few solder bridges after reflowing. Cleaning up solder bridges is what consumes most of my time when drag soldering, so maybe I’m wrong to assume the reflow method will be faster. For a different board with larger pitch chips or lots of discrete components, I could see how reflow would be a lot faster though.
Give stencils a try. Positioning is trivial, definitely less of a pain than putting down paste with a syringe. I use OSH Stencils. Polyimide stencils work ok, but the steel stencils give much better results, especially for large boards and/or fine pitch parts (0.5mm or less).
Don’t use flux with paste. Unless your paste is old and dry, in which case throw it away if you value your time. I kept my paste in the fridge, but I ended up with a liquid mess. Now I keep it at (cool) room temperature. Simply buy the smallest syringe you can find and be ready to throw it away when you start having issues. Buy your solder paste from reputable distributors.
Use good quality PCBs. ENIG greatly improves results. OSH Park are my favorite for consistent results. Clean the boards with isopropyl before applying solder paste.
And get a cheap pizza oven. I use an unmodified Black&Decker TO1675B (less than $50 from Amazon) and a thermocouple attached to an old PCB. Put thermocouple and populated PCB on grate; turn oven to bake; keep an eye on the temperature and turn off heat when it raises to fast (human PID); proceed until you see the solder reflow (starts around 210C for non-leaded solder); turn off heat; wait half a minute; open door; let cool down.
I regularly build prototype boards with 0.5mm pitch QFN, and the soldering step is the least of my worries. https://twitter.com/WegmattLLC/status/767453120565686272
You need a good stencil. And a good first experience to motivate you 🙂
I would say at least invest the time to put some tinfoil in a toaster oven, using a thermocouple is good enough. That’s how I reflowed lots of boards before getting a real P&P and conveyor oven.
https://www.youtube.com/watch?v=VTYJg_McyXo
Also I used to make my own stencils from soda cans, a bit tedious but they lasted forever:
https://www.youtube.com/watch?v=JWUJtmgh55M&t=5s
These days I laseretch them from mylar myself for prototyping and I order them online for production.
Haven’t tried them myself at all, but OSHstencils offers lasercut stainless steel stencils, . Their mylar stencils also supposedly good enough 0.5 pitch.
The thickness matters, or you can adjust the apertures to put less paste if your stencils are standard thickness. I would say go with 0.1mm if your cream pads are == SMD pads (size).
Paste needs to be the right consistency, toothpaste thickness. Reflow is very forgiving with misalignment but at your pitch you have to be at least in the ballpark location if you expect the part to be pulled into place.
If you need to fix bridges, clean hot tip + flux will do the job, pulls away the extra solder.
I do not store the solder paste in the freezer too, and the flux it contains goes bad very quickly. Eventually (after about 2 years) paste solidifies so I’m not able to even push it out the syringe. Of course, when it becomes solid – I just throw it off. But until that moment I just mix the soldering paste with equal or 2/3 amount of paste flux (I use Chinese AMTech) before using it and it works wonderfully.
An interesting update: I was right about the 15-349 lot code on my solder paste meaning day 349 of 2015, so the paste was already past its expiration date when I bought it, assuming Amazon didn’t refrigerate it in their warehouse. Here’s the message from MG Chemicals tech support:
“The date of manufacture for that product was December 14, 2015. If it has been stored refrigerated it would have a 2 year shelf life. If it was stored at room temperature, it would have a 1 year shelf life.”
The paste didn’t seem obviously spoiled to me. There was no visible separation of flux from solder, and it flowed nicely enough from the syringe. Felix mentioned a toothpaste consistency, which sounds about right. But using old paste certainly can’t have helped, and Amazon.com probably isn’t the best source for this. I’ll try again with another sample of paste from an electronics distributor like DigiKey, who is more likely to keep it refrigerated in the warehouse and to ship recently-manufactured product.
Sorry for not replying to this – “The solder paste that I used (linked above) is a mix of solder and no-clean flux. Should I be applying more flux beyond that?”
YES
GOD YES
ALL OF THE FLUX
The flux inside the solder is enough flux to wet the solder balls together into one blob of solder. It’s not enough flux to wet the pins or the pads on the circuit board; if you’re not flooding the area with a flux pen prior to reflowing, shit just isn’t going to work.
MG chemicals products do not work well, if you need quality try the company chemtronics or tech-spray.
MG chemicals are very, very low quality, I even had better luck with Dustronics products over the MG stuff.
I ordered tubes from All of the above, chemtronics seemed to work best but the Dustronics one was the best price and worked fine.
I have a feeling most of the companies get all the stuff from the same company and put a privat label on the product,,so I just order direct from Dustronics at half the price of the Tech-spray, Chemtronics or MG ,, Dustronics will sell you direct.
I purchased from Dustronics they will sell you direct. http://www.dustronics.com