

Build an Electric Scribble Machine
Looking for a creative project for kids to build? The Electric Scribble Machine is an entertaining device that’s easy to build from common parts – great for a scout troop project, school science fair, or just a lazy afternoon at home. For the past several years, as part of our local elementary school’s annual Discovery Day, I’ve led groups of kids ages 7-11 through the construction of a scribble machine. Tomorrow will be my last turn at Discovery Day, so I’m documenting the scribble machine design here for reference.
The basic concept is simple, and is borrowed from an Exploratorium design:
- An off-center weight on an electric motor will cause it to wobble and vibrate
- Mount the wobbly motor to a body made of plastic, cardboard, recycled bottles, or whatever’s available
- Attach colored felt-tip markers to the body to create legs
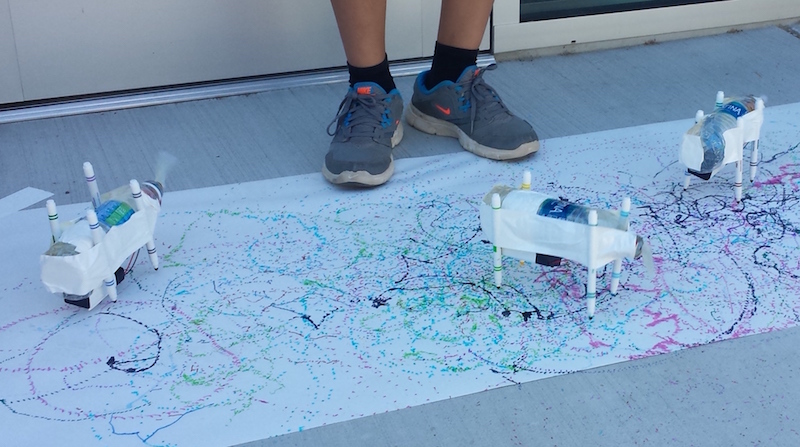
When the machine is placed on a large sheet of paper, it will wobble and jump around erratically, drawing interesting patterns as it moves.
Step 1 – Motor
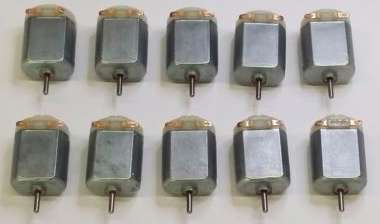
I use cheap DC hobby motors rated for 1.5V to 6.0V. They work fine with just a single AA battery, but are better with 2xAA batteries.
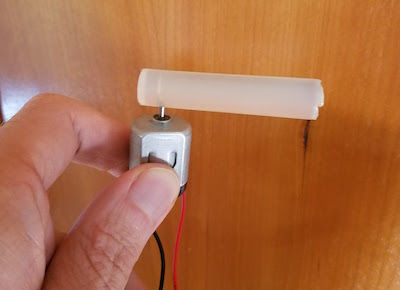
Step 2 – Off-Center Weight
Anything that can be mounted onto the motor’s shaft will work. The more unevenly the weight is distributed, the better. I’ve found that glue sticks for hot glue guns work nicely, and are easy to mount thanks to their texture.
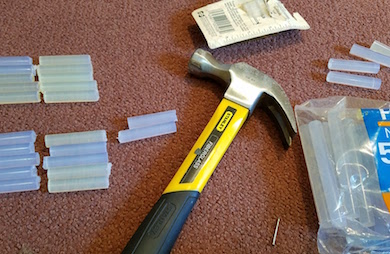
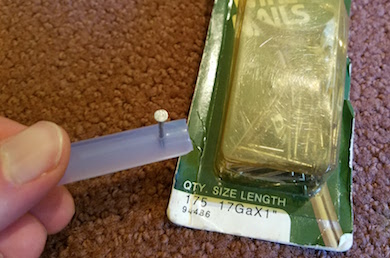
I use generic 4 x 0.44 inch glue sticks, and cut them in half with kitchen scissors to make 2 inch sticks. I hammer in a finishing nail near one end of the stick, then pull out the nail, leaving a small hole behind. The hole makes it easy to press-fit the glue stick onto the motor shaft without any additional tools: just push the shaft into the hole. The rubbery texture of the glue stick holds the shaft tightly, so it won’t easily pull loose.
Step 3 – Battery Holder (optional)
A 2xAA battery holder with an integrated on-off switch helps to create a reliable finished project. In the first years of building scribble machines, I held the motor wires directly to the battery terminals with rubber bands. It worked, but was a constant source of frustration when the wires came loose.
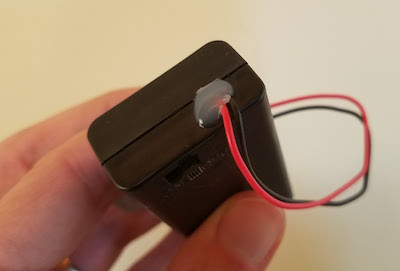
I’ve found that the wires on cheap battery holders are often poor quality, and break easily. Last year, about half of the battery holder / motor units suffered some kind of wire breakage during the day, leading to a lot of unhappy kids and emergency solder repairs. This year, I’ve added a drop of hot glue to the outside of each battery holder at the point where the wires exit. I’m hoping this will serve as a strain relief, and help reduce the number of broken wires.
Step 4 – Soldering (optional)
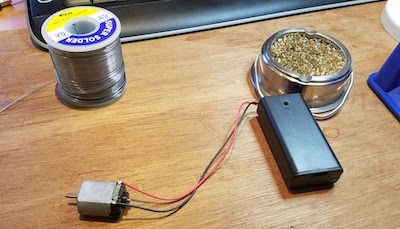
For the most reliable results, the battery holder wires should be soldered to the motor terminals. This is as easy as soldering gets, and it takes only a few seconds. A $15 Radio Shack soldering iron will do the job nicely.
As an alternative to soldering, the battery holder wires could be twisted around the motor terminals with pliers. There’s normally a small hole in the center of each motor terminal, which makes the job fairly easy.
Step 5 – The Body
Here’s an opportunity to get really creative – the body can be made from virtually anything! Try empty water bottles, plastic baskets, DVDs, cardboard, foam board, or whatever else might be handy. In past years I used empty plastic water bottles, sometimes with a few rocks inside to act as ballast. The plastic bottles work fairly well, although they do sometimes get partly crushed by kids who are overzealous in their construction efforts.
This year I’m trying something new: flat cardboard bodies, with holes drilled for the motor and felt-tip markers. It’s definitely possible to create these from old cardboard boxes, but cutting and drilling is time-consuming and tedious when making more than one or two. I took the easy path, and got squares of laser-cut double-thickness cardboard made by a local service. They were only 84 cents each, and the precise cut-outs for the motor and markers make it easy to snap the components into place. I added eight holes for markers, so the kids can experiment with different placements.
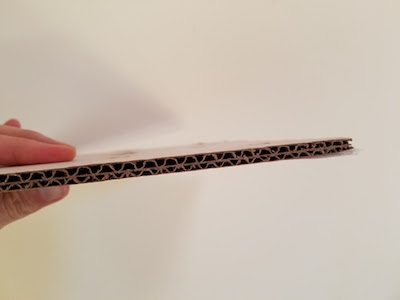
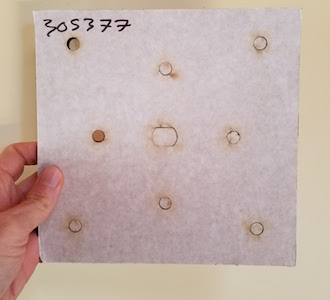
You’re welcome to use my laser-cut design. The Ponoko service will make them for you, if you add the design to your “personal factory” and select a material. Mine were cut from double layer corrugated cardboard, 6.7 mm thickness, 181 x 181 mm size (Ponoko’s standard P1 size).
Step 6 – The Legs
The legs of the Electric Scribbling Machine are generic colored felt-tip markers. Many parents already have dozens of these stuffed into every odd drawer and closet. Washable markers are nice for recovering from accidents, but not required. I used this cheap 30-pack of fine tip markers.
Three legs or four? I’ve tried both, but usually go with four. The design of the scribble machine requires some fine-tuning of stability, and four legs create a more stable base than three. Too much stability isn’t necessarily a good thing, however, since a certain degree of wobbling is required to make a good scribble design. But a high degree of wobbling will quickly lead to wild gyrations, and then the machine will topple over in a sad pile. It takes a few minutes of experimentation with leg lengths and ballast weights to find a happy medium.
Step 7 – Assembly and Use
I normally prepare the battery packs, motors, and glue sticks ahead of time. On the day of the event, the kids combine these with the batteries, body, and legs to assemble a finished machine. It sounds simple, but the assembly process always seems to require a surprisingly large amount of time, usually 30 minutes or more.
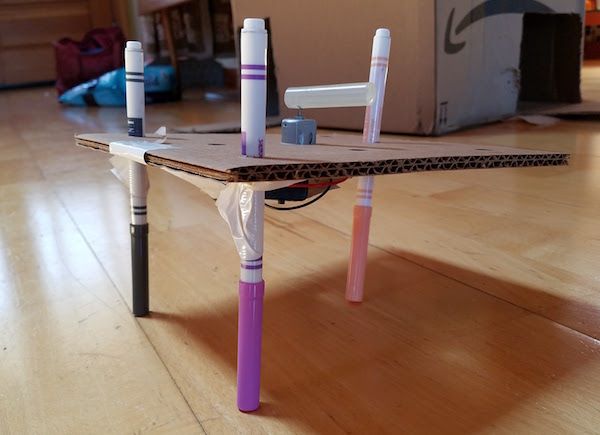
Duct tape, masking tape, rubber bands, or hot glue can be used to mount the motor and battery pack onto the body. These are the heaviest components, so it’s best to place them near the center of the body. I’ve found that most 7 to 11-year-olds don’t have the physical dexterity to work with rubber bands, so duct tape is my preferred adhesive method. After mounting the motor and battery, the legs are attached the same way. The caps on the markers add about 1.5 inches to their length, which needs to be considered while mounting them, otherwise the finished machine will sit too low to the ground when the caps are removed.
After watching the machine scribble random designs for a while, it’s time for some directed experiments.
- What happens if one leg is a different length than the others?
- What’s the effect of moving the legs closer to or further from the body’s center of mass?
- Can you configure the machine to wobble forward in a straight line instead of gyrating randomly? Try racing them.
- Reconfigure the motor to lie on its side, spinning the weight in the vertical plane. How does the machine’s motion change?
- Decorate the bodies with stickers and give them cool names.
Shopping List
Supplies for 30 kids:
30 electric motors $45.00
15 hot glue gun sticks $8.69
30 battery holders $24.36
60 AA batteries $11.87
30 laser-cut cardboard bodies $25.20
100 colored markers $17.44
The total cost is about $132, or $4.42 each.
If you build an Electric Scribble Machine, send me a note and tell me how it went!
Be the first to comment!No comments yet. Be the first.
Leave a reply. For customer support issues, please use the Customer Support link instead of writing comments.