

Backyard Metal Sand Casting
Today’s project: metal casting! I’d been wanting to try this for years, because who doesn’t love playing with molten metal? This was a single-sided open air sand casting process, which is about as simple as it gets. You basically just press an object into some densely-packed sand, remove the object, and pour metal into the resulting sand cavity. Humans have been doing this for thousands of years. Easy peasy, sort of.
This project was a long time coming. I discussed some metal casting ideas last year, and acquired some equipment. Then everything sat on a shelf gathering dust for 13 months.
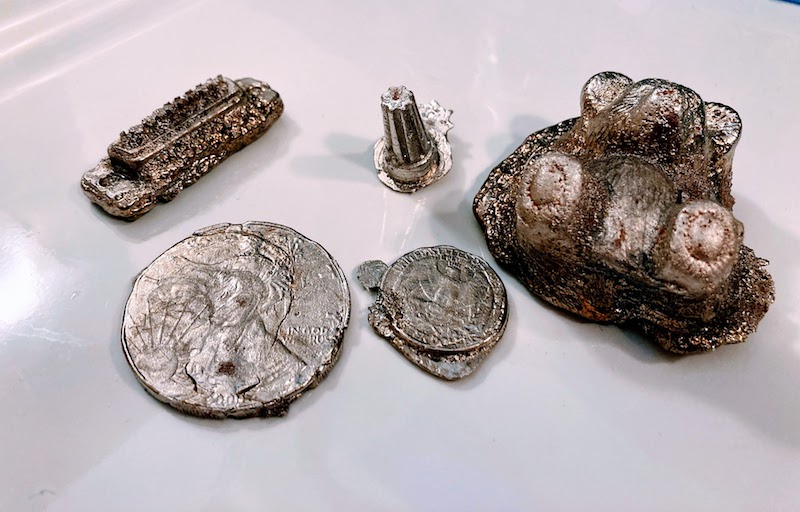
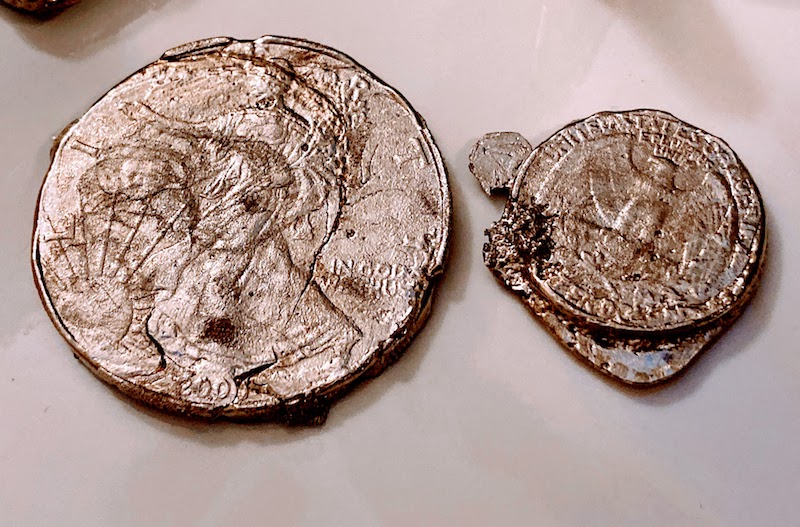
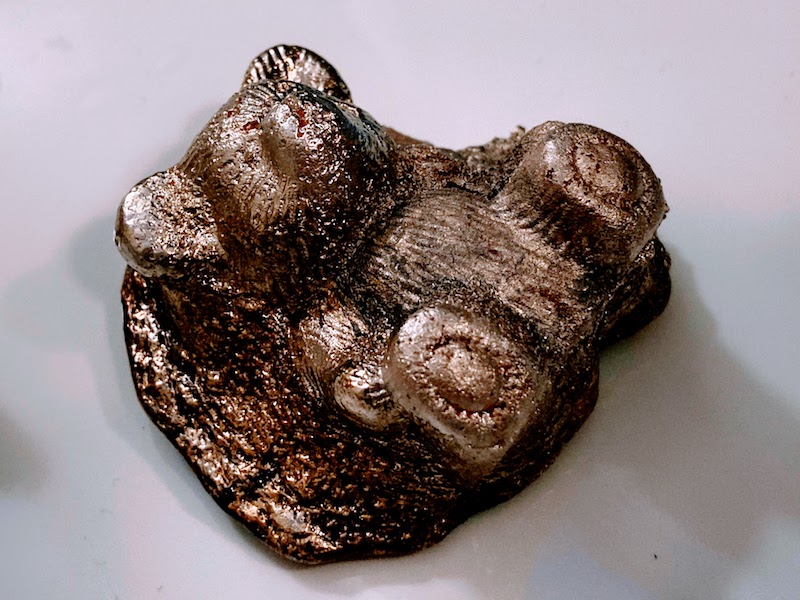
I used pure bismuth for the casting: atomic number 83 on your periodic table. Bismuth has a pretty low melting point of 521 F / 272 C, easily reached with an electric heater. The objects here are a quarter, a silver dollar, a wire nut, a DB-19 connector, and a teddy bear pencil eraser. A major limitation of this particular process is that the object must have parallel or tapered sides so you can remove it from the sand without disturbing the cavity you just made. That’s why the teddy bear looks like it’s embedded in a rock: I had to dig it out of the sand instead of lifting it out cleanly. This process is also limited to making one-sided reliefs instead of full 3D objects, because the back is just a molten pool of metal directly exposed to the air as it cools.
Sand casting is probably better suited for making tools and gears and big stuff, as opposed to small detailed models like those here, but you can’t beat its simplicity. I made a huge number of mistakes, and the quality is pretty bad, but hey… it worked! Molten metal! Try something, learn something. The images from the coins came through much better than I’d expected, and the teddy bear is pretty neat. I feel like I’ve discovered some secret alchemy with this ancient process.
Sand Casting 101
The traditional sand casting technique uses something called green sand, which is a mix of regular sand, clay, and maybe a bit of other stuff, plus a small amount of water to help it stick together. I used something called Petrobond which is an artificial oil-bonded sand designed specifically for metal casting. When you pack it down tight, it’s very firm – a consistency similar to silly putty or a super dense cheesecake. Either way the grains are small enough to get pretty fine details. Petrobond advertises an average grain size of 0.07 mm.
I began by building a small wooden frame – a four-walled box with no top or bottom. I placed the frame onto a metal lid from a cookie tin to create a temporary floor, then arranged my reference objects inside the frame face-up. I think maybe you’re supposed to dust the objects and the “floor” with a releasing agent, but I didn’t have any, so I skipped this step.
Next, I packed sand into the frame, slowly burying the reference objects. You’re supposed to sift the stuff to break up the chunks and remove any foreign material. My wife vetoed using the kitchen colander or sifter, and my DIY sifter built from window screen failed miserably, so my Petrobond didn’t get sifted properly. I packed it in as tightly as possible with my hands, then rammed it down hard with the base of a heavy flashlight. The top surface of the sand was scraped level with the frame, using a metal ruler. I then carefully flipped over the frame and removed the cookie tin lid. Because the sand was packed very tightly, it did not fall out. I placed the inverted frame back onto the cookie tin lid, with the reference objects now exposed.
The objects were perfectly flush with the surface of the dense-packed sand. How do you remove them without disturbing the sand? There must be some secret method that I’ve yet to learn. I damaged the mold substantially in the process of removing the objects, and also spilled loose sand into mold cavities. There was a lot of swearing involved.
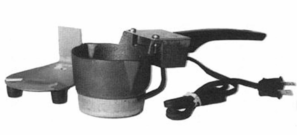
The final step was to melt the bismuth and pour it into the mold cavities. This was somewhat anti-climactic. I used an electric ladle to melt a one pound chunk of pure bismuth purchased from rotometals.com. It took a few minutes to melt, and smelled like a tire fire. I’m not sure if the smell came from the bismuth or from the ladle, but it was terrible and I feared my neighbors would complain. Once melted, I poured the bismuth into the molds like soup into a bowl. I let everything cool down for about an hour before digging the castings out of the sand.
Room for Improvement
I was happy to get “read the lettering on a quarter” level of detail in some areas, but the final casting results were mixed. I would have gotten better results and finer detail if I’d been more careful with removing the original coins from the mold, and poured the metal faster. You can see where the silver dollar partially cracked due to uneven cooling. This happened when I poured some bismuth into that mold, but not enough to fill it fully, and then waited a few seconds before pouring in the rest. I was trying to avoid overflowing.
Bismuth probably wasn’t the best material for this project. It has a low melting point and is comparatively non-toxic, but it’s brittle. Next time I may try pewter or another low temperature alloy that’s specifically intended for metal casting.
When you heat the bismuth, or most any other metal except gold, the surface of the molten metal reacts with oxygen in the air to create an oxide layer. You’re supposed to skim this off before pouring the metal into your molds. I forgot to keep skimming tools at the ready, so my oxide layer dregs went into the mold along with everything else.
The biggest improvement would be graduating to two-sided casting, using two sand frames that lock together. You can buy ready-made frame sets inexpensively. But even after reading several tutorials about the process, I still don’t really understand how the two-sided mold making works. I’m sure it’s very simple, but something about the geometry of it still escapes me.
Read 4 comments and join the conversation4 Comments so far
Leave a reply. For customer support issues, please use the Customer Support link instead of writing comments.
This is on my list as well. I’m thinking more about lost-wax or lost-pla with plaster, however.
I did this type of sand casting in shop class in middle school! Likely one of the last years they offered it too. We used the wooden frame molds to do the process with a few failures along the way. The casting metal of choice was aluminum which the shop teacher melted in a tabletop oven.
Neat! Do you remember if it was some kind of special metallurgy oven? Aluminum melts at 1220 Farenheit, so I don’t think a normal kitchen appliance would be enough.
Yes, it was a small specialized oven. Definitely not consumer grade.