

BMOW 1 Computer

Back in early 1980’s, I lived and breathed the world of the Apple II, Atari 800, Commodore 64, and their brethren. I could PEEK and POKE those machines like nobody’s business, and I spent countless hours writing programs, playing games, or just fiddling around. In contrast to today’s PCs, the computers of that era were inviting to tinkerers, with a comparatively simple hardware design and a BASIC prompt at boot-up.
As a computer engineering major in college, I learned the details of digital logic design. I even built a rudimentary computer on a prototyping kit built into a suitcase: MIT’s infamous “Nerd Kit”. But at the end of the semester, it was all torn down, I went on to a career in software, and that was that.
More recently, I learned of various projects to build simple computers similar to those 80’s machines, constructed entirely of discrete logic chips like counters, adders, flip-flops, and NOR gates. No Pentiums or PowerPCs here– these people built their own CPUs from the ground up, along with the memory subsystem, I/O, and everything else the computer required. I had stumbled onto the world of the homebrew CPU. To create such a computer required a detailed microarchitectural design, custom instruction set design, custom software tools like assemblers and compilers, and of course a custom circuit board or three populated with lots of fat DIP chips and a big mess o’ wires. Projects like the Magic-1, D16/M, and Mark 1 FORTH Computer showed me the way.
I decided to build a homebrew CPU computer of my own. It was a big mess o’ wires.
Construction is documented in 100 blog posts, ranging from the original idea through dozens of setbacks to a final demo for thousands of people at the 2009 Maker Faire.
The Hardware
Big Mess o’ Wires 1 is an original CPU design. It does not use any commercial CPU, but instead has a custom CPU constructed from dozens of simple logic chips. Around this foundation is built a full computer with support for a keyboard, sound, video, and external peripherals.
My original goals were:
- Build the CPU from scratch, primarily using basic 7400-series logic. No 6502, Z-80, etc.
- Keep the hardware complexity to a minimum. I’m not an electrical engineer.
- Be capable of running “real” programs, not a 4-bit CPU or toy machine.
- Provide a way to interface with a PC.
- Be fast enough to run interesting programs interactively.
Stretch goals:
- Boot into a simple integer BASIC program, capable of interactively editing and running its own programs.
- Support multiple programs executing simultaneously, via a pre-emptive multitasking OS.
- Provide keyboard input, VGA video and sound output.
Initial design began in November 2007 with a high-level sketch of the CPU internal design. A simplified Verilog hardware simulation proved the key design details. Construction began in earnest in February 2008, using a large wire-wrap board to interconnect the 50 or so chips needed. In April, a half-finished BMOW 1 booted up for the first time, computing fibonacci(12) = 144 using a simple ROM-based program. One by one the original system goals and stretch goals were met, including VGA video, three voice audio, BASIC, and a bootloader for communication with an attached PC. BMOW 1 eventually gained the ability to run complex programs written in assembly or compiled from C. The main construction phase ended in February 2009, with the completion of a customized case to house everything. As of March 2009, Big Mess o’ Wires 1 is fully functional, but will probably never be “finished”.
Architecture
BMOW 1 borrows liberally from other homebrew designs, as well as the MAYBE design presented in the book Computation Structures by Stephen Ward and Robert Halstead. Data busses are 8 bits wide, and the address bus is 24 bits. Four 8-bit registers are used for general data, and three 24-bit registers store the program counter, stack pointer, and a scratch/working address pointer. Registers and the arithmetic and logic unit are interconnected by one data bus, while RAM, ROM, and memory-mapped hardware devices use a second data bus. The ALU also has dedicated left and right data input busses.
Machine language instructions are implemented as a series of micro-instructions, stored in three parallel ROMs to create a 24-bit microcode word. One micro-instruction is executed each clock cycle, and the micro-instruction bits are used directly as enable and select inputs to control all the chips in the machine. Up to 16 micro-instructions may be needed to implement a single machine language instruction.

Note: Some additional devices are not shown here, including the VGA display circuitry and real-time clock.
24-bit addresses allow for up to 16MB of memory, but only a little more than 1MB of combined RAM and ROM is installed. The most-significant byte of the address is called the bank byte, and is normally invisible to programs. The standard instruction set presents a 16-bit interface to programs, with most instructions implicitly referencing the current bank. Cross-bank references are possible, but awkward (think x86 segment registers).
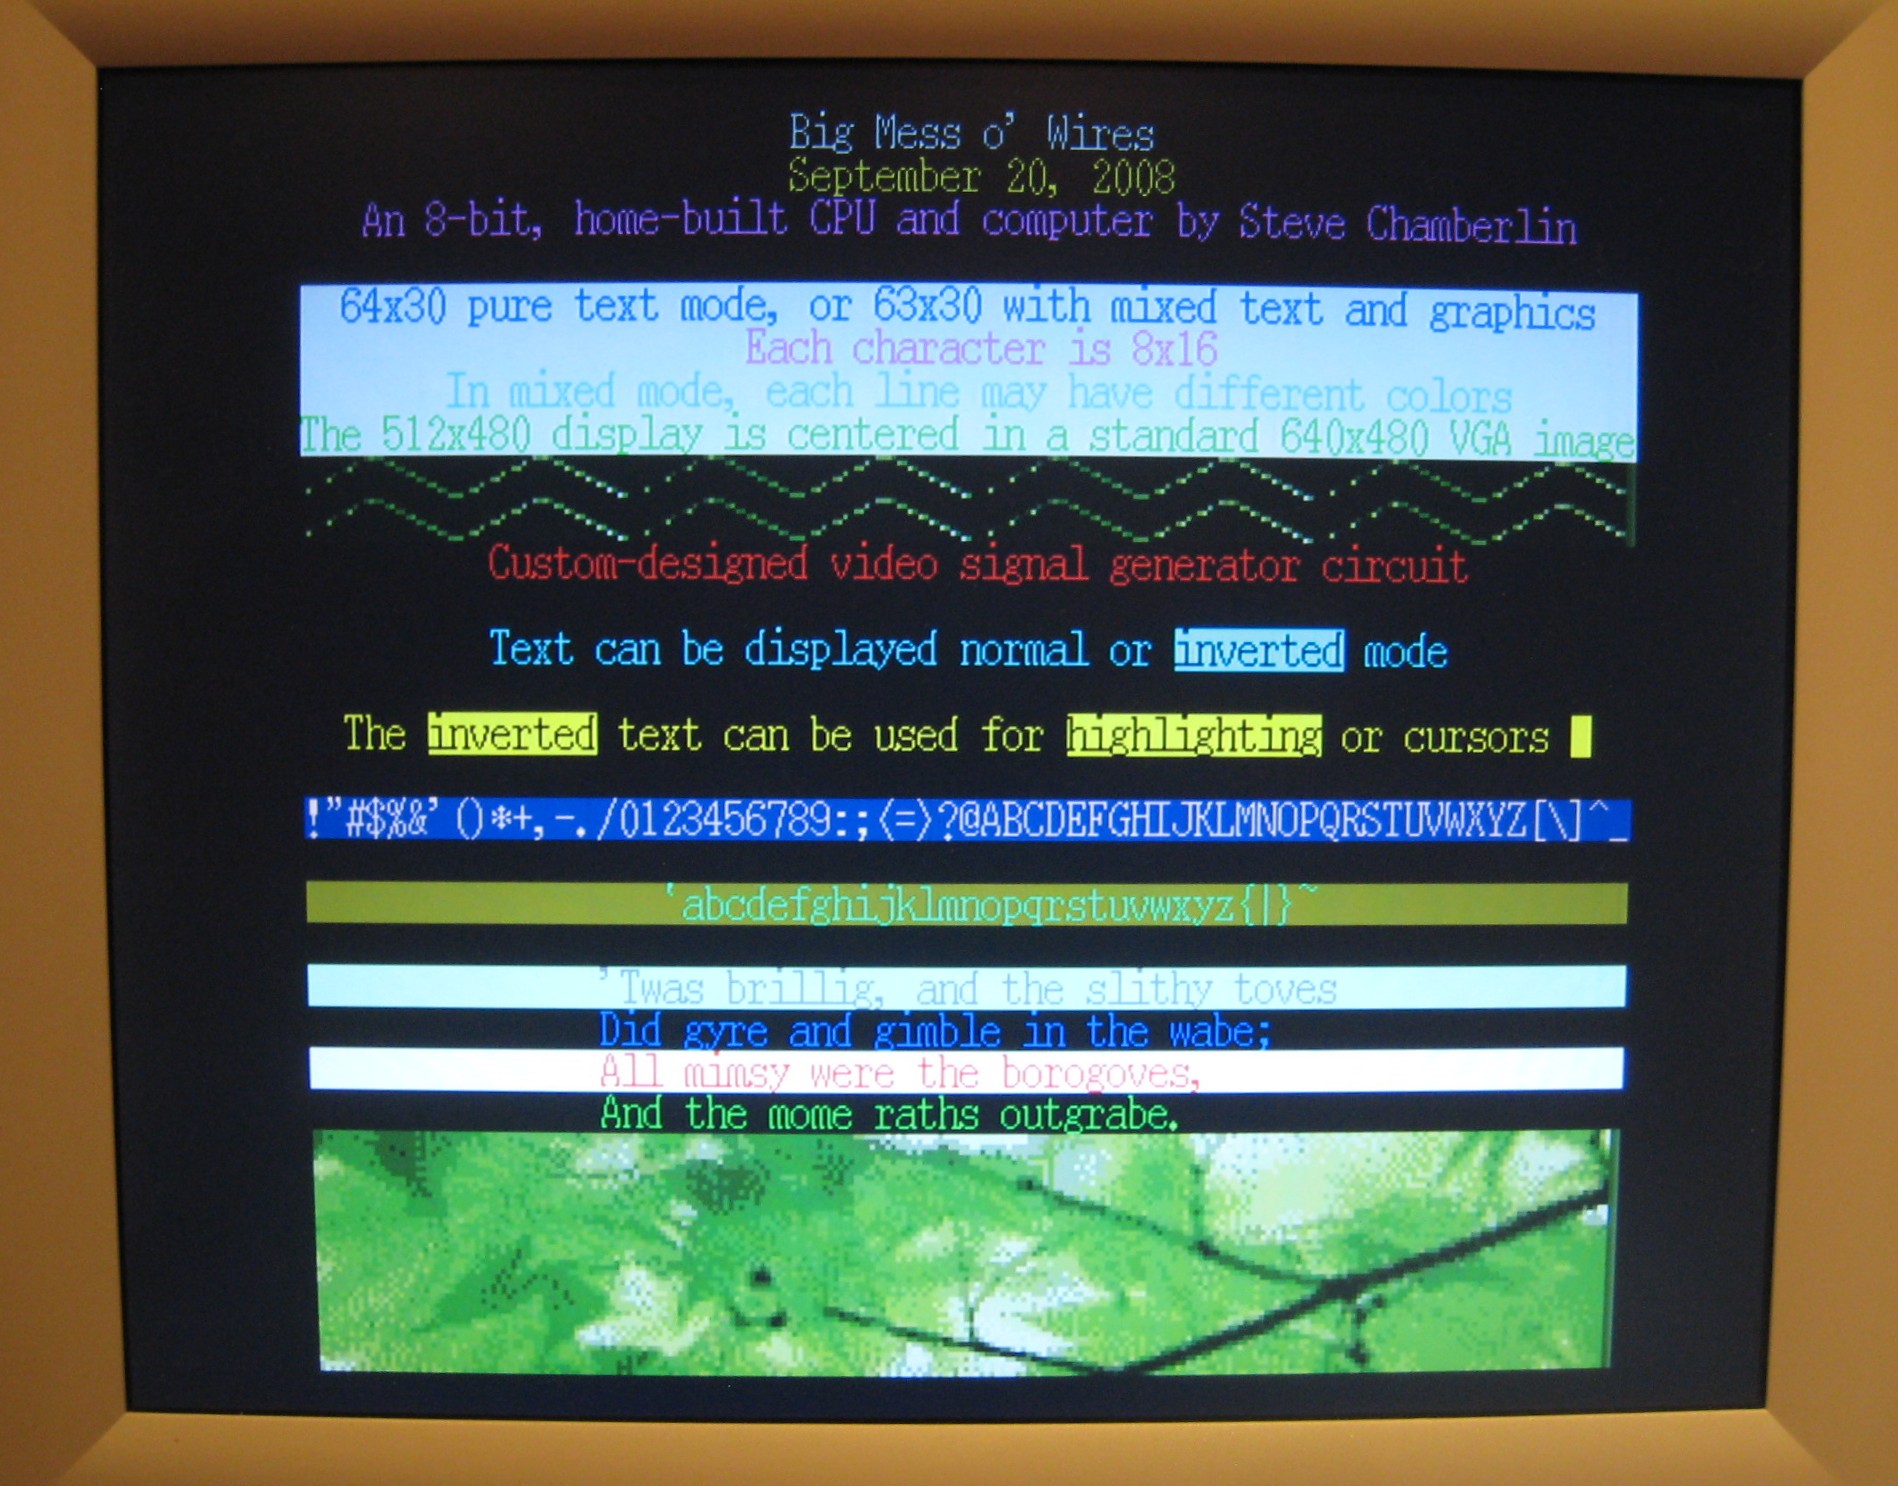
A 512K ROM contains a bootloader/menu program. A USB-to-TTL interface based on an FTDI chip provides an easy way to move data to and from a connected PC. A standard PC keyboard with PS/2 connector is used for keyboard input, and a 24×2 character text LCD serves as a debug output display. Custom video circuitry drives a standard VGA monitor, with a maximum resolution of 512 x 480. A three-voice programmable sound generator provides music and sounds.
BMOW 1 is built on an Augat wire-wrap board pre-populated with thousands of wire-wrap pins. The chips are pushed into the board without soldering, and can be easily removed, similar to a prototyping breadboard. Unlike a breadboard, the pins are individually connected on the underside of the board according to the needs of the circuit design. A wire-wrap tool is used to wrap stripped wire ends tightly around each pin. Wires can be removed fairly easily in case of a mistake. BMOW 1 contains about 2500 such wire wraps.
Specs
- Current clock speed is 2MHz. It could theoretically go to about 3MHz (untested).
- 512 KBytes of RAM, 512 KBytes of ROM.
- Power draw is 10 Watts, 2.0A at 5V.
- VGA video output is 512×480 with two colors, or 128×240 with 256 colors.
- Audio and music is provided by a three-voice programmable sound generator.
- Keyboard input is a standard PC keyboard with PS/2 connector.
- Debug display is a 24×2 character text LCD.
- There are roughly 1250 wires connecting the components, so 2500 individual hand-turned wire wraps.
Files
- BMOW Block Diagram – Shows the system busses and data paths for BMOW 1’s custom CPU.
- Video System Block Diagram – Shows the design of BMOW 1’s video display circuitry, the most complex subsystem in the machine.
- Layout – Shows the location of every chip on the BMOW 1 system board, color-coded by subsystem. More discussion of the layout is in the post Board Layout.
- Schematic Diagrams – The whole enchilada: detailed diagrams showing every chip, every pin, and every connection.
- Wire List – A spreadsheet documenting every wire in the machine, its endpoints, and the order the wires were added. Essential for navigating the insane rat’s nest of wiring beneath the board. (The spreadsheet has embedded macros. Excel may warn you about this.)
- GAL Programming Equations – Data on the various programmable logic elements used throughout BMOW 1.
- Microcode – Source listing for the microcode that implements BMOW 1’s high-level machine instructions. Each high-level (programmer visible) instruction is implemented as a tiny program of 1 to 16 micro-instructions. The high-level instruction set that’s implemented in this microcode is a close cousin to 6502 assembly language.
- Microcode Assembler – A PC-hosted tool that reads the microcode source listing, and generates the binary data to be programmed into the microcode ROMs. It’s a custom assembler for microcode.
- BMOW simulator (requires the Microsoft .NET Framework 2.0 runtime) – A PC-hosted GUI-based BMOW 1 hardware simulator. Load a ROM image, single step the simulated machine, set breakpoints, view callstacks, reference source code, and much more.
- PC Bootloader – A PC-hosted GUI tool for downloading a program to BMOW 1’s RAM and executing it.
- Program Assembler – A PC-hosted command-line tool for assembling BMOW 1 source code into executable programs. It’s a customized version of the Acme 6502 assembler, with BMOW 1-specific extensions.
- Software Examples – Source listings from BMOW 1 programs, including the bootloader client that runs on the BMOW 1 hardware, and audio/video demos.
- Prototype Verilog Description – A Verilog model for an early prototype of the BMOW 1 CPU core. This is badly out of date now, and there are a couple of places where I cheated and wrote non-synthesizable code, so you couldn’t make hardware directly from this. Mainly for historical interest.
- Modified Atari Font Map – The 128×128 pixel font map originally used for BMOW, taken from the Atari 8-bit computer. Each letter is 8×16, and there are 128 letters in the font map. The image shown here is actually 256×256 and must be reduced 50%. Also, the raw binary version of the font map, already reduced and with the PNG header stripped out.
- 8×16 Font Map – The 128×128 pixel font map used for the final version of BMOW, adapted from an X-Windows font. Each letter is 8×16, and there are 128 letters in the font map. The image shown here is actually 256×256 and must be reduced 50%. Also, the raw binary version of the font map, already reduced and with the PNG header stripped out.
- Microsoft BASIC for BMOW – Pagetable.com reverse-engineered this excellent, retargetable version of MSBASIC for many different 6502-based computers in 2008. I added BMOW as a new target, and it assembles using the modified ACME 6502 assembler above.




you might be nuts. but in a good way.
Hello!
Wow!
Back during the days of the Apple and the R6502, I, myself happened to be a very good programmer. In both BASIC and assembler. So much so that I would be able to diagnose a problem for someone else from just by viewing a sick machine’s responses.
What you are doing is just the bee’s knees. And that
is good.
Hi Steve
Love your system. Well done!
I noted your remark about the system being stand alone by using the keyboard and lcd display. Thought you might be interested in a cheap display that I am using for my Z80 CP/M system. http://www.allen.caldersmithguitars.com/all-50.jpg
The display has no backlight. I bought some from:
http://www.allelectronics.com/make-a-store/item/LCD-101/256-X-128-LCD-PANEL/-/1.html
The display can hang straight off the address/data busses and isn’t too hard to drive.
Allen: Looks quite impressive! Do you have any more details about your system on the web, beyond that photo?
Impressive work!
I wonder what tune you are playing in the demo-video and if there is a mp3 available?
The song in the AY-3-8913 demo video is called Agent X II, by “The *genious* Tim Follin”. It’s a Spectrum ZX tune that I downloaded as part of a collection from http://bulba.untergrund.net/music_e.htm . No MP3 version, sorry.
http://taro.lool.net/Game_Music/idx_c64.html has a collection of C64 midis including Agent X II. Since the link above was down when I checked.
Also, AMAZING!!!
Thanks Steve, it was the “VTX, YM, etc” archive v1.2 on the site you linked (just remove the accidental “.” at the end of the URLs htm) and converted it to WAV with Audio Overload.
Fixed the Agent X II link, thanks.
WOW!!!
Just looking at it brings tears to my eyes.
You’ve completed one of my life long goals, I just hope I’ll be able to do something like that before I die…
You’ve got all my respect, and am Now an Internet Hero.
OMFG! truely a labor of love.
/kneel, /worship
[…] (this is the part were more than half of you think I’m crazy, nerdy, or both) In a nutshell, it’s a home made CPU. Personally I think it’s fricking awesome. […]
When the nuke war starts and i wanna play chess i hope your in my bunker!
Amazing stuff. How much time you spend on it?
It’s been on and off since November 2007; some weeks I’m really busy and some weeks I don’t touch the computer at all. On average I’d guess I spend about 10 hours a week on it, which is a few weeknights and a Saturday afternoon.
I’d never gasped out loud until I saw that.
Very impressive…
Amazing! Congratulations. I bow down. I loved the 6502 for the same reason you did.
[…] Project Page // Share this: […]
neat work, congrats!!
Incredible. This proves that computers arent magic mystery boxes and humans still know how they work 🙂
Amazing stuff. Well done. Someone submit this to slashdot.
This is great stuff, also makes you wonder just how impossibly complex modern computers are…
could you post more/larger photo’s of it please? especially of the above image “gallery10.jpg”, that would make a nice wallpaper 😀
Very nicely done. I’m an old school 6502 poker as well.
I love you.
Very impressive! I admire your dedication and originality.
thx for the ‘cant-believe-what-i-see-situation’
🙂
inspiring work!
i.r.
[…] Big Mess o’ Wires » BMOW 1 A custom CPU constructed from dozens of simple logic chips. Around this foundation is built a full computer with support for a keyboard, sound, video, and external peripherals. (tags: diy hardware electronics) […]
dude, this happens to be my -ultimate- goal with computer science. You are seriously right up there with a figurative god.
Could you estimate how many transistors you used to compare em with intel cpu’s millions and billions?
Well done anyway!
[…] mis felicitaciones por gran trabajo, pueden encontrar mas informacion sobre como esta creado en su pagina web. .gallery { margin: auto; } .gallery-item { float: left; margin-top: 10px; text-align: center; […]
great job!, impressive!
[…] has been going around the blogosphere for a few days now, but I just have to say – the Big Mess o’Wires is one of the coolest hardware projects I’ve seen in a long […]
[…] Big Mess o’ Wires – the home-made computer Wanna build your own computer (in you garage)? Maybe you can learn something from this guy: http://www.bigmessowires.com. He made an amazing work with his BMOW 1 (Big Mess o’ Wires). […]
[…] P.S. Подробности можно почитать здесь и здесь. […]
Steve…
Cool! Nice work. I wanted to design a CPU, having worked in circuit design with MSI logic & PALs back in the ’80’s. Do I presume correctly that 3-state data allows for multiplexing (selection of registers)?
Yes about the tri-state logic. When one register’s output is disabled, it goes into a high-impedance state, allowing something else to drive the bus without creating contention.
I am amazed.. Awesome work indeed. How to learn microelectronics and implementing logic on circuits?
[…] und jeder Menge Logikschaltkreisen sich seine eigene CPU mit Rechner dran zu basteln. Quelle bigmessowires.com Erinnert mich irgendwie an meine Anfänge mit Rechnern – der Z1013 war auch nur eine separate […]
[…] simplement par défi, voire par curiosité, il a décidé de pondre son propre microprocesseur, le BMOW, soit le Big Mess O’ Wires. Je suis stupéfait d’apprendre cette nouvelle, […]
[…] Dieser Computer ist handgefertigt. Er besteht nur aus simplen Logic Chips und Kabeln. Passend ist der Name desselben: Big Mess of Wires (BMOW). […]
No wonder there’s a copper shortage! Amazing — that it actually works!
hi man,this is awesome…digital logic makes cpu…so cool!
WoahAaa! dude u r awesome.
One question, how did u manage to minimize the electrical interference with so many wires running side by side?
Hi Steve!
I love your system! It’s very cool, come on!
Regarding the electrical interference with many wires: it is a problem, but not a fatal one. I tried to avoid running many wires parallel to each other, preferring to run them at an angle, to minimize the crosstalk. The system speed is also pretty slow (2 MHz), which means transient noise has more time to settle out before the next clock edge. The CPU still does crash occasionally, though, which I’m guessing it a noise problem.
I would love to build a “Big Mess O’ Wires” would you consider making a guide book to building one?
[…] CPU是沙子做的,经过艰难的提纯到单晶硅锭,然后再Balabala… …到一块CPU的诞生,绝对是一件高科技的事情,印象里这事没个上亿美元的投入断然是做不得的(参考咱们龙芯的投入)。我曾问过INTEL关于这方面的事,但是人家严肃的告诉我:“这是国家机密,再问拘捕你”,吓。危急时刻,美国加州S哥(Steve Chamberlin)挺身而出,他无论在什么地方,都像漆黑中的萤火虫一样,那样的鲜明,那样的出众。S哥耗时18个月,硬是用钳子和榔头土法炼钢般造出了一坨8位的CPU:BMOW(Big Mess of Wires),共耗资3000多美元,使用了1253条电线,同时放开了所有跟此项目相关的设计,配套操作系统及理念。 […]
So, does this mean you could hand 1250 or so people each a length of wire with bare ends, and with a handful of chips and a football field this could be built on a Human scale? I sense a Guiness event forming…
You’re crazy, in a very smart sort of way :-D. Wow! Good job 🙂
[…] https://www.bigmessowires.com/bmow1/ a few seconds ago from xmpp in context […]
*JAWDROP*
The name “Big Mess Of Wires” absolutely fits; I’m stunned by just looking at it! Keep up the work at your future projects! 🙂
NrDesign