

Archive for the 'ROM-inator' Category
The End of the ROM-inator
All good things must come to an end, and today it’s the end of the Macintosh ROM-inator II SIMM and SIMM programmer. The DIY ROM-inator I kit was discontinued a year ago, and now the ROM-inator II is also being retired. I hate to see it go, but as I’d cautioned more than year ago, this was inevitable.
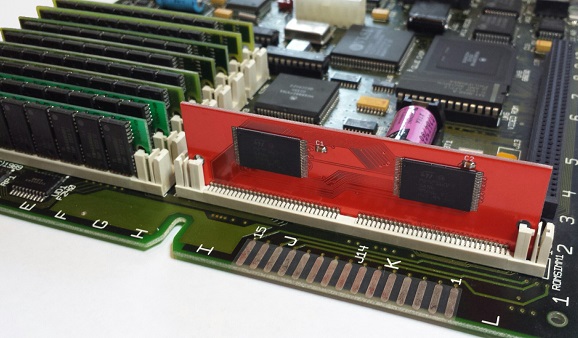
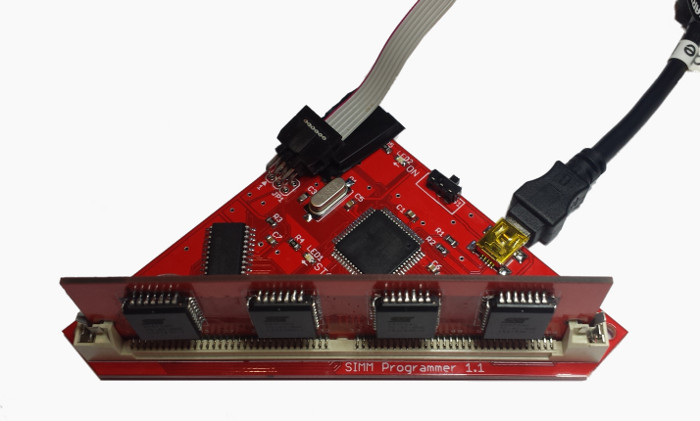
The ROM-inator II SIMMs (both standard and MEGA sizes) use a set of 16 megabit 5 volt flash memory chips to interface directly with the Macintosh bus. There was only one manufacturer still making this chip, and they moved it to “end of life” status in March 2018. Supplies dwindled, prices went up, and now they’re all gone. The 64-pin SIMM socket needed for the SIMM programmer became similarly hard to get, with only one known remaining supplier with a finite number of new-old-stock parts.
Both technical challenges might be solvable, with enough effort. Perhaps level converters with 3.3 volt flash memory could be integrated on the SIMM. The top edge of the SIMM might be redesigned with a different edge connector to fit a programmer socket that’s still commercially available. But candidly, the ROM-inator was always a somewhat poor value proposition for me, requiring more effort to maintain and support than was reasonable given its sales. I’m not interested in a big new engineering effort to redesign the hardware now.
There are also some issues on the software side that would need attention, if the ROM-inator II were to continue. There’s an unknown bug involving the SIMM programmer’s bootloader, which often causes the programmer to fail to be detected by the software. On MacOS Sierra and later, the software requires an awkward series of quitting and restarting before it will successfully connect. The driver and software application also need to be digitally signed, to shut up the warnings from the latest versions of Windows 10 and MacOS.
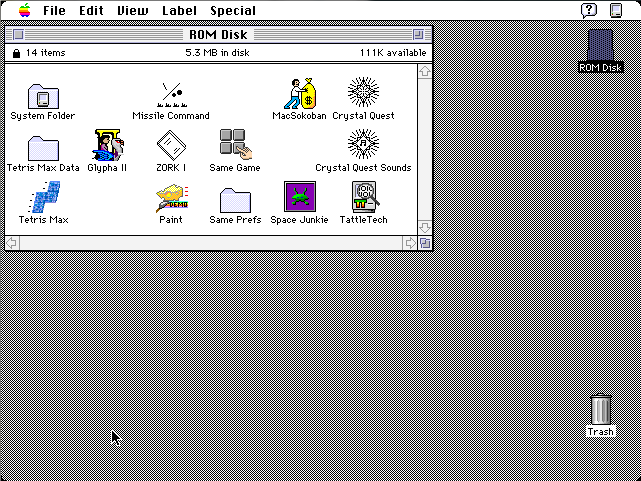
Smaller capacity 5V flash memory chips remain available, and I could conceivably design a “ROM-inator II Mini” with 512KB or 1MB of total storage. That would be enough for a modified system ROM with the new startup sound, new icons, HD20 support, and 32-bit clean ROM. But it would leave no space available for a ROM disk, and no way for users to reprogram the SIMM. And there’s already somebody on eBay who’s selling almost exactly that.
Thanks, ROM-inator. It’s been a fun ride!
Read 11 comments and join the conversationMac ROM-inator II Sale!
Want to add new features to your old Mac? The Mac ROM-inator II hardware for vintage Macintosh is on sale at a special price for a limited time. The ROM-inator II SIMM replaces the stock Macintosh IIx, IIcx, IIci, IIfx, IIsi, or SE/30 ROM with a programmable flash memory module. Add a bootable ROM disk, change the startup chime, hack the icons, gain HD20 support and get a 32-bit clean ROM. For the ultimate in customization, you can also use the optional ROM SIMM Programmer to reprogram ROM-inator II with your own custom content. It’s a great way to breathe new life into your old II-series Mac or SE/30.
- 8 MB Mac ROM-inator II MEGA, $59 SALE! $49
- ROM SIMM Programmer, $59 SALE! $49
- 4 MB Mac ROM-inator II Standard, $36
Boasting 2x the storage capacity of the original ROM-inator II, the 8 MB ROM-inator II MEGA is on sale for $49, which is $10 off the regular price of $59. The MEGA’s default ROM disk image has been expanded with a nice collection of classic utilities and games, including ResEdit and some SCSI tools, which should be useful for anyone configuring a new hard disk. The ROM SIMM Programmer is also on sale for $49, $10 off the regular price of $59. Combining the ROM SIMM Programmer and the MEGA, you’ll have the maximum possible flash ROM space for your custom content. The 4 MB ROM-inator II “standard edition” is also available for $36.
Mac ROM-inator Kit Back in Stock
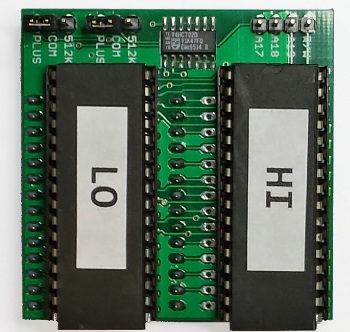
After a long absence, the Mac ROM-inator Kit is back in stock at the BMOW store. The ROM-inator replaces the stock 64K or 128K of ROM in a compact Macintosh with a full 1 MB of flash memory. Once installed, the flash ROM’s contents can be updated from within the running Macintosh, allowing for a bootable ROM disk and crazy customization possibilities. It’s compatible with the Macintosh Plus, 512Ke, 512K, and 128K.
The kit includes preprogrammed flash chips with the following ROM changes as defaults. Any of them can be changed by updating the flash memory with a simple GUI tool.
- Startup beep is replaced by a glass “ping”
- Happy Mac icon is replaced by a Mac wearing sunglasses
- Pirate icon is displayed while waiting to load the ROM disk
- ROM disk image including System 6, utilities, and games
- 128K ROM code turns a Mac 128K or 512K into a 128Ke or 512Ke
Get Them While They Last
This will most likely be the final batch of Mac ROM-inator Kits, so if you’ve been wanting one, get it now! The ROM-inator is nice bit of technology, but when I put on my businessman hat I must admit it hasn’t been a great product. Stuffing the kits and pre-programming the ROMs is very time-intensive, and isn’t something I wish to continue doing. Instead, I’ve documented a “Make Your Own Kit” parts list and instructions for DIY builders. But for those who prefer a pre-packed kit, you can still get it while supplies last.
Read 3 comments and join the conversationMEGA, and the Future of ROM-inator II
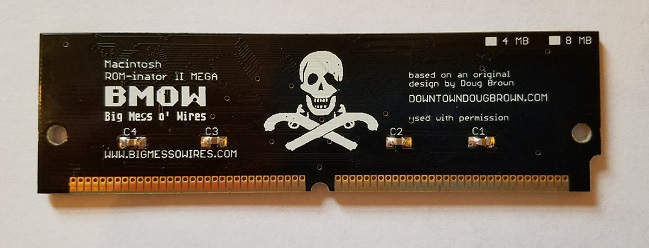
It’s my pleasure to introduce the Mac ROM-inator II MEGA, with 2x the storage capacity of the original ROM-inator II SIMM. Like the standard ROM-inator II, the MEGA replaces the stock Macintosh II series or SE/30 ROM with a programmable flash memory module. Once installed, the flash ROM takes over the Macintosh, allowing for a bootable ROM disk, new startup sound, new icons, HD20 support, 32-bit clean ROM, and other crazy customization possibilities.
I’m assembling the MEGA SIMMs as needed, so the order processing time will be longer than for other BMOW products. The standard ROM-inator II SIMM will remain available, and is probably still the best choice for most users. But for those looking for the largest possible ROM that the Macintosh II series machines can support, the MEGA is a great option.
The default ROM disk image has been expanded for the MEGA. Thanks to the FC8 on-the-fly decompression that I implemented last year, the 8MB of flash on the MEGA is enough to store the 512KB system ROM and a 12MB disk image full of classic utilities and games. The utility programs include ResEdit and some SCSI tools, which should be useful for anyone configuring a new hard disk. Both the MEGA and the original ROM-inator II SIMMs can be reprogrammed with the optional ROM SIMM programmer.
The Future of ROM-inator II
Both styles of ROM-inator II SIMM use a set of 16 megabit 5V flash memory chips to interface directly with the Macintosh bus. There’s only one manufacturer that still makes this chip, and they recently moved it to “end of life” status, with an official retirement date of March 2018. The chips are still available for now, but already the supplies are dwindling, and the price is going up. This isn’t good news for the long-term viability of the ROM-inator II products.
I may place one final order for a large number of chips before March 2018, but after that I don’t see a clear path forward. Using 3.3V flash memory would require level converters for 60-something memory bus signals, with 32 of those requiring bidirectional level conversion. That would be expensive, and difficult to physically fit and route on a 3 inch SIMM.
Smaller capacity 5V flash memory chips remain available, and I could conceivably design a ROM-inator II Mini with 512KB or 1MB of total storage. That would be enough for a modified system ROM with the new startup sound, new icons, HD20 support, and 32-bit clean ROM. But it would leave little or no space available for a ROM disk.
We’ll see what 2018 brings. Until then, enjoy the ROM-inator II hardware while it lasts!
Read 4 comments and join the conversationROM Disk Creation with ROM-inator II

Good news, ROM-heads! The software needed for ROM-inator II programming is now available for Mac OSX as well as Windows, and I’m marking the occasion with this step-by-step guide for creating your own bootable ROM disk. Here’s what you’ll need in order to get started:
Hardware
- ROM-inator II Basic, Atom, or Mega programmable ROM SIMM
- USB connected ROM SIMM Programmer
- A modern computer running Windows 7 or later, or Mac OSX
Software and Files
You can find the latest versions of all of these in the Downloads section of the ROM-inator II project page.
- ROM SIMM Programmer utility software
- FC8 compression command-line software
- ROM-inator II 512K base ROM file
Disk Image File
Lastly, you’ll also need a disk image file that defines the contents of your ROM disk. If you’ve previously used a Floppy Emu disk emulator or a Macintosh software emulator like Mini vMac, you’ve doubtless seen these kinds of disk image files before. For ROM-inator II, the disk image file should be in “raw” format, meaning it contains only the actual contents of the Macintosh disk with no extra headers or checksums. Files in this format typically have a .dsk suffix for their filename. If in doubt, confirm that the first two bytes of the file are 4C 4B (hex). You’ll find an example disk image at the ROM-inator II project page.
Prepare the Disk Image
When using compression, the ROM-inator II Atom SIMM can store a disk image as large as about 2.2 MB (or 5.5 MB for ROM-inator II Basic, 12 MB for Mega). The exact limit depends on the contents of the disk image and its compressibility. You can use your own pre-existing disk image, or start with these empty 2.25 MB or empty 5.5 MB or empty 12 MB disk images. If you’re using your own disk image, its size must be a multiple of 65536 bytes (64 KB).
I recommend Mini vMac for editing the contents of the disk image. It’s a cross-platform tool that emulates a Macintosh Plus, and you can quickly mount disk images by dragging them into the Mini vMac window. Once you’ve mounted a few different disk images, you can copy programs and data between images to configure your ROM disk image however you’d like it. If you’re unfamiliar with this process, check out this disk image setup tutorial for the original ROM-inator.
On Windows, another alternative is HFV Explorer to transfer data directly to/from the disk image, without a Mac emulation intermediary.
Don’t forget to include a System folder in your disk image! The Macintosh will need an operating system in order to boot. You can find installers for Systems 6 and 7 at Macintosh Garden – as well as all sorts of other vintage Mac software.
Compress the Disk Image

Next, you’ll compress the disk image file so that it fits in the space available in ROM. The compression format is FC8, a custom format that I designed specifically for this purpose. The FC8 compressor is a command line program, so you’ll need to run it from a command prompt (Windows) or terminal (Mac). The ROM-inator II disk driver uses FC8’s block compression format, with 65536 byte blocks. To compress the disk image, type this at the command line:
fc8.exe -b:65536 mydisk.dsk mydisk.fc8
This will compress the disk image file mydisk.dsk, and create the compressed file mydisk.fc8. If the fc8 program or the disk images aren’t in the current directory, you’ll need to specify the path to those files on the command line.
Check the size of the resulting mydisk.fc8 file. For the ROM-inator II Atom, the compressed file must be no larger than 1.5 MB (1572864 bytes). For ROM-inator II Basic, the compressed file must be no larger than 3.5 MB (3670016 bytes). For the ROM-inator II MEGA, the compressed file must be no larger than 7.5 MB (7864320 bytes). If it’s too big, remove some files from your disk image and try again.
Note that simply deleting a file from the disk image may not help, because “deleting” normally just marks sectors as unused but doesn’t actually set their contents to zero. To truly delete the file and gain better compression density, you may need to create a new disk image from scratch and then copy all the files from the old disk image. It’s a minor hassle, but worth it for the improved compression density. Typical disk images will compresses to 60-70 percent of their original size, when using FC8 65536 byte blocks.
Create the ROM Contents File
You’ll need to concatenate the 512K base ROM file and the compressed disk image file, in order to create the final ROM contents file. The base ROM file contains the low-level code needed to operate your Macintosh, including the ROM disk driver that performs on-the-fly decompression of your disk image’s data. At the time of writing this file is named iisi+romdrv1.2.rom, but check the project page to get the latest version. The concatenation is performed on the command line, using the built-in programs copy (Windows) or cat (Mac OSX and Linux):
copy /b iisi+romdrv1.2.rom + mydisk.fc8 myrom.rom (Windows)
cat iisi+romdrv1.2.rom mydisk.fc8 > myrom.rom (Mac OSX and Linux)
This will concatenate the files iisi+romdrv1.2.rom and mydisk.fc8, and create the combined file myrom.rom. If the files aren’t in the current directory, you’ll need to specify the path to those files on the command line.
The resulting myrom.rom file should be 2 MB (2097152 bytes) or less for the ROM-inator II Atom, 4 MB (4194304 bytes) for the Basic, or 8 MB (8388608 bytes) for the Mega, in order to fit the space available in ROM SIMM.
Program the SIMM

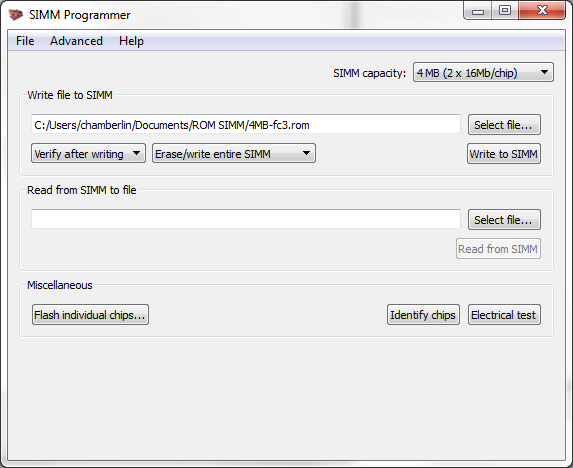
The final step is to program the ROM-inator II SIMM with your new ROM contents file. Connect your ROM SIMM Programmer to your PC or Mac’s USB port. Turn the programmer’s power switch to OFF, insert the ROM SIMM in the socket, then turn the switch to ON. Open the ROM SIMM programmer utility software.
From the software’s GUI, select myrom.rom as the file to write. Programming speed will be fastest when “verify after writing” is selected as the verification option. Ensure the SIMM capacity is set correctly (2 MB for the ROM-inator II Atom, 4 MB for the Basic, 8 MB for the Mega), then press the Write to SIMM button.
After programming is complete, turn the programmer’s power switch to OFF, and then remove the ROM SIMM from the socket. Have fun with your new ROM disk!
Read 7 comments and join the conversationROM Hacking Tutorial with ROM-inator II
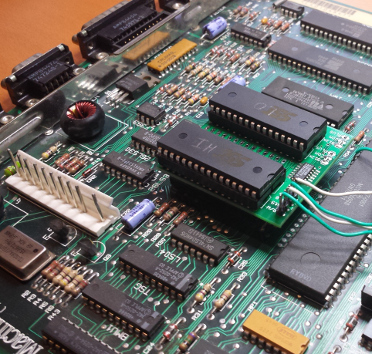
The ROM-inator II replacement flash ROM for the Mac II series and SE/30 comes pre-programmed with nifty new features for your vintage Macintosh. With the optional ROM SIMM Programmer, you can edit the ROM’s contents, altering the ROM disk or writing a different stock ROM image. But why stop there? For the truly adventurous, this tutorial will demonstrate how to patch the ROM code to alter the machine’s low-level behaviors. This is an advanced tutorial for major gear-heads, so hang on to your hat!
We’ll begin with the Macintosh IIsi ROM. It’s a universal ROM, meaning that even though it was designed for the IIsi, it also works in many other Mac models. The original IIsi ROM is just a 512K chunk of raw data, which you can find here. The ROM-inator II’s contents are also based on the IIsi ROM, with many modifications and additions. The latest ROM-inator II contents are available on the product’s web page, and at the time of writing it’s this file. Only the first 512K of the file is ROM code, and the rest is data for the ROM disk.
Hex Editor
To modify or patch the file, we’ll need a tool called a hex editor. I’ll be using a Windows hex editor called xvi32, but there are many other options for Windows, Mac, and Linux. Check out Synalyze It and Hex Fiend for some other examples. If we open the ROM-inator II file in xvi32, we’ll see this:
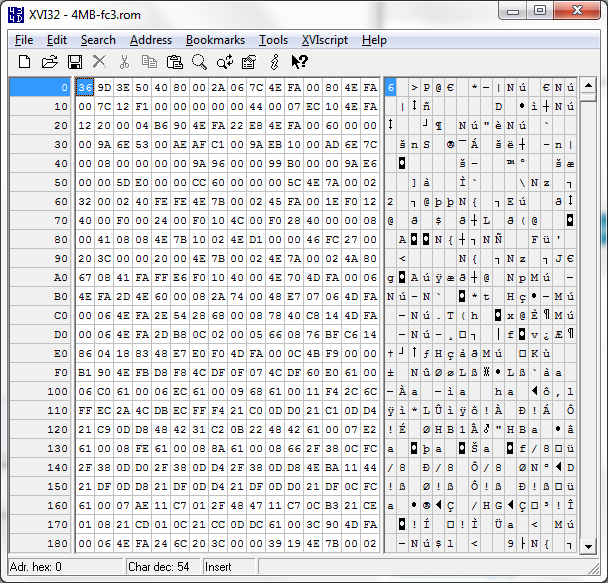
What’s all this? Running down the left side are the file offsets in hex. These are the same as the addresses within the ROM code. In the center panel, we see the actual bytes from the file, displayed in hex, 16 bytes per line. In the right panel we see those same 16 bytes again, but displayed as printable characters instead of as hex values. That’s not especially useful in this example, but it’s handy when examining ROM code that contains embedded string constants.
In the example above, the value at offset 32 is 6E, which is equivalent to the ASCII character ‘n’.
Disassembler
To do anything useful with this, we’ll need to understand how these bytes are structured and what they mean, so that we’ll have some idea how to modify them. In this case, we know that the bytes are 68000 machine code, so we can feed them through a 68000 disassembler to create a more human-readable version. As with the hex editor, there are many options for 68K disassemblers, including this slick web-based disassembler. Using the web disassembler to examine the first few bytes of the file, we’ll get output like this:
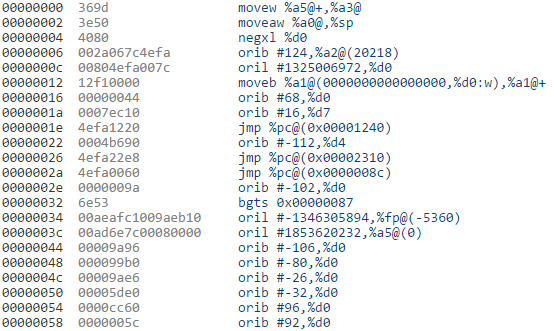
Once again, the left column shows the file offsets (ROM addresses), and the center column displays the actual bytes in hex. The column on the right displays those same bytes reinterpreted as 68000 machine code. The number of bytes per row is no longer fixed at 16, but instead varies with the size of the encoded 68000 instructions. Notice that the code is displayed using syntax normally employed for x86 disassembly, so it looks a bit odd for those people accustomed to 68K syntax. But even if we ignore the syntax, something about this code just looks wrong. It begins with a couple of strange move instructions, a negation, and OR-ing random-seeming registers with strange constants. It just looks wrong, and that’s because it is wrong. One of the limitations of disassemblers is that they struggle to distinguish code from data, and in this example the bytes beginning at address zero are mostly data. By attempting to interpret them as 68K code, we get garbage.
By employing some knowledge about the 68K CPU, we can make better sense of this. At reset time, the 68K initializes its stack pointer from address 0, and its program counter from address 4, then it begins executing code. So the first instruction to be executed will be the one whose address appears at offset 4 in ROM, which we can see from the hex dump is 4080002A hex. That may seem like a strange address, since it’s a 32-bit address far outside the range of the 512K ROM code. Once again, we need to employ some knowledge of Macintosh internals to know that the ROM is initially mapped into the CPU’s address space at 40800000. So 4080002A simply means offset 2A in the ROM. As it turns out, the instruction at 2A was disassembled correctly in the listing above, and it’s just a PC-relative jump to address 8C. If we try the disassembler again, this time feeding in the bytes beginning at 8C and adjusting the base address accordingly in the disassembler settings, we get something that looks more reasonable:

It begins by loading a value into the status register, which the 68000 manual tells us will disable interrupts. It then loads a value into D0 and stores it into the cache control register. More processor initialization follows. Whew! We can make sense of this, but it’s slow and tedious work.
A Mac-Specific Disassembler
For this work, a better disassembler is FDisasm, a 68K disassmbler with some Mac-specific intelligence. FDisasm is itself a vintage Macintosh program running under System 6 or 7, rather than a modern Windows or OSX application, so it’s normally run under emulation with the cross-platform Mini vMac emulator. In addition to simply disassembling the 68K code, FDisasm also replaces address and data constant values with their symbolic names, where those names are known from Apple reference sources or previous disassembly work. It even inserts some helpful comments into the disassembled code. To do all this, FDisasm needs to have formatting information with advance knowledge of the Mac ROM being disassembled. Unfortunately, the IIsi isn’t one of the ROMs for which FDisasm contains pre-supplied formatting information. But happily for us, Rob Braun has already done some work in this area, and created partial formatting information for FDisasm with the IIsi ROM. Using that formatting information, FDisasm generates this disassembly beginning at address 8C:
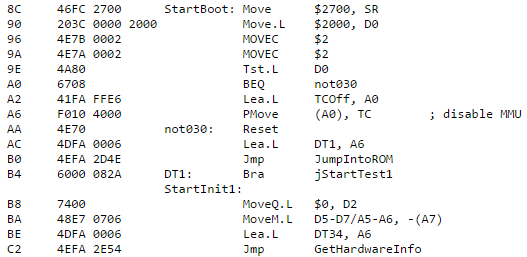
That looks much better! We see that address 8C has the label StartBoot, and other addresses and constants also now have meaningful names. It looks like the MOVEC instruction was disassembled incorrectly (a FDisasm bug?), but that’s a small matter. With disassembly at this level, we can finally begin to search for interesting sections of code to study, and eventually to modify.
Double Chime
As an example, we’ll walk through the construction of a ROM patch to make the Mac play the startup chime twice. Maybe it’s such a great chime that it deserves to be played twice? Poking through the disassembly, we eventually find some relevant code at address 45C0A:

While it’s not obvious, I can tell you from super-secret sleuthing that this code is called from a computed jump instruction at 4651A:

This code requires some explanation. At the point the boot chime is played, the Mac’s RAM hasn’t yet been configured, and there is no stack. That means the code can’t use the normal JSR/RTS mechanism to call and return from subroutines. If we examine the code at OrigBootBeep6, we’ll learn that it uses the A6 register as a return address, once it’s done playing the chime. So the line above that loads DT140 into A6 is setting the return address, which happens to be the address of the instruction immediately following the jump. To play two chimes, we’ll need to duplicate this block of code two times.
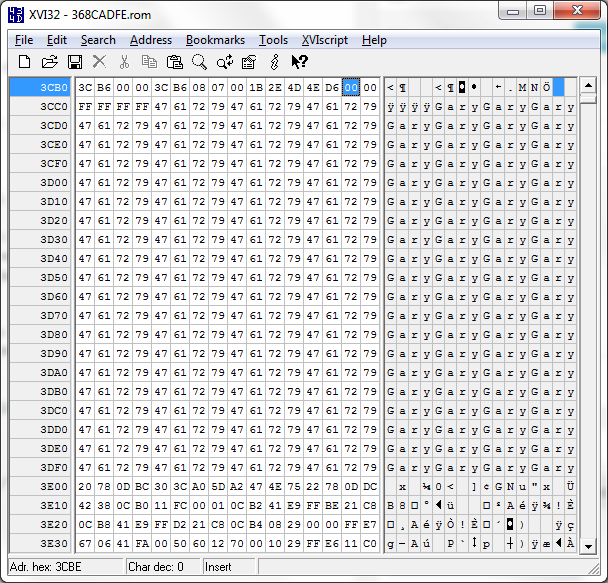
Patching code becomes problematic when the new code requires more bytes than the old code. The code contains many address cross-references, so we can’t simply shift the bytes down to make room for new code, the way we’d insert an extra word into a sentence in a text editor. Instead we need to find some unused area of the ROM, put the new, larger code into that area, and then modify the original code to jump to the new code. Finding a suitable unused area is as much art as science, but while skimming through the ROM disassembly, this jumps out at address 3CBE:
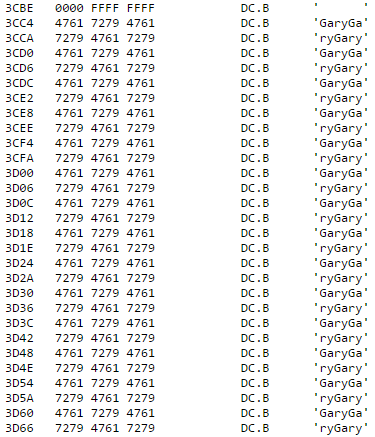
I’m going to hazard a guess that somebody named “Gary” worked on the IIsi ROM.
Gary appears to have filled up padding space with many copies of his name, which we can replace with new code. If we’re wrong and all those “Gary” bytes are actually necessary, the computer will crash horribly. Such is the excitement of ROM hacking. We want to insert some new code that plays the chime twice, then jumps back to the instruction just after the old code. Using the original code as a template, our new code should look something like this:
        MoveQ.L   $28, D0
        Lea.L     NEXT1, A6
HERE1:  Lea.L     ($XXXX), A0
        Jmp       HERE1(A0.L)
NEXT1:  MoveQ.L   $28, D0
        Lea.L     NEXT2, A6
HERE2:  Lea.L     ($YYYY), A0
        Jmp       HERE2(A0.L)
NEXT2:  Lea.L     ($ZZZZ), A0
        Jmp       NEXT2(A0.L)
where $XXXX and $YYYY are the offsets from HERE1 and HERE2 to OrigBootBeep6, and $ZZZZ is the offset from NEXT2 to DT140, the continuation point of the original code. We can compute those offsets by doing some hexadecimal math, subtracting the addresses where those instructions lie in the “Gary” area from the addresses we need to jump to. We’ll use the hex editor to do the actual patching work. Using xvi32 to view Gary’s ROM padding beginning at address 3CBE:
We can type directly into the center area of byte values to modify them. But what bytes should we type, to implement the new code that we want? Converting from assembly code to byte values is the job of an assembler, so we could use a 68K assembler like EASy68K to do the work. But in this case, almost all of the instructions already exist in the original code, so we can simply copy the assembled byte values from there, modifying the bytes that represent addresses as needed. For example, we can see from the original code that MoveQ.L $28, D0 assembles as the two bytes 70 28. Beginning with the first “Gary” at 3CC4, we’ll crib bytes from the original code, not yet worrying about the address offsets. The result looks like this:
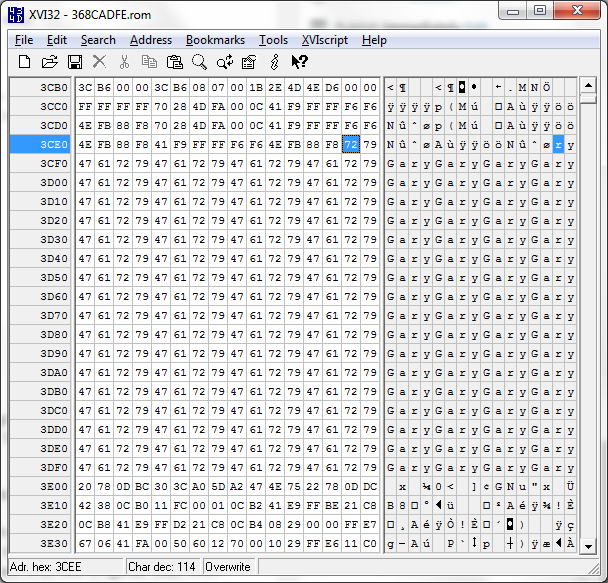
The offsets require more careful study. First, we consider the instructions like Lea.L NEXT1, A6. While this looks like an absolute address, it’s actually a PC-relative address. Another FDisasm bug? An alternative 68K disassembler represents these same instructions as LEA ($C, PC), A6. This loads A6 with the address 10 bytes ($C hex) beyond the current program counter value. 10 is still the correct adjustment in our new code, so that doesn’t need to change. Next we consider the computed jump instructions like JMP HERE1(A0.L). While this looks like an absolute offset, it’s actually a PC-relative offset that the alternative disassembler shows as JMP (-$8, PC, A0.L). Once again, -$8 is also the correct adjustment in our new code, so that doesn’t need to change either.
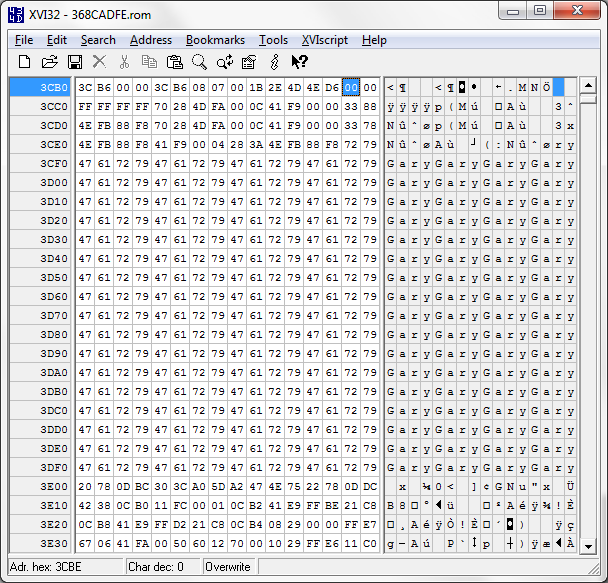
The XXXX, YYYY, and ZZZZ offsets are the only values that need to change. In the original code, the instruction was:
46514 41F9 FFFF F6F6 DT139: LEA.L (-$90A), A0
46514 was the address, 41F9 was the instruction opcode, and FFFFF6F6 was the (negative) offset. So we need to find the three instances of the bytes FFFFF6F6 in the new code, and modify them to the correct offsets for OrigBootBeep6 (twice, from HERE1 and HERE2) and DT140. After applying some math, these offsets turn out to be 00003388, 00003378, and 0004283A, respectively.
Finally, we need to patch the original code, so that it jumps to the new code. To do this, we’ll perform a similar hex calculation to subtract the original code’s address from the “Gary” address at 3CC4. We only need to modify the offset in the instruction at address 46514 to point to our new code instead of directly to OrigBootBeep6. This is a little bit sloppy, as D0 and A6 will end up getting set redundantly, but it’s simpler than modifying that whole block of code at 4650E.
Beep! Beep!
That’s it! The modified ROM file is here.
This should give you a sense of the kinds of ROM modifications that are possible with the ROM-inator II and the ROM SIMM programmer. Patching the ROM can be challenging work, but with a little imagination and patience almost anything is possible.
Read 10 comments and join the conversation