

68 Katy – 68000 Linux on a Solderless Breadboard
What does it take to build a little 68000-based protoboard computer, and get it running Linux? In my case, about three weeks of spare time, plenty of coffee, and a strong dose of stubborness. After banging my head against the wall with problems ranging from the inductance of pushbutton switches to memory leaks in the C standard library, it finally works! I’ve built several other DIY computer systems before, but never took their software beyond simple assembly language programs. Having a full-fledged multitasking OS running on this ugly pile of chips and wires is a thrill, and opens up all kinds of interesting new possibilities. I’ve named this plucky little machine 68 Katy.
Hardware
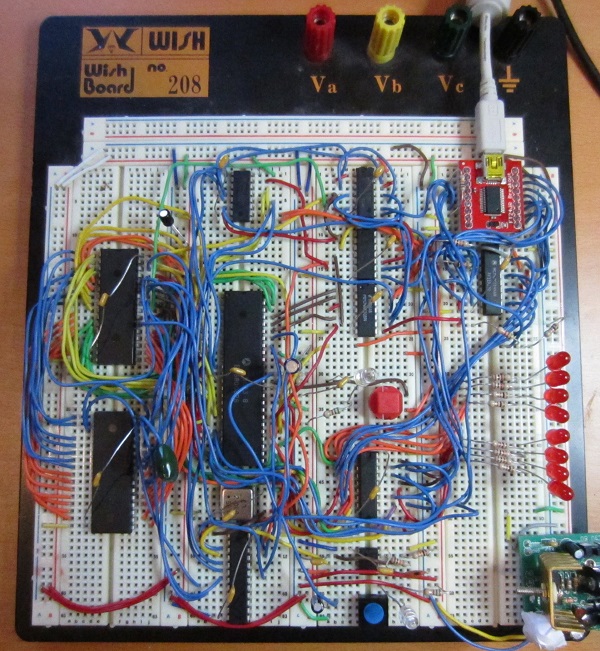
Here’s a look at the final version of the hardware. It took about a week to assemble and wire up all the parts on a solderless breadboard. The heart of the system is a Motorola 68008 CPU, a low-cost variant of the more common 68000, with fewer address pins and an 8-bit data bus. The CPU has 20 address pins, allowing for 1 MB of total address space. It’s paired with a 512K 8-bit SRAM, and a 512K Flash ROM (of which 480K is addressable – the remaining 32K is memory-mapped I/O devices).
The standard 68000 CPU has a 16-bit data bus, so it normally requires at least two 8-bit RAM chips and two 8-bit ROM chips. The 68008 requires fewer memory chips thanks to its 8-bit data bus, but the trade-off is that memory bandwidth is only half that of the 68000. Neither chip has any on-board cache, so half the memory bandwidth leads to roughly half the performance. My 68008 runs at 2 MHz (it was unstable when tested at 4 MHz), providing similar performance to a 1 MHz 68000. That’s pretty slow, even in comparison to 68000 systems from the early 1980’s, which were typically 8 MHz or faster.
An FT245 USB-to-FIFO module provides a communication link to another computer. On the external PC, it appears as a virtual serial port. Windows Hyperterm or another similar terminal program can be used to communicate with it, like an old VT100 terminal. On the 68 Katy side, the FT245 appears as a byte-wide I/O register mapped into the CPU’s address space. Reading from its address fetches the next incoming byte from the PC, and writing to the address sends a byte out to the PC. The FT245 has an internal 256-byte buffer, which helps smooth out the communication. When there’s an incoming byte waiting in the buffer, it triggers a CPU interrupt.
A 555 timer provides the only other interrupt source, generating a regular series of CPU interrupts at roughly 100 Hz. The initial version of the hardware had no timer interrupt, but I later discovered it was essential in order to get Linux working correctly.
The protoboard has eight LEDs for debugging, which are driven from a memory-mapped 74LS377 register. The rest of the protoboard is filled with assorted 7400 series parts and one PAL, which are used for address decoding, interrupt arbitration, and other basic glue logic.
Schematics? Forget it. Everything was built incrementally, one wire at a time, while staring at chip datasheets. It’s an organic creation.
Software
Once the hardware build was done, I began writing some simple test programs in 68K assembly language. Wichit Sirichote’s zBug monitor provided a good starting point for my own ROM-based monitor/bootloader. Using the monitor program, I was able to load other programs in binary or Motorola S-record format over the FT245 link, store them in RAM, and execute them. I was even able to get Lee Davison’s ehBASIC for 68000 working, which provided a few hours of fun.
One feature I could have added to the monitor program, but didn’t, was the ability to reprogram the Flash ROM. The ROM chip has a read/write input pin just like an SRAM, but writing to the Flash ROM is more complicated. The CPU needs to first write a magic sequence of bytes in order to unlock the ROM. Then it needs to write more magic bytes to tell the ROM which blocks to erase, followed by the new bytes to be written. Finally, it must poll the output of the ROM to learn when the erase and reprogram sequence is complete.
The monitor program could have updated itself, or any other data stored in ROM, by copying itself to RAM, then running from RAM while saving new data to Flash ROM. But I was lazy and never implemented that feature, so I had to physically pull the ROM chip from the protoboard and place it in an external EPROM programmer whenever I made a change – about 100 times over the course of the project. Ugh.
Linux
Inspired by a similar project, I decided that a simple monitor program and BASIC weren’t interesting enough, and I needed to run Linux on this hardware. It sounded interesting and exciting, but I really had no idea where to begin. I had plenty of experience as a Linux user (as well as other UNIX versions), but I knew nothing about how the kernel worked, or how to build it from source code, or to port it to new hardware. So the real adventure began there.
The first challenge was to learn how to build a Linux image for an existing machine. It seemed simple enough in theory – just download the source code from kernel.org or some other distribution tree, and compile it. Reality was more complicated, and there were many details that confused me, and build problems I was powerless to solve. It wasn’t easy, and I discussed the process in much more detail in this earlier post.
I chose to use uClinux, a Linux distribution designed for microcontrollers and other low-end hardware, particularly CPUs without an MMU and that can’t support virtual memory. Then I chose a very old version of uClinux, based on kernel 2.0.39, that dates all the way back to 2001! I configured it to disable nearly every single optional feature, including all networking support. This ancient code was my best hope for getting a Linux that would actually run in 512K of ROM and 512K of RAM.
Starting with the uClinux configuration for another 68000-based system, I updated the code to reflect the 68 Katy memory map, changed the system initialization code, and added a driver for the FT245. Describing those steps makes them sound simple, and they might have been for someone more experienced with Linux, but for me it was a challenge just to identify which files and functions needed to modified. Google wasn’t very helpful, since I was working with such an old version of the kernel, and the resources I found on building/porting Linux mostly weren’t applicable. I primarily relied on the Linux grep command to search through the thousands of kernel source files for strings of interest, then stared at the code until I could understand how it worked.
After about a week, I had something I was ready to test. And it worked, at least a little bit! It showed the first few lines of kernel output, but hung at “calibrating delay loop”. Aha, I needed a timer interrupt. Of course! I added a 555 timer and some extra interrupt logic, and was ready to try again.
The second attempt got further into the boot process, but failed to mount the memory-resident root filesystem. I was stumped for a while. After looking more carefully, I discovered that my linker script was mapping the root filesystem and BSS to the same address in RAM, and the earily initialization code was overwriting the filesystem with zeroes. And more fundamentally, I discovered that it wasn’t possible to fit all of Linux in 512K RAM, including the kernel code, static data, root filesystem, and dynamically allocated memory. Something had to be moved to ROM, or it was never going to work.
In the third attempt, I moved the root filesystem image to ROM, freeing up about 150K of RAM. And this kind of, almost worked! It booted, mounted the filesystem, and seemed to be working OK, but then suddenly it would land back at the monitor program prompt. Huh? I eventually tracked this one to the FT245 driver I’d written. I only implemented the minimal set of required driver functions, and the other optional functions were NULL entries in a function table somewhere. One of the functions I thought was optional proved to be required. When the kernel called it, it used a NULL function pointer, causing a jump to address 0, restarting my monitor program.
The fourth attempt was better. It spawned the init process, and ran the startup script, but died with out-of-memory errors before it completed. At the time, 68 Katy’s memory map was 256K ROM, 256K I/O devices, and 512K RAM. By shrinking the I/O space to 32K, I was able to increase the usable ROM to 480K, providing enough space to store the root filesystem image and the kernel code itself! This freed up another 251K of RAM.
The fifth attempt actually booted to a shell prompt! Now it was executing the kernel code directly from ROM. I was able to run a few commands, like ls and cat, but then the system would run out of memory and die. As I investigated, it looked like memory allocated from malloc() and do_mmap() was never beeing freed. Was this some kind of free list allocator I didn’t understand? No. It turns out I’d made a typo in a function called is_in_rom(), adding too many zeroes, causing the memory allocator to think all addresses were in ROM and so didn’t need to be freed. Then after fixing that, I discovered a small memory leak in the C library setenv() function. I never did solve that one, but instead just modified the programs that used it to avoid calling it.
My debugging method was primitive: lots of printk and printf statements sprinkled everywhere. Then pull the ROM chip, reprogram it in an external EPROM programmer, replace it in the protoboard, and try again.
The sixth attempt finally worked. Two weeks after beginning my experiments with Linux, I had a working system! Here’s a screenshot of the boot sequence:
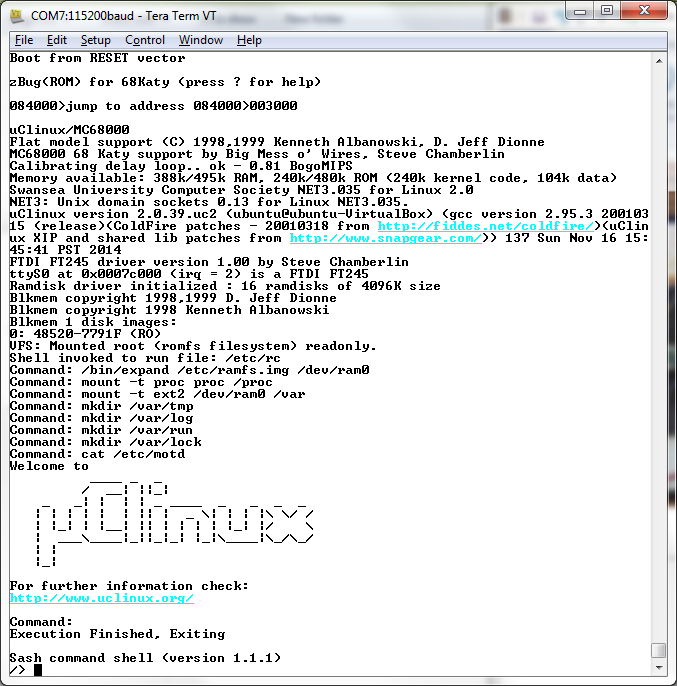
Watch the video for more details. I’m using a shell called sash, which has a few dozen common shell commands (like ls and cat) built directly into it. The root filesystem in ROM is read-only, and a small read-write filesystem is created in a RAM disk. The system supports multitasking, so it can run an LED blinker program in the background while still working in the Linux shell. It even has vi, and Colossal Cave Adventure!
It was an interesting journey. The Linux kernel still seems big and unwiedly to me, but no longer seems so scary as it did initially. It’s just an especially big program, and most of its pieces aren’t too difficult to understand if you open up the relevant source files and start reading.
Memory Requirements
So how much memory does it require to run a super-minimal uClinux system, with an old 2.0 kernel? If you follow my example and put as much as possible in ROM, it needs about 343K of ROM and 312K of RAM, or just 628K of RAM if you’ve got a bootloader that can fill RAM from some external source. My 68 Katy system is slightly heavier than that due to including vi and Adventure, but not by much. Here’s the breakdown:
ROM
- kernel code and read-only data (.text and .rodata segments) – 251K
- kernel initialized static data (.data segment) – 27K
- root filesystem – 189K
RAM
- kernel static data (.data and .bss segments) – 84K
- kernel dynamic allocations during boot-up – 104K
- RAM disk – 64K
- init and shell process allocations – 58K
- stack and exception vectors – 2K
Problems
The kernel always measures the CPU at 0.81 bogomips, regardless of the clock crystal I use. The 555 timer interrupt is independent of the CPU clock, so with a faster clock the bogomips calculation should measure more executions of the busy loop per timer interrupt. I’m not sure why it doesn’t, but it means any real-time calculations will be off.
The display in vi acts weird. Some lines appear prefixed with a capital H, and stray Unicode characters appear here and there. At first I thought this was a hardware bug, and I’m still not certain it isn’t. But I think it’s probably an issue with the way my terminal program (Tera Term) handles the ANSI escape sequences sent by vi. I tried all the different terminal settings available in Tera Term, and also tried a different terminal program, all with the same result.
What’s Next?
This 68008 system on a protoboard was intended to be only an experiment and proof-of-concept for the real 68 Katy, which I had planned to build on a custom PCB with a full 68000 CPU, a CPLD for glue logic, more RAM, an SD card, and ethernet. But this experiment was perhaps a bit too successful, and now I’m wondering if it really makes sense to go to the effort of building the “real” system if it’s going to be essentially the same thing, only faster. Of course the SD card and ethernet will add some interesting new elements, so maybe it’s fine. I probably need to sleep on the question for a few days.
One way of adding more spice to the next iteration of 68 Katy would be to include video output, so it could directly drive a monitor instead of being controlled through a serial terminal. I’ve done that once before, with BMOW 1, which had VGA output. It mostly worked, although the arbitration for video memory between the display hardware and the CPU was clunky and produced visible display artifacts. To take things further, I could even aim for DVI or HDMI video output, since VGA is a slowly dying standard.
The smart move is probably to stick with my original plan. Lots of extra features are cool, but also have a way of killing a project. I’d rather have something with 10 features and that works, than something with 20 features that I never finished or that collapsed under the weight of its complexity. But until then, excuse me while I go play some more Colossal Cave…
Files
The source code for my 68 Katy port of uClinux is available for download, as well as the toolchain I used to build it, the monitor/bootloader source, and a preconfigured VirtualBox machine image of Ubuntu 12.04 to host it all. Grab the files here. Have fun!
53 Comments so far
Leave a reply. For customer support issues, please use the Customer Support link instead of writing comments.
What a journey to you, and in part for all your readers. I learn something already.
Hats off to you sir.
Awesome and inspiring work! Looking forward to hearing what you do next.
This is great stuff. Congrats on getting everything up and running!
Great work!
This is awesome! Very nice project, you’ve inspired me!
What can I say other from fucking awesome work :-).
Completely awesome!!! Congrats on a making a cool project.
I hand-wired a 68k system almost exactly like this long ago, it’s really cool to see you have Linux running!!
Great!
Thanks for the kind words! It’s great to share the project with other people who understand what went into it, and can point out my mistakes too. 🙂
Good Job! Thanks for documenting it and taking us along for the ride.
Can you show contents of /proc/cpuinfo (if it exists) too?
/> cat /proc/cpuinfo
CPU: MC68000
MMU: none
FPU: none
Clocking: 6.5MHz
BogoMips: 0.81
Calibration: 409600 loops
Which is all wrong. 🙂
Very nice!
Pretty awesome stuff. Amazing ingenuity.
That is beautiful.
I loved the 68000 but the biggest thing I ever hand wired was a 6809 based seismograph with 56k RAM.
Congratulations.
You must have a lot of free time Steve 🙂 Congratulations, great project!
Yesterday I added the ability to reprogram the Flash ROM through the bootloader, that I mentioned above. Ah, much better! No more yanking the chip out of the breadboard every time I need to change something. It’s pretty slow though, and takes a couple of minutes to download the new Flash image into RAM and then program it into the Flash ROM.
For testing purposes, it would be so much easier to download an entire Linux image (including filesystem) into RAM and then execute it straight from there, but 68 Katy doesn’t have enough RAM to do that. I would need much less ROM in that case, though, since I’d only need ROM space for the bootloader itself. So I’m thinking about altering the memory map again, and shrinking the ROM to something like 32K, which would give me space to increase RAM to 960K. But then I’d need to add a second RAM chip and more address decoding logic, which might not be worth it if this is already the end of the line for this “prototype”.
Have you tried a ZIF socket on your breadboard?
> For testing purposes, it would be so much easier to download
> an entire Linux image (including filesystem) into RAM and then
> execute it straight from there, but 68 Katy doesn’t have enough
> RAM to do that. I would need much less ROM in that case, though,
> since I’d only need ROM space for the bootloader itself. So I’m
> thinking about altering the memory map again, and shrinking the
> ROM to something like 32K, which would give me space to increase
> RAM to 960K. But then I’d need to add a second RAM chip and more
> address decoding logic, which might not be worth it if this is
> already the end of the line for this “prototype”.
Another solution would be to use an non-volatile SRAM (NVRAM), instead of your flash. This is quite easy to make with an SRAM, a Lithium battery, and some electronics for protection against unwanted errase.
Leon – French Hobbyist.
This is very cool project. Would it be possible to run linux on a mac plus ?
Interesting thought. Yes it should be theoretically possible – the Mac Plus definitely has more capable hardware than the system I built. There’s already a Linux distro for 68K Macs (http://www.mac.linux-m68k.org), but it requires a 68020 or better and MMU. But that project predates uClinux, I believe. It should be possible to port uClinux to the Mac to get support for the Mac Plus and other Macs with the 68000 CPU.
640K should be enough ram for anyone.
Amazing stuff! I wish I had knowledge and skills to do this.
Pssshhht! Let’s see him run Windows 10 on a PIC.
Way to go! This is very cool and I’m sure it was fun, if frustrating at times.
I wouldn’t have thought it possible without an MMU and with so little memory!
It is very inspiring. Cheers to you.
This is very cool.
Understood regarding lack of schematics and organic nature of the project. Still, I’d love to be able to replicate this with my kids. And I gather it should be possible if you were able to post some high-res pictures that cover each system part from a few angles to get a clearer view of the connections. That along with a part list (BOM) would enable me to double-check “guessed” connections against chip pinouts.
Cheers,
Go buy a copy of The Art of Electronics Student Manual and take a look at chapter 10 and 11. It has a similar 68008 breadboard design. In that class, everyone built the computer and then extend it for their own final project. Mine a radio transmitter/receiver transmit digital data. Maybe you’ll be inspired in some of the sample projects listed in the book. Good times; I think it was 1991 or so.
Outstanding
Nice job. Try setting terminal type to VT100 instead of ANSI, maybe the colour is confusing it.
Try to use putty (http://www.chiark.greenend.org.uk/~sgtatham/putty/) as terminal emulator. It is a lot better in regards of the escape codes.
I like putty, but it does telnet and SSH, not raw serial terminal communication. Unless I’ve missed something?
My version of PuTTy supports connection types “Raw”, “Telnet”, “RLogin”, “SSH” and… “Serial”.
!!! WAY COOL !!! Nice trip down memory lane. I’ve not seen this attempted since the late 80’s.
Ah yes, I guess I was using an old version of PuTTY. New version supports serial connections, but the result in vi is the same as it was with Tera Term. I don’t see any place in the settings to change the escape code behavior. The closest thing is Settings -> Terminal -> Keyboard, but that controls what escape sequences are sent when I press keys on my keyboard, not how escape sequences that are received from the remote host will be interpreted. From looking at the raw data, I can see that vi is sending ESC[n style of escape sequences. But somehow they don’t match what Tera Term or PuTTY are expecting.
Looking at the details of ANSI escape sequences from http://en.wikipedia.org/wiki/ANSI_escape_code :
A lot of the lines vi is sending begin with something like: ESC [ 3 ; 1 H H
It looks like this is supposed to move the cursor to row 3, column 1, except there should only be one H at the end. So the second H is interpreted as a literal H, which is what both Tera Term and PuTTY show.
There are also many lines like: ESC [ 18 ; 1 H ~
This moves to row 18, column 1, then prints a literal tilde character.
Lastly, there are some unescaped bytes with values over 127. I guess these should be Unicode, or some other code that maps 128-255 to special characters. For instance in what looks like a title line, it sends “levee ” (the name of the author of this vi version?), then:
ESC [ K (clears a line), then
“(c)3.4”, then the bytes
$AF $08 $6D $0C $D2, then
“(c)3.4” again, then the bytes
$AF $08, then
“. Copyright (c) 1983-1989 by David Parsons”
What’s all that? $AF is Latin-1 for a long dash, and $08 is backspace. Or is that a two-byte Unicode character, or some type of escape sequence?
Thats a nice work and waste time. This CPU is obsolete and it’s not required to do somthing with it. Use a modern CPU or MPU like an Raspberry, an ARM Cortex-M4F or a DSP like a BLACKFIN DSP instead and you got a new challenge and explore the knowledge of an “up to date” System. All they are not expensive and good avaliable. You get your fun, i am sure.
Juppeck
@Juppeck Sorry, I think you’re missing the point. I personally have several dozen boards at my disposal (Arduino, RPi, BBone, Panda, IFC6410, etc.) All great boards. However, this is pretty unique. Being able to put together components on a bread-board by hand and getting it to boot Linux is very cool in my book. Especially since I can actually show kids how an entire system is put together from scratch. No such thing with any of the other boards.
Nice to know that the one I built back in 2012 was your inspiration.
https://www.youtube.com/watch?v=GJmPS3jMwD4
Anyway, mine was much faster since I overclocked it at 16MHz plus its a 16bit wide databus.
Hi Luis! I also talked a bit more about your system in this earlier post – http://www.bigmessowires.com/2014/10/27/designing-a-68k-single-board-computer/ Nice work! I’m not sure why I was never able to approach the MHz speeds that you had. Did you ever publish your uClinux mods anywhere? I couldn’t find them…
Yes… I’m sure you didn’t find them on the blog! 😉
But even if you did, no worries I don’t care.
About the speed, if you have a schematic somewhere I can take a look I might give you some ideas of what could be limiting it, because 2MHz is just too slow…
When I placed mine in a PCB I clocked it at 20MHz and everything was running fine!
Nice to see more 68000 fans out there.
Very inspiring and it seems like you had a fun time doing it. Great work!
Hi!
What a cool project! I’m wondering about the same thing as Karim — would you mind sharing the list of parts you used? A better photo would be awesome too. Maybe we could then reproduce your schematics and maybe even figure out why you had to run it at 2MHz.
Thank you,
Lubo
I’ll try to put together a parts list and reverse-engineer the schematic after Thanksgiving. This old Motorola app note also presents a 68008 minimal system that you may find useful: http://ferretronix.com/tech/68k/an897.fsl.d.rev0.pdf
AWESOME! Thanks Steve.
Karim
I’ve added a 68 Katy parts list and circuit schematics here: http://www.bigmessowires.com/68-katy/
Please let me know if you find any errors.
Getting anything to run on a solderless breadboard above 1 MHZ is a challenge and an accomplishment. Garth Wilson describes some of the reasons here –
http://www.wilsonminesco.com/6502primer/index.html
You’ve done it much better by actually getting an modern OS loaded and running.
Damn it, this is inspirational! Having made a 1/2 megabyte Nascom 2 CP/M system with Pluto graphics, floating point card, and much more, back in the 80’s, I miss this sort of thing more than I can say. Cheers, Doctor Dark.
I used to run a computer business back in the late 80s / early 90s doing Commodore and Mac repairs and upgrades, so the 68000 was a core part of my hobby life as well. But I have to admit, while I built many wire-wrapped, breadboarded and point-to-point 65xx, 68xx and Z80-based systems, I never tried to create a home-brew 68000-based system. Everything worked with was on an existing platform.
I know what you mean about no schematics from building as you go though. I’ve done that a few times. Now I wish I had schematics to some of the stuff I did. Sucks having to reverse-engineer your own designs. Congrats on a nice piece of work there!
Your absolutely crazy.
Good job
Peter
If you added more RAM you could have a newer kernel. 🙂 So maybe it is worth doing?
I\’ve justed ordered a batch of these boards. I\’m a sucker for a 68K project 🙂
When i get it i\’ll put a video on my youtube channel.
Hi!
I always wonder if it is possible to turn a sega genesis in a 16-bit computer?
This is inspiring. I’m going to try and build this on a breadboard before trying anything more complex (like adding an mc68681 duart)
For those that are looking for the source, the download links no longer work. But are still available here:
http://web.archive.org/web/20170606135857/http://www.uclinux.org/pub/uClinux/dist/uClinux-dist-20040218.tar.gz
and:
http://web.archive.org/web/20161028125832/http://www.uclinux.org/pub/uClinux/m68k-elf-tools/m68k-elf-tools-20030314.sh
But can it run doom?