

Retro Puzzle Contest: Solution

On Monday I posted a retro puzzle contest for vintage computing fans. Starting with only a confusing image of jumbled 8-bit characters, I promised that players would proceed through a tricky series of nested challenges, ultimately leading to the name of a person. If you’ve read the book (or seen the movie) Ready Player One, then you’ve seen this type of puzzle chain. I predicted that knowledge of vintage computers, software engineering, and 1980s cultural references would be helpful. And I offered a $100 gift certificate to whoever solved the puzzle and identified the mystery person first.
SPOILER ALERT! The puzzle was solved by the pseudonymous “frogor”, 28 hours after it was first posted. Congratulations! I’m going to describe the solution here, and the several different layers of the puzzle’s challenges. If you’d like to attempt solving the puzzle yourself first, read no further! It’s not an easy puzzle, and you won’t solve it in 5 minutes, maybe not in 5 hours, but you’ll find a retro-techno-challenge that’s worthy of the time you invest in it. See the original puzzle announcement here.
Level 1
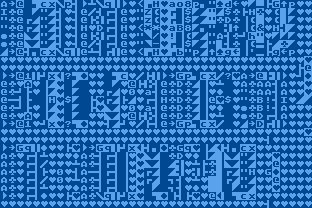
The puzzle begins with a 39 x 26 grid of random-looking letters, numbers, and symbols. OK, now what? Several people suggested that it was some type of ASCII autostereogram image. Others thought that if they squinted, they could sort of imagine three rows of large letter-type structures, separated by hearts. Interesting theories, but if you could simply stare at the first clue and see the answer, that would hardly be a “series of challenges”. No, that wouldn’t be a puzzle worthy of this audience.
But there are a lot of hearts in the image – what might their significance be? Also diamonds, clubs, and spades. And all the glyphs look conspicuously bitmap-y, like the glory days of 8-bit computers. And then there’s the odd choice of blue-on-blue color scheme. Hmm.
Identifying the font used in the image seems like a good idea. So how can you do that? If you’re lucky, you’ll recognize it immediately, because you were immersed in it for hours every day during your formative years. Otherwise, you will probably have to brainstorm the names of various vintage computers, look for examples of their character set fonts, and see if they look like a match. Some people pointed to code page 437, and others to PETSCII, which both look close but aren’t quite right. Some of their glyphs have slightly different shapes than the clue’s image, and a few glyphs from the clue’s image aren’t present in code page 437 or PETSCII fonts.
The font used here is actually ATASCII, from the Atari 8-bit series of home computers sold between 1979-1991. The blue-on-blue color scheme is a clue. Those are the default text colors used by the Atari 8-bit computers. And all those hearts? The heart is the first entry in the ATASCII character set.
Level 2
Atari font, check. Now what? Maybe it’s a clue? “Atari” plus random gibberish symbols equals the name of the mystery person? Maybe not.
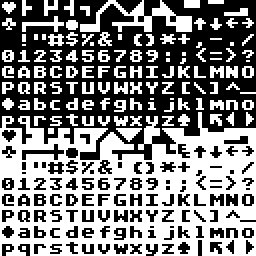
A font map is a mapping between numbers and glyphs. In the case of ATASCII, there are 256 different glyphs corresponding to the numbers 0 through 255 – one byte. For example, the heart is ATASCII value 0, and the capital A is ATASCII value 65 (hex 0x41). Converting all the glyphs to the equivalent byte value seems like it could be useful, but how?
If you’re a masochist, you could open two side-by-side windows with the image from the clue and the ATASCII font map, and do the conversion by hand. There are about 1000 glyphs in the image from the level 1 clue, so this would take a long time, and you’d probably make some mistakes.
A better solution might be to write a small program to automate the process. Inspection of the clue’s image shows that each glyph is 8 x 8 pixels. So write a program to compare each 8 x 8 block from the clue’s image with 8 x 8 blocks from the ATASCII map, until it finds a match, and then record which ATASCII entry it was.
Even better, use some existing software to do the conversion for you. Frogor writes “I used ImageMagick with some character tables to break apart the grid into individual characters and automate mapping them to their character set byte values.”
When the conversion is done, you’ll have an array of 1014 bytes.
Level 3
Now what can you do with this array of bytes? What is it? It seems to have some kind of structure: there are a large number of 0 bytes, and other values like 17 (hex 0x11) appear very frequently. It’s definitely not random data.
Making sense of the data is tricky. Maybe you can try to guess what sort of data I would put here, knowing the parameters and theme of the puzzle contest. Or maybe you have lots of hacking experience, and can recognize the raw forms of common file types and data structures just by staring at the bytes.
The people from level 1 who thought they could see three rows of large letter-type structures actually had a good idea. Frogor writes “I tried to figure out what my output -was- and could very definitely see some data structure by shifting the rows of hex bytes one character at a time. Since ‘file’ didn’t recognize it, I guessed it might be an image encoding of some sort – GraphicConverter RAW Import has an -amazing- visualizer which lets you play with the various settings until I tried as a last ditch effort a color encoding I probably should have started with.”
Yes, the bytes are a simple two-color bitmap, in raw form without any headers or other metadata. It’s just a grid of pixels. If you write each byte in binary, with a black pixel for a 1 bit and a white pixel for a 0 bit, then the 39 x 26 grid of glyphs from the first clue is converted into a 312 x 26 two-color bitmap image. Each one-byte glyph has eight bits which encode eight pixels horizontally, so the converted bitmap is eight times wider than the original grid of glyphs. And oh, what a bitmap it is.
Level 4

The upper-right of the bitmap says “BMOW RETRO PUZZLE AUG 2020”. Good, that tells you you’re in the right place. Then there’s some kind of weird code, and a couple of clock / arrow things pointing in different directions. Right.
It doesn’t take a rocket surgeon to recognize that this is some type of substitution cypher. Those boxy and wedgy shapes with dots inside them are clustered into groups that look like words, and the clusters
![]() and
and ![]()
appear twice, on both the second line and the third. Maybe you immediately recognize this as the Pigpen Cypher, a classic cypher that’s often used in games and puzzles. Or maybe you search Google for “cypher with lines with dots inside them”, and are rewarded with Pigpen Cypher as the top result.
It seems Frogor was initially stumped, but was saved by outside help. “The next stage of decoding gave a tantalizing clue in the first row – but figuring out the second and third rows I credit to a suggestion of a friend.”
Performing a Pigpen substitution for the second and third rows of the bitmap reveals some new text. But two of the dots don’t seem to be part of the Pigpen cypher.
Level 5

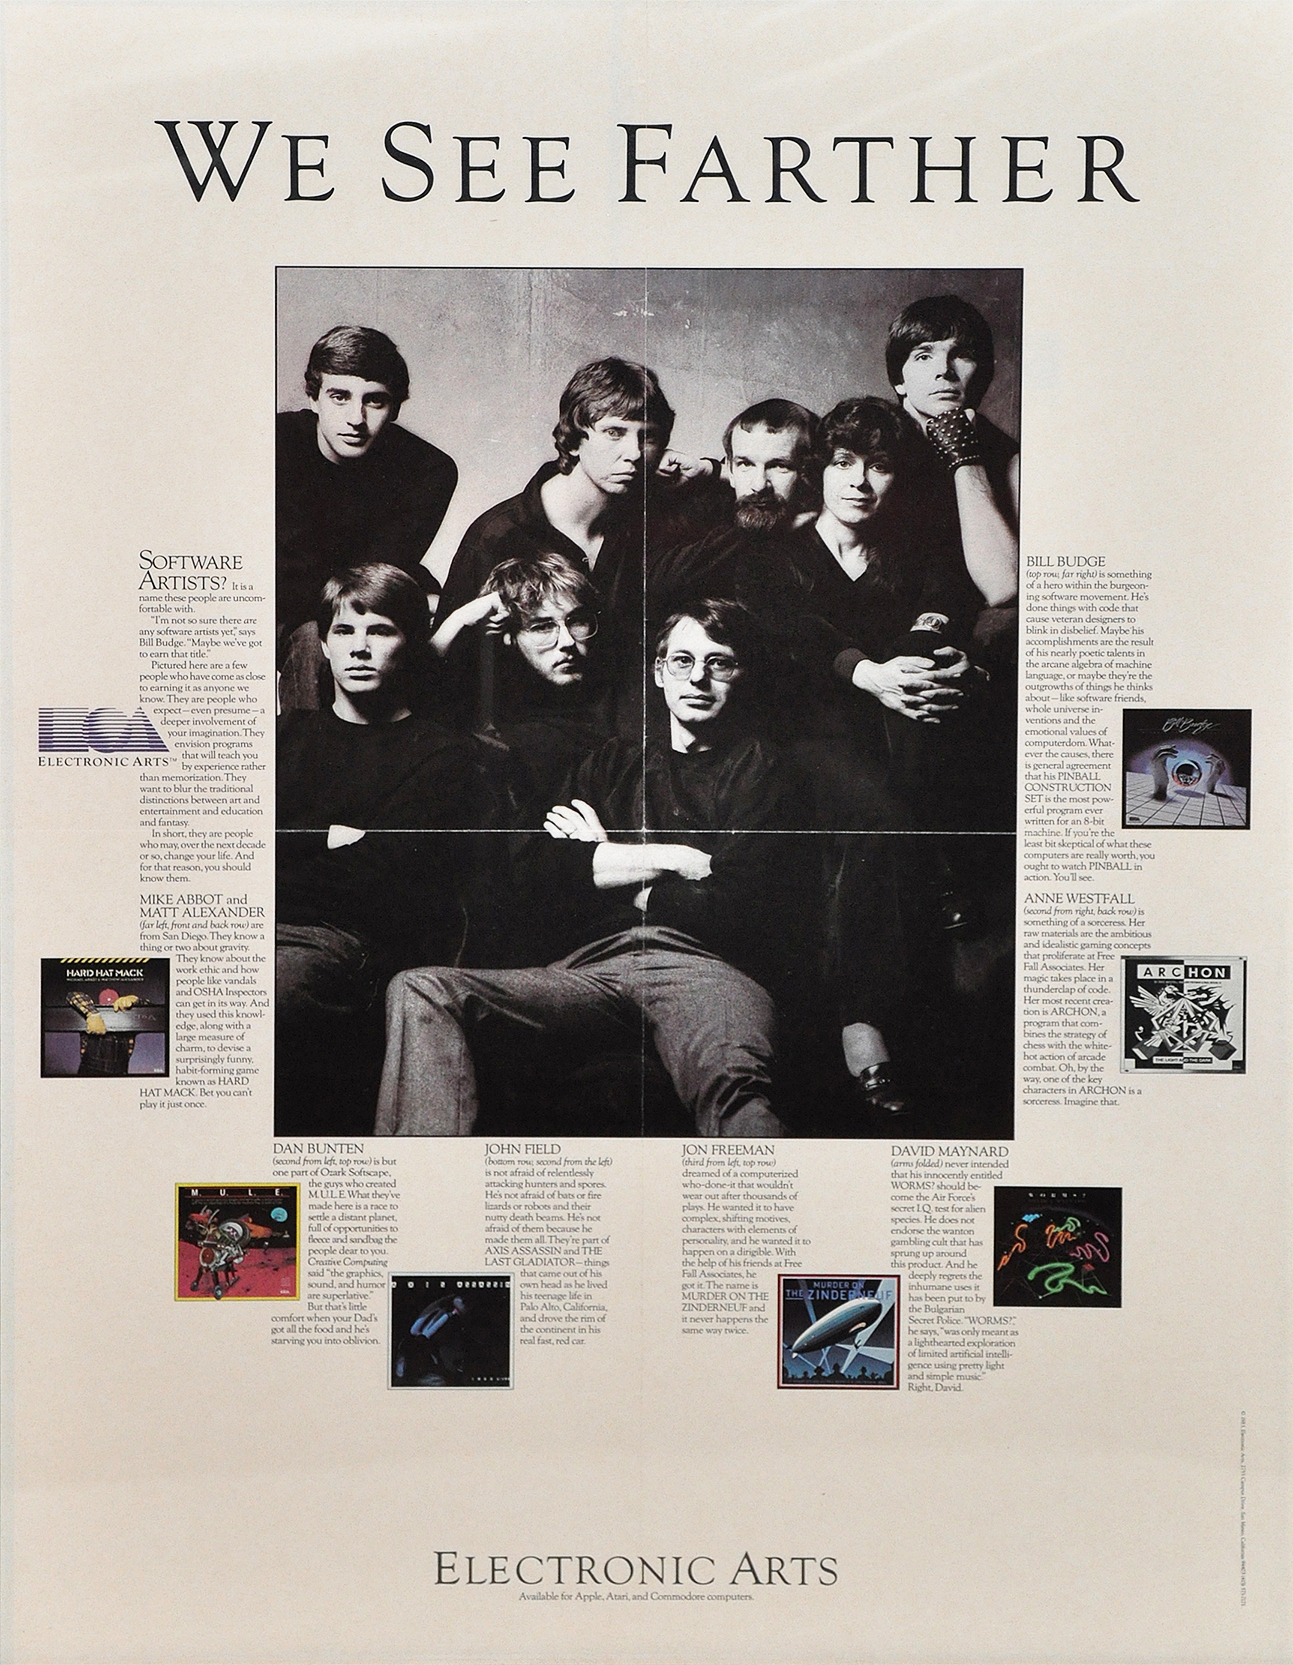
Here’s where knowledge of 1980s cultural references comes into play. “We see farther.” If you were alive in the 80s and were involved in the home computer scene, you recognize this as the slogan of game developer Electronic Arts. And if you don’t recognize it, Electronic Arts is the top search result for this phrase.
The other lines are just lists of numbers. There’s also a mystery dot on each line, and those clock / arrow things at the end of each line. What’s this all about? What if you replace the numbers with the corresponding letters of the alphabet? It sounds worth a try. That gives you DI·FCDG and H·CEFG. Ugh.
Maybe the numbers are referencing one of the people on this iconic Electronic Arts “We See Farther” poster?
Maybe those clock / arrow things are pointing to someone on the poster? Or maybe they aren’t actually clocks or arrows, but compasses pointing north and east? That looks interesting! In that case, the mystery dots could be decimal points for a latitude and longitude in decimal degrees format. Frogor says “in hindsight the helpers on the right side were nice confirmation of being on the right path”.
What is at:
49.6347 degrees north
8.3567 degrees east
Google Maps provides a quick and ready answer for the latitude / longitude lookup.
Level 6
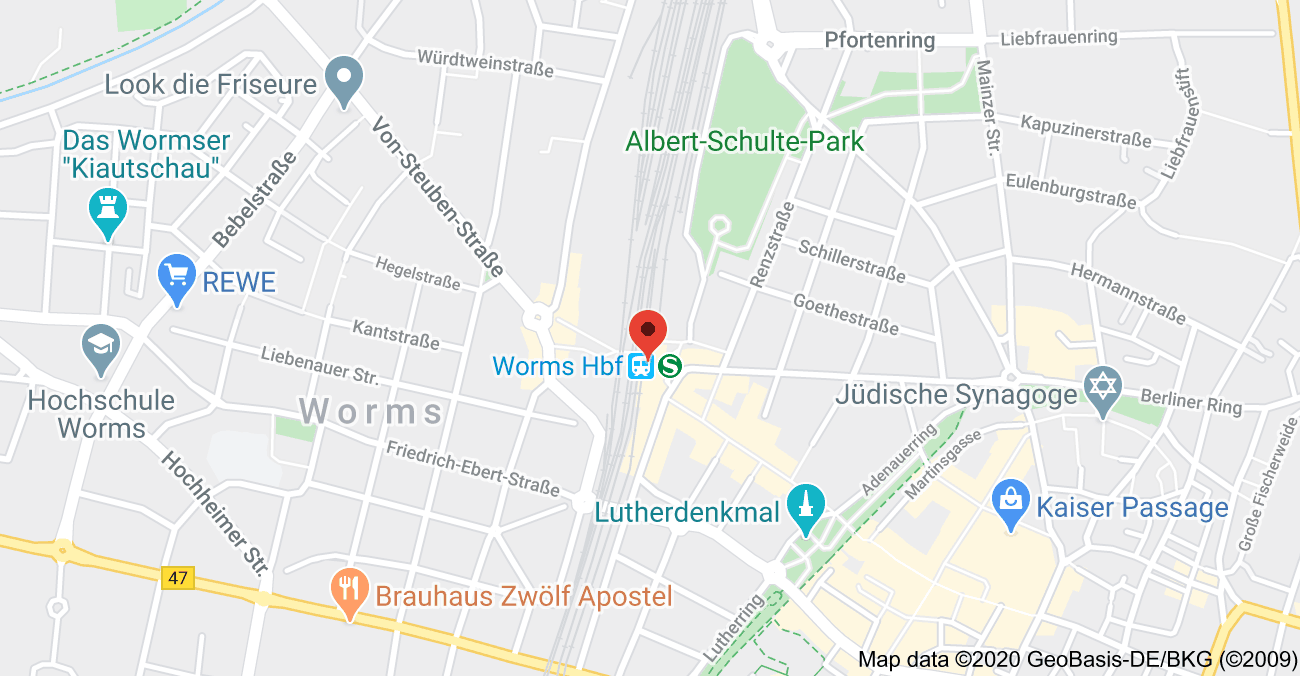
The location is somewhere in Germany, at something called “Worms Hbf”. Your German-speaking friend or a dictionary will tell you that Hbf is an abbreviation for Hauptbahnhof, the main train station in a city. Investigating the map further confirms that 49.6347 N, 8.3567 E is the location of the central train station in the city of Worms, Germany.
Level 7
WE SEE FARTHER
ELECTRONIC ARTS
WORMS, GERMANY
We see farther. Electronic Arts. Worms. All the pieces are here, but what do they mean? Is there some other clue in these words? If there’s some connection here, it’s not obvious.
If you go back to that Electronic Arts poster again, and take a closer look:
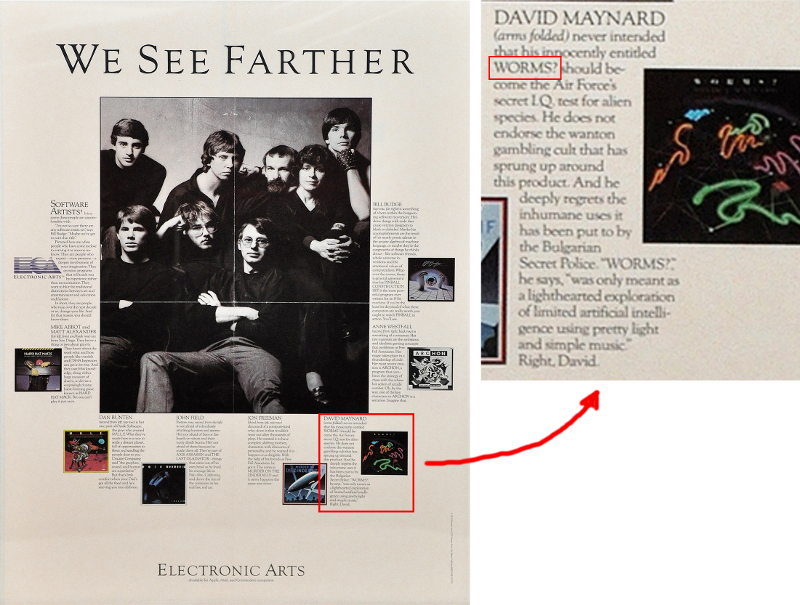
DAVID MAYNARD (arms folded) never intended that his innocently entitled WORMS? should become the Air Force’s secret I.Q. test for alien species. He does not endorse the wanton gambling cult that has sprung up around this product. And he deeply regrets the inhumane uses it has been put to by the Bulgarian Secret Police. “WORMS?”, he says, “was only meant as a lighthearted exploration of limited artificial intelligence using pretty light and simple music.” Right, David.
Seven levels deep into the puzzle, the mystery person is finally revealed! Phew! Success at last.
Creating the Puzzle
My original inspiration for this puzzle was simply “encode some stuff in ATASCII”. My first computer was an Atari 800, and I spent many hours staring at its strange square letters and symbols. They’re etched in my brain.
The idea to use an obscured latitude and longitude came from Brainchase. If you have kids that enjoy puzzles, they’ll love Brainchase. Or forget your kids and sign up for yourself. The first levels of their puzzles are simple enough for even young kids, but to finish them all requires hardcore problem-solving skills. And they have super cool prizes like buried treasure.
Eventually I arrived at the central idea: a latitude/longitude that points to a city whose name is also an English word, that when combined with another phrase, will uniquely identify somebody. “We see farther” jumped into my head immediately as a recognizable 1980s phrase that fit the puzzle’s retro-computer theme. I played loads of EA games as a kid, and also worked at Electronic Arts for many years as an adult.
To make the puzzle fit together, I needed to find an EA game whose name was also the name of a city. And it couldn’t be just any EA game, it needed to be an early game from the era when “We see farther” was still in use. There are no cities named “Archon” or “Pinball Construction Set”, but Worms fit the bill perfectly. So you see, I didn’t actually choose the mystery person. I chose the puzzle format, and the identity of the mystery person was determined for me.
Finding a latitude/longitude for Worms was harder than I expected. A city is a large place; it doesn’t have a precise latitude/longitude. No matter what coordinates I entered into Google Maps, the default behavior was to show a very zoomed-in view of streets and individual buildings, rather than a regional or national map of Germany. I worried this might give people the wrong idea. Would they understand that the clue meant the whole city of Worms, and not some random shopping mall or Burger King in the city? What building should I point to? I eventually settled on the train station as a stand-in for the city itself.
For the Pigpen cipher, I created a custom Pigpen font using Bitfontmaker2. This probably wasn’t necessary, but it was fun to type my secret messages in plaintext and have them automatically rendered in Pigpen. The other elements of the bitmap were drawn in by hand, to create the finished bitmap shown in level 4.
I used LVGL’s Online Image Converter to turn the bitmap into an array of hexadecimal bytes. Then I wrote a short Python program to turn the hex bytes into decimal bytes spread across DATA statements for use with BASIC. As a final step, I wrote an ATARI BASIC program and ran it in the Atari800MacX emulator.
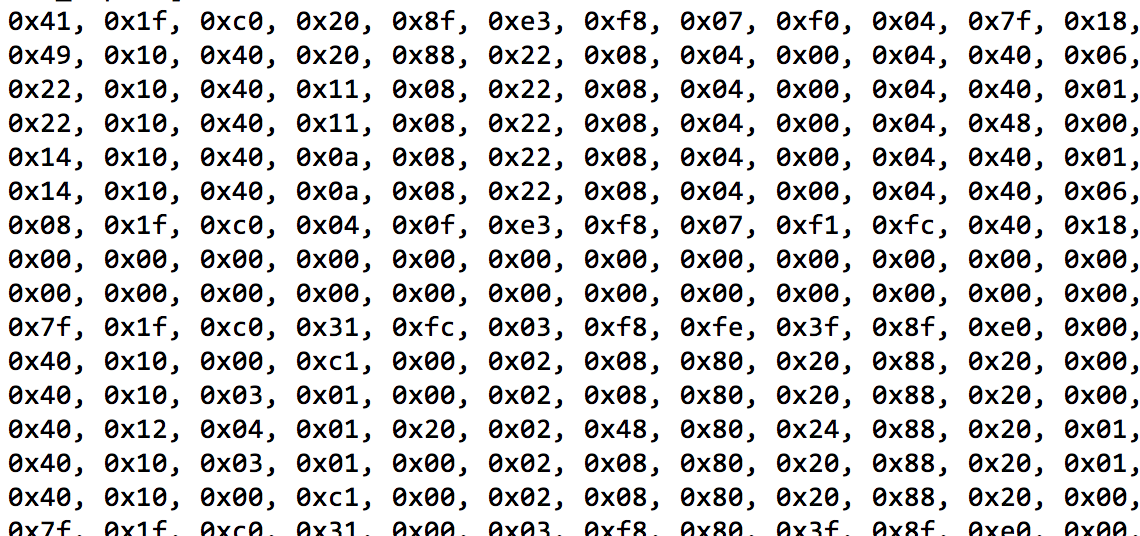
10 FOR R=1 TO 26
20 FOR X=1 TO 39
30 READ NUM
40 PRINT CHR$(27);CHR$(NUM);
50 NEXT X
60 PRINT
70 NEXT R
1000 DATA 65, 31, 192, 32, 143, ...
CHR$(27) is the escape sequence. It ensures that control characters like tabs, newlines, and the bell are rendered as ATASCII glyphs instead of performing their control functions. Running this BASIC program created the finished image used for the first clue at level 1. Because the image came from a real (emulated) Atari rather than some paint program, I could be confident the glyphs, colors, and spacing were 100% accurate. This ensured that people could correctly identify the font, and do a pixel-by-pixel comparison against the ATASCII font map if necessary.
A Sequel?
I really enjoyed developing this puzzle, even though it took a long time to create. I also enjoyed watching other people’s thought processes as they tried to solve it. A friend of mine “live-texted” me his progress, which was lots of fun, even though he never finished.
I was a little bit disappointed that more people didn’t attempt the puzzle. Maybe lots of people took a brief look at it, weren’t sure where to begin, and immediately gave up. Or maybe people didn’t really understand what kind of puzzle it was, or why it might be interesting and worthwhile for them to invest time in solving it.
That leads to thoughts of a sequel. Now that puzzle #1 is done, and more people understand what this puzzle format it all about, I’m hoping there might be greater interest in a new one. I would enjoy the challenge. Would you?
Read 3 comments and join the conversation3 Comments so far
Leave a reply. For customer support issues, please use the Customer Support link instead of writing comments.
Great puzzle and write up. I tried but frogor was so darn fast!
Thanks Steve for the puzzle and the deep dive solution. I would love a sequel! I tried but Frogor was just too good.
Fun fact: He learnt about the puzzle yesterday at 1pm and solved it by 4:30pm. A true Wade Watts.
I looked at the puzzle, did not get far at all. Reading the walkthrough made me realise that there is no way I would have solved it. However, that does not mean I didn’t enjoy it. (BTW, thanks for the link to Brainchase!) I drop by BMOW regularly, and usually find something of interest. So sure, keep ’em coming!