

Archive for the 'Bit Bucket' Category
Computer History Museum Visit
A fantasy-land for hardware nerds like me is hidden in a former Silicon Graphics building in Mountain View, California. Despite living only a few miles away from the Computer History Museum, somehow I’d never found the time to visit there before today. It was well worth the visit, as the museum is stuffed to the roof with amazing artifacts from computing history. Even though the majority of the exhibits were closed due to a renovation project, I still got to see all kinds of wonderful techno-treasures.
 Here I am standing inside the Cray-1 supercomputer. In 1976, this machine was as high-performance as you could get, a 250 MFLOPS monster that cost $5 million and required 115 kW of power.
I thought BMOW had a lot of wires, but brother, when I saw this Cray, my jaw dropped. Just look at this thing! See all that blue stuff on the inside? Those are individually-routed wires, stacks of wires, piles of wires, mountains of wires, every single one neatly-labeled with an ID code.
The Cray-1 is a hollow cylinder, about 6 feet tall, 4 feet in outside diameter, and 2 feet in inside diameter. Most of that space is consumed by about 2000 circuit boards, and the rest is positively stuffed with wires. I stared at the circuitry for a long time, trying to estimate the wiring density, and decided the machine has somewhere on the order of 100,000 individual wires.
 Here’s a close-up, which gives you a sense of the massive scale of the wiring. It’s just insane.
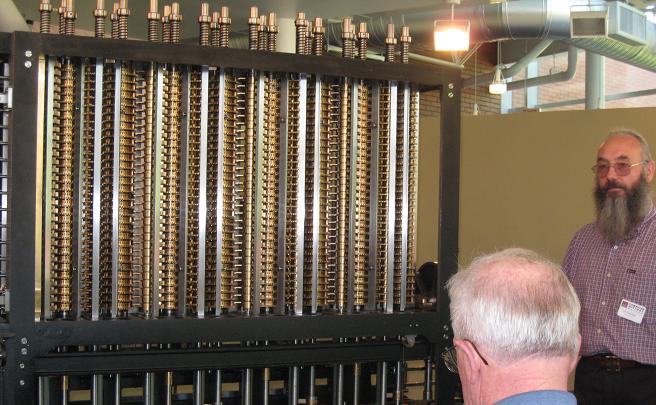
When I finished ogling wires, I took a look at Babbage’s Difference Engine No. 2. Designed by Charles Babbage in the 19th century, this massive mechanical marvel computes tables of polynomials. It supports up to 7th-order polynomials, and computes results to 30 decimal places. The desired polynomial is entered by setting a series of gears, and then a crank is turned by hand to generate the results, one at a time. Babbage designed it all on paper, and built working versions of small pieces of the mechanism, but it remained a purely theoretical invention for more than a century after his death. Some doubts remained about whether the machine would actually have worked, had it been built.
In 1985, the Science Museum in London set out to build a working Difference Engine No. 2, from Babbage’s original design drawings. The project took 17 years to complete, facing all sorts of setbacks, but in the end the machine worked as Babbage had intended. The finished difference engine is on display at London’s Science Museum, but a duplicate was made for project benefactor and Microsoft millionaire Nathan Myhrvold. Myhrvold agreed to lend his duplicate to the Computer History Museum, to share and educate.
Some of the other computing artifacts I got to see:
- Deep Blue, the IBM chess computer that defeated World Chess Champion Garry Kasparov in 1997.
- The first mouse- a block of wood with a momentary push switch mounted on it. Created by Doug Engelbart at PARC in 1964.
- A 10MB hard disk platter, 3 feet in diameter, from 1974.
- An original Apple I, the kit-built ancestor of the Apple II. A hand-assembled logic board, keyboard, and power supply, mounted on a plywood plank.
- A restored and working PDP-1. During the restoration, volunteers were able to retrieve data originally stored in the core memory decades earlier.
Too much awesome stuff!
Read 1 comment and join the conversationT-Shirts
 BMOW logo T-shirts are now available! Check the link on the left sidebar. Get one and show a little electronics geek pride! Available in six colors, $18.99 each, operators are standing by to take your order.
These are the same T-shirts that I and my assistants wore at the Maker Faire last year, where many visitors were disappointed they couldn’t buy a shirt for themselves. I only made six in that first run, but my friends who got them still seem to wear them a lot (maybe a little TOO much). I wore one at Disneyland last year, which led to a long conversation about CPU design with a guy I met while in line for Mr. Toad’s Wild Ride. Electronics geeks are everywhere.
Feeds
If you’re not reading the BMOW comments, you’re missing half the discussion. Matthew Simmons asked if there’s a comments feed, and the answer is YES. I’ve added links for both the posts and comments feeds to the left sidebar. I often make follow-up comments to my own posts, with progress updates or related discoveries, and lots of smart people provide great suggestions and commentary. If you normally read the BMOW site with an RSS reader, be sure to add the comments feed too so you don’t miss out.
Be the first to comment!Care Package
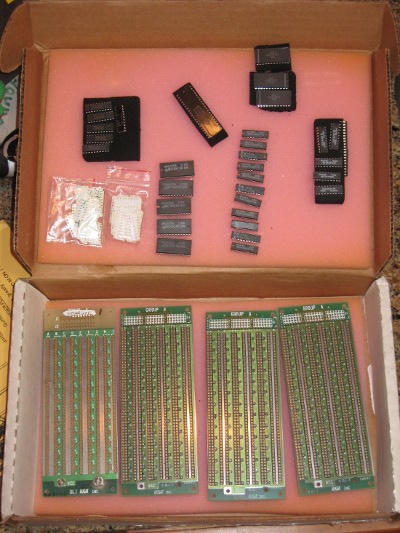 After reading about BMOW on Slashdot last week, Jim George offered up some Augat wire-wrap boards and old-school ICs that were sitting around gathering dust. His care package arrived today, just in time for a weekend of tinkering.
There are four Augat boards, each one about 7 x 2.5 inches, or about 25% of the area of the BMOW system board. Each board has space for five columns of skinny DIP 0.3 inch chips. The undersides (not shown) are pre-populated with about 600 wire-wrap pins.
Jim also threw in a few dozen wire-wrap tags, which are just little plastic cards with holes in them that can be placed on the pin side of the board, showing where the chips are placed and marking the pin numbers. I can’t believe I built all of BMOW without these. They seem like such an obvious thing. Staring at a featureless green board with a thousand pins on it, it’s easy to get disoriented without markers like these.
To round out the package, Jim also included a handful of 7400 series logic chips, and other related parts:
- 74AS181 x 5, 4-bit ALU
- 74ALS374 x 11, 8-bit register
- 74F323 x 7, 8-bit shift register
- 74F299 x 6, 8-bit shift register
- 6116 x 3, 2K x 8 SRAM
- Intel 8255 peripheral interface adapter
Thank you Jim!
Read 5 comments and join the conversationSoftware-Generated Video
I’ve become interested in software generated video, after reading the book The Black Art of Video Game Console Design by André LaMothe. It’s a unique book, covering everything from atomic theory all the way up to building your own embedded computer system. Unfortunately it’s plagued by a million errors, but I was still fascinated by the idea of direct synthesis of video in software, which is part of the design of the game system discussed in the book.
Most computer systems (including BMOW) have dedicated video display hardware. The CPU writes data to video memory, and at the same time, the display hardware reads data from video memory and synthesizes the actual analog voltages that constitute the video signal for the monitor or TV. In BMOW the display hardware consists of fourteen separate chips, including the video memory itself, character generator, counters for the current row and column, shifter, oscillator, various registers and buffers, and a RAMDAC. It took a long time to design, but it’s pretty powerful.
In contrast, software-generated video creates the final video signal voltages directly from the CPU or microcontroller pins, with no intervening hardware at all except a handful of resistors to form a simple R2R DAC. You’ve got a MCU, some resistors, and that’s all. It generates the video signal in real time, on the fly, and there’s no need for any video memory or frame buffer. Fascinating stuff. The downside is that you need a fast MCU, and your code must be deterministic and per-clock-cycle exactly identical from scanline to scanline. Almost all the processing power is consumed by generating the video, so there’s little left for other logic, and logic code must be interleaved with the video code. I was vaguely aware of this technique before, but never really looked at it deeply because of all these problems with it. At least, that was the case until I saw some of the things the XGameStation from LaMothe’s book can do.
Check out the XGameStation Micro Edition web page. That’s some fairly impressive stuff from a little microcontroller and software-generated video. I decided I wanted to build one of these myself, as a short but interesting detour from work on 3D Graphics Thingy. Most of the XGameStation systems are prebuilt systems, which don’t interest me much, but there’s also the XGameStation Pico Edition that you can put together yourself. Perfect! Except it’s pretty expensive for what you get. I just can’t stomach paying $60 for a kit that contains a $3 microcontroller and a bunch of passive components that I mostly already own anyway. To make matters worse, a $50 SX-Key is also required to program the SX28 microcontroller, bringing the total cost to $110 for a simple little breadboard project.
I did some research, and found that I can get all the parts I need from the $60 Pico Edition kit for under $10 total, except one: the 78.75 MHz clock oscillator. In order to generate color video, you need a high-speed clock that’s an integer multiple of the base NTSC frequency of 3.579545 MHz. Sadly, these just don’t seem to exist anywhere that I’ve found. The only solution appears to be to buy a programmable oscillator, which is what the kit contains, I think. But programmable oscillators with the speed and precision needed are pretty expensive, and only sold in large quantities. Without that oscillator, it’s possible to generate black and white NTSC video only. Of course this still doesn’t change the need for the $50 SX-Key, for which I’ve found no alternative and no used ones for sale. Sigh.
As an alternative, I also looked into making a simple software-generated video system from a PIC24, which is at the heart of another XGameStation design. That’s a little more questionable, since there’s no specific “Pico” design using the PIC24 whose software I could use, but there is a wider selection of tools and software for the PIC series than the SX28. But the same oscillator requirements exist, and while the PicKit2 programmer is a little cheaper than the SX-Key, it’s still not cheap.
At the moment then I’m stuck, and not sure if I should pursue this idea any further. The microcontroller and other parts can be had for just a couple of bucks, so it’s a bit frustrating that the oscillator and programmer requirements are turning this into a $100+ project.
Read 21 comments and join the conversationDeath of a Dremel
My last planned bit of BMOW case construction was a front-mounted LCD. This required cutting a hole for the LCD in the faceplate, as well as a gap for the wires to pass through the steel case front. Once again my trusty Dremel tool was put to use. This time I enlisted the help of my daughter to get some action photos, while I cut through the steel. Look at those sparks fly! Yee-ha!!!

I am a manly man, cutting steel! Unfortunately, moments after this photo was taken, the Dremel unexpectedly shut down. At first I thought maybe I’d blown a fuse, but the house outlet still works fine, and there’s no fuse I can find anywhere on the tool. I tried cleaning out the motor brushes, but that’s about all I could think to try. The Dremel manual doesn’t mention anything about what to do when the tool fails to turn on. I guess I killed it. At least I had the cut about 95% finished, and I may be able to finish it off by hand.
Dremel Tool: 2009-2009 R.I.P
Read 29 comments and join the conversation