

Progress on Audio
I’ve made some good progress on the audio hardware, working with the SN76489 and an Arduino microcontroller to help test things out. I put those components plus a clock generator on a breadboard, and wrote some simple Arduino programs to exercise the SN76489’s inputs. It didn’t take too long to get some simple tones, but I expect it will take much longer to learn to use the sound generator creatively to get the best possible results. Here’s a video of my contraption playing a continuous chord with one of the three voices ascending and descending:
I’m still not really sure what the “correct” way to connect this part to an external speaker is, but here’s the schematic showing what I did: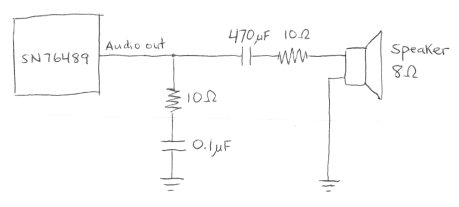
The first 10 Ohm resistor and 0.1 uF capacitor are there because they were in the datasheet for the related SN76494, to “prevent oscillation”. Whether they’re present or not doesn’t actually seem to make any difference, on the scope or to my ear. The 470 uF capacitor is there to remove the DC bias from the SN76489’s output, which swings back and forth around an average of roughly 3 volts. Without it, the circuit still works, but the sound isn’t as loud. The value of 470 uF was pure chance: I tried some smaller values around 1 uF, but they messed up the audio waveform. 470 uF was the next smallest value I had, and it worked. I’m not sure the second 10 Ohm resistor is necessary at all. I was trying to add some resistance to help prevent the total current draw from the SN76489 output pin from exceeding 10 mA, but I don’t think I succeeded.
With a single voice at maximum volume, and no speaker connected, the peak-to-peak voltage swing at the output pin is about 560 mV. With all three tonal voices at maximum volume, the swing is about 2 volts. The measured voltage drops by about half when the speaker is connected. Subjectively, the volume from the speaker is only medium-soft.
This all looks pretty promising, but despite that, I think I’m going to dump the SN76489 and put in the extra effort to try to get the AY-3-8913 working instead. While they’re generally similar, the AY-3-891x chip is enough more advanced that it sounds a lot better, at least to my ears. It’s in stereo, it’s got hardware envelope control, tonal voices can have noise in them, and there are two more bits of precision on the tone frequency settings. The SN76489 kind of makes me want to claw my eyes out after five minutes. Listen to this SN76489 music sample, and compare it to this AY-3-8910 sample, and you’ll see what I mean.
Read 18 comments and join the conversationAudio Plans
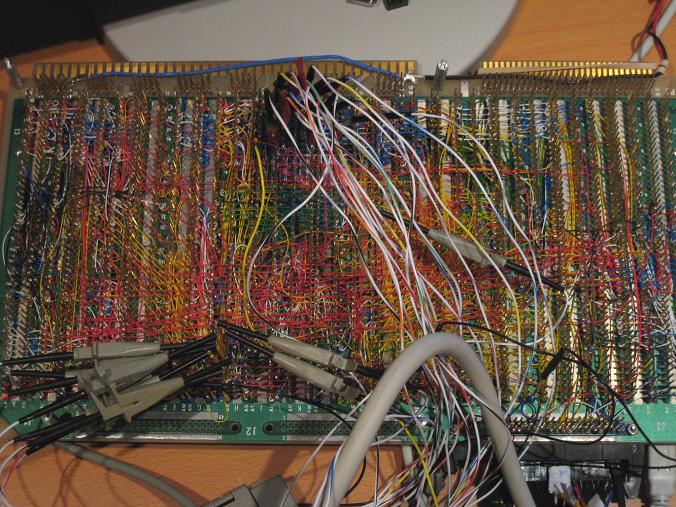
 It’s finally time to create an audio system for BMOW. There’s not much board space left, so this will likely be the end of the road as far as new hardware goes, save perhaps one or two miscellaneous chips. I’ve got space remaining for one more 0.6 inch DIP, or about six more 0.3 inch DIPs, depending on their pin counts. There’s also a spot where I’d planned to add a second SRAM, which is all wired up, but with some work it could be unwired to provide space for a second 0.6 inch DIP or two more 0.3 inch ones. This will be as much an exercise in space conservation as in hardware design.
I bought two 1980s-vintage programmable sound generators from www.arcadecomponents.com: an AY-3-8913 and an SN76489. The BMOW audio system will include one of these, with a minimal amount of extra hardware to support it.
SN76489
This chip was made by Texas Instruments, and was also known as the SN94624 as seen in the photo. It was the sound engine in systems like the TI-99/4, IBM PCjr, Tandy 1000, Acorn BBC Micro, ColecoVision, and Sega Master System, and first went into production in 1980. It has three tone generators and one noise generator. The tone generators create simple square waves at programmable frequencies and amplitudes. The tone frequencies have 10 bits of precision. Altering the envelope for a sound requires the CPU to rapidly change the amplitude for a tone generator.
The chip itself is pretty small: a 16-pin 0.3 inch DIP. The four voices are mixed internally and connected to an analog sound out pin. Interfacing with the chip looks pretty simple: it’s like a slow RAM, with standard chip enable and write enable inputs. It is write-only, and cannot be read. The only complication is that writes take 32 clock cycles to complete, requiring some extra hardware to latch the data and CPU control signals and hold them for 32 clocks.
AY-3-8913
The AY-3-8913 is a variant of the AY-3-8910, which was used in systems such as the Atari ST, Amstrad CPC, Sinclair ZX Spectrum, Intellivision, and Vectrex. It was also at the heart of the Mockingboard sound card for the Apple II family. It is similar to the SN76489, but a bit more capable. The AY has three voices, each of which can be mixed from one of three independent tone generators and a single noise generator. The tone frequencies have 12 bits of precision. The tones are simple square waves, which are then modified by a hardware envelope generator to create triangle waves, sawtooth waves, and other patterns.
The chip itself is a 24-pin 0.6″ DIP. There are quite a few useless pins, so minimizing size doesn’t appear to have been a design goal. The three voices are connected to three separate analog sound out pins, so some extra hardware is needed to mix them for a single speaker. Presumably this is some kind of op-amp circuit, but I need to research it. Interfacing with the chip requires mimicking the two-wire bus protocol for some long-dead General Instrument CPU. It can be read or written. The timing requirements for setup, write pulse width, and hold times are slow enough that some extra interface hardware would be needed, probably similar to that for the SN76489, maybe a bit more complicated.
Pros and Cons
The TI chip requires less board space, and looks a bit simpler to interface with. It has a single-pin, pre-mixed output. It might still require an op-amp anyway in order to drive a speaker, though. The AY chip has a hardware envelope generator, and better precision for the tone generator frequencies. It definitely requires an op-amp to mix the channels and drive a speaker.
I should really design it out in detail, but I’m guessing the interface hardware for the AY would require two or three extra chips. Because it’s a 0.6 inch DIP, and the way the remaining BMOW board space is organized, it would require a bunch of long wires (about eight inches) spanning the width of the board. In contrast, I think I could do the TI SN76489 hardware with a single extra chip, and fit it all in one area of the board.
The bottom line looks like the TI chip will yield somewhat poorer audio results, but will be simpler to get going. I’m leaning towards it for that reason. I still need to do some more research into the AY interface requirements, and figure out how to sum channels and drive a speaker with an op-amp, then I should be ready to make a decision and get started.
Read 6 comments and join the conversationFun With Fonts
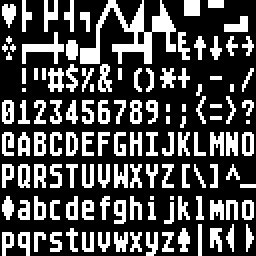
The BMOW display circuitry supports bitmap fonts, with each character on an 8×16 pixel grid. When I first built the hardware, I used an 8×16 font from X-Windows, but I never cared for it much. Here’s what it looks like:
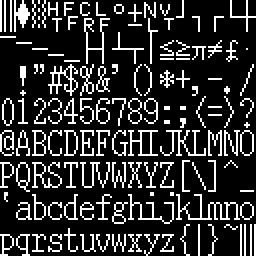 It’s a serif font, more at home on a printed document than on a computer screen. Notice how lower-case hij all run together, as do klmn, #$, and other font glyphs. Zero is taller than the other numbers. The period/decimal point is in the left portion of the glyph cell instead of centered, which looks very odd for a fixed-width font when it’s used as a decimal point. All the character strokes are one pixel wide, giving it a narrow feel. There’s one pixel of empty space between most characters, horizontally and vertically, so it also feels a bit crowded.
I decided to try some new fonts to replace the X-Windows one, but 8×16 fonts aren’t common. Instead, I tinkered with some classic computer fonts.
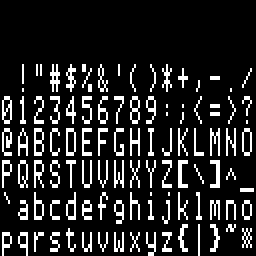 This is a slightly modified version of the character font from the Apple II series of computers. The Apple II font glyphs are 7×8, so I inserted an extra empty column into each glyph, and scaled it up to twice the original number of rows vertically, to get 8×16 glyphs. Like the X-Windows font, all the character strokes are one pixel wide, giving it that same narrow feel. The characters themselves are also pretty narrow, with most being only 5 pixels wide, providing 3 pixels of space horizontally between adjacent characters. Most characters are 7 pixels tall (14 after scaling), leaving 1 pixel (2 after scaling) of space vertically between adjacent characters. A lower-case letter with a descender will actually touch a capital letter on the line below it. I burned this into BMOW’s character ROM and played with it for a bit, but it just didn’t look right.
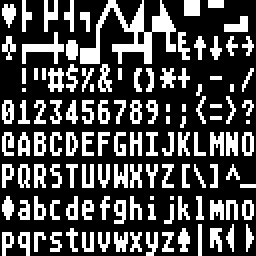 Ah, this is more like it. This is the 8×8 font from the Atari 8-bit computers, scaled up to twice the height vertically, to get 8×16 glyphs. It’s big and bold, with all the character strokes two pixels wide. The characters themselves are wider too, with most of them being six pixels wide, providing two pixels of space horizontally between adjacent characters. Most characters are actually shorter than the Apple II ones, though: 6 pixels high (12 after scaling), leaving 2 pixels (4 after scaling) of space vertically between adjacent characters. I burned this into BMOW’s character ROM, and was fairly happy with the results. My only real regret was that by scaling up an 8×8 font to make an 8×16 font, I was effectively throwing away half of BMOW’s vertical resolution.
 My solution was to retouch the Atari font by hand, taking advantage of the addition vertical resolution compared to the original to make curved edges look smoother. You can see the result here. In the process of smoothing the letters, I actually made them slightly bolder than they were before, so now this is an extra-bold in-your-face style font. I’m pretty happy with it overall, as it’s nice and legible, and has a good retro-8-bit style to it.
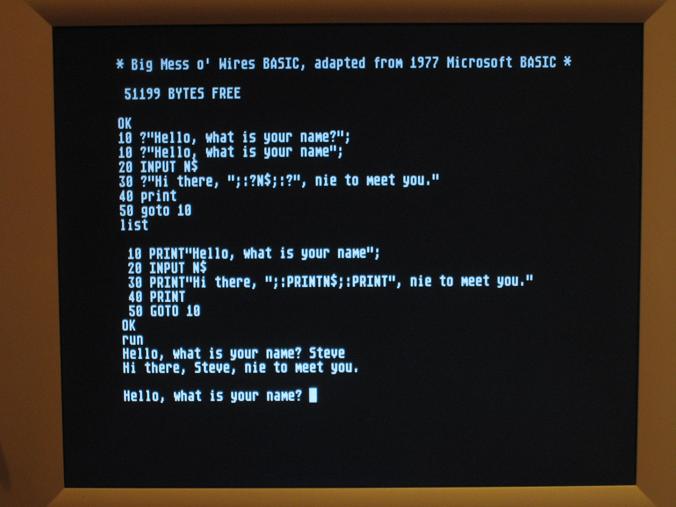
Here’s a photo of BMOW running MSBASIC with the final font:
Fudging It
I showed off BMOW to an old college friend the other day. He and I did all the digitial electronics labs together at MIT, where I learned what little I know about how to build a computer. Sadly, he seemed to think I was a little insane for all the energy I’ve put into this project, but I have to admit my demo was a little underwhelming. It didn’t help that MSBASIC crashed when I tried to show it off.
Yes, the random crash bug with string manipulation came back. Again. I’d earlier thought it was 100% present with one version of the code, and 100% absent with another, but it started happening intermittently with the “good” version of the MSBASIC code. Six months ago I would have set up the logic analyzer again, and gone digging for the source of the bug, but I couldn’t bring myself to do it this time. My previous investigations had suggested that memory at $149F was getting overwritten or misread somehow, so I made a very quick and ugly “fix” to the MSBASIC code to avoid that location altogether. In fact, I relocated the whole program image to begin at $1500, wasting about 5K of RAM. That seems to have resolved the problem, but it’s a pretty ugly fix. This bug will almost certainly come back to bite me again later, under other circumstances and at a different memory location.
Be the first to comment!Back from the Dead
It’s been a month since my last update, but BMOW and I are back from the dead, and better than ever. I even have some progress to report with MSBASIC! That’s pretty crazy when you consider that BMOW and I both underwent surgery in the past month. No photos of mine, but here’s BMOW on the operating table:
My month started with a health scare: out of nowhere one morning, I was hit with extremely intense abdominal pain, and was totally incapacitated. Called 911, took an ambulance to the hospital, and had surgery to remove a 6mm kidney stone. Afterwords I had a stent put in for a week, which was nearly as miserable as the stone. I’m happy to say I’m back to normal now. Overall I rate the whole experience zero stars, would not recommend.
Right on the heels of that, I had a big project milestone at work, which I won’t bore you with. Suffice it to say it occupied a lot of time. And right in the midst of that, I somehow decided it would be a good idea to replace my PC. Being the hacker sort, I of course built a custom PC from assorted new and used parts, which created all kinds of interesting problems. I had the guts of three different PCs scattered across the floor for a week. In the end I got the new PC up and running, with all the important BMOW data moved over (I hope).
Fast forward to today, when I finally decided to put BMOW back together, and take another look at this mysterious bug with MSBASIC. I described the issue in my previous entry– BASIC seemed to work fine with control flow and numeric computation, but it would lock up any time a string literal or variable was used. I couldn’t even print “HELLO WORLD”. I traced the problem to a mystery overwrite (or failed read) of a specific address in the MSBASIC code dealing with strings, which I was 99% certain was due to a hardware problem of some kind.
There were several issues getting the new PC talking to BMOW again today. I had hastily copied over all the MSBASIC source files from the old PC, which included some experimental modifications I had made to try to track the string bug. It took some digging around to determine how it had all been originally, and restore the code to its earlier state. Then some compiler settings appeared to have gotten lost in the translation, and it took more fiddling just to rebuild a new MSBASIC program image successfully. Then there was more COM port weirdness with the FTDI USB serial driver I’m using to connect to BMOW. Fun.
Finally I got it all going again, launched MSBASIC, and did some string-related operations to begin narrowing down the problem further. But I’ll be damned if it didn’t just work! I was really skeptical at first, so I exercised it for quite a while, rebooted, and cold started, but nothing I could do would shake it. I don’t know why, but maybe some of the steps I went through to get the software working on my new PC affected things somehow. That’s a pretty flimsy theory, but I can’t chase a bug that’s not there anymore.
So there you have it: a working MSBASIC running on BMOW. Is the bug going to come back again as soon as I breathe on it wrong? Quite possibly, but like I said, there’s nothing more I can do about it if I can’t even see the bug.
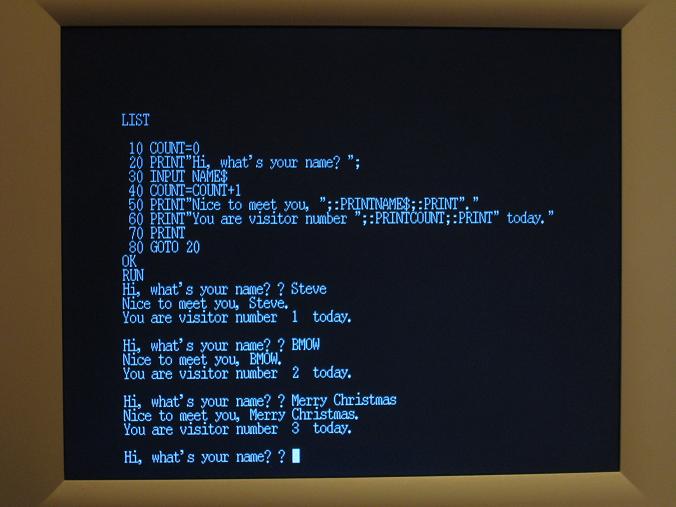
Onward to better things, then. There are still a couple of minor issues with my port of MSBASIC that I’d like to resolve. The biggest is that my keyboard driver doesn’t support the caps lock key, so I have to hold down the shift key while typing all keywords. FOR is not the same as for, according to MSBASIC. There are also some display formatting issues. You can see in the photo above that the visitor number has two spaces before and after it, for reasons unknown.
Beyond that, I think it’s time to start wrapping up BMOW. It’s come a long way in a year plus, and it’s been pretty amazing, but I’m feeling the pull of other projects and passtimes that I’d like to work on too. Before I send BMOW off for a well-deserved retirement, though, I want to build a decent case to hold everything, and protect it from accidental smashing. It’s been sitting bare on my desk for a year, and it’s a miracle that some kid, cat, or flying object hasn’t demolished it already. Just look at this thing:
I’ve got a case, I’ve got the tools, all I need is a little time and motivation to put it all together.
For bonus points, I’d still like to add some simple audio output, and maybe persistent storage using battery backed RAM, but I won’t cry if those never come to pass. As I tell my kids, we’ll see. I can’t say exactly how the next few months will turn out for BMOW, but I’m sure they’ll be interesting ones.
Read 10 comments and join the conversationMicrosoft BASIC
A picture tells the story here:
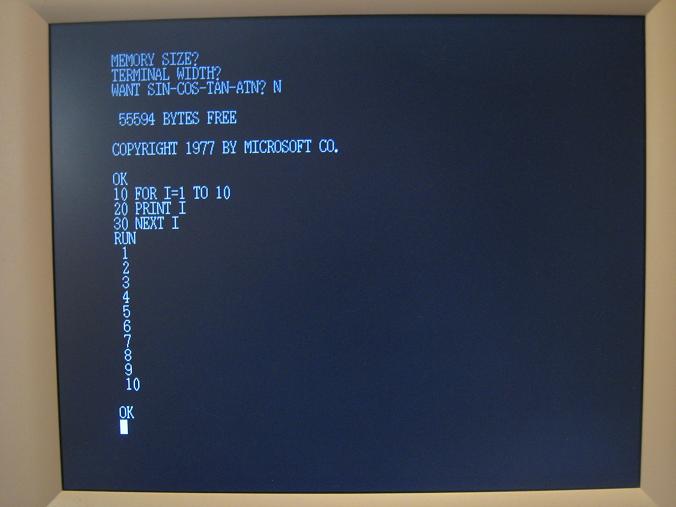
It’s BASIC! And not just any BASIC– it’s the venerable Microsoft BASIC that I remember fondly from the Apple II, Commodore 64, and other machines of that era. The version shown here is a plain-vanilla build that makes no assumptions about memory size or terminal capabilities. I think it was originally used on the KIM-1 computer.
BASIC took longer than I’d expected to get working, and in fact it still doesn’t work correctly. Any reference to a string variable or a PRINT statement with a string literal will lock up the computer. It works in the simulator, though, and I had it print “HELLO STEVE” infinitely on the real hardware earlier, but then I tweaked a few things and broke it somehow. Hopefully it won’t be too difficult to fix.
The main obstacle to getting MS BASIC running correctly on BMOW was the imperfect emulation of the 6502 instruction set. As I’d mentioned earlier, I never implemented some 6502 instructions, and others I implemented slightly differently than the 6502. I had to write microcode to implement several dozen 6502 instructions that BMOW was missing, which were mostly the ones that used page zero addressing. I also had to harmonize which condition codes are modified by each instruction. That was a slow and tedious process that would have been impossible without the BMOW simulator.
Another source of problems was BMOW’s stack. The 6502 has a 256 byte stack at $0100 in memory. Since it’s only 256 bytes, the stack pointer register is just 8 bits. BMOW has a 24-bit stack pointer that can point anywhere in the 16MB address range. Most of the explicit references to stack memory in the MS BASIC code used a STACK symbolic name, which was easy to change. But there were also some hidden assumptions about the stack location in the address arithmetic of parts of the code. Again, finding those would have been impossible without the simulator.
Of course I had to implement BMOW-specific I/O routines for text. I still don’t have CTRL-C working. And LOAD and SAVE don’t do anything, since there’s no storage medium from which to load or save.
The final challenge was working with two different assemblers. Up until now, all of the assembly code I’ve written has been assembled with an assembler called ACME. I’ve made lots of changes to ACME so that it supports all the instructions and addressing modes that are unique to BMOW. The MS BASIC code I used was written for the ca65 assembler, however. That meant I couldn’t use any BMOW-specific instructions or addressing without resorting to hand-assembled bytes included into the source code. It also meant that I couldn’t easily incorporate my existing keyboard, video, and console libraries into MS BASIC. My eventual solution was assemble the BMOW libraries with ACME, and include them as binary data in the ca65 source files. That worked, but it meant none of the labels or constants defined in the ACME source can be referenced from the ca65 source, which is a pain in the butt.
If I get the problems with strings sorted out, and generic BASIC programs running OK, then I’ll probably look at adding some BMOW-specific keyboard to BASIC for drawing graphics and things.
Read 9 comments and join the conversation