

Designing an Electric Scribbling Machine
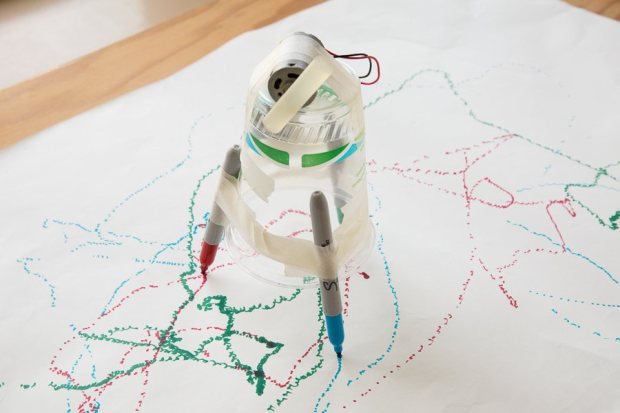
I’m working on a design for a “scribbling machine”, similar to the concept shown here from Make Magazine. For the past three years, I’ve led groups of children through a scribbling machine construction project at our school’s annual Discovery Day event. Take a motor with an offset weight on its shaft, attach it to some kind of tripod with colored pens for legs, and add 25 third graders. The offset weight makes the machine vibrate unpredictably, drawing patterns on the paper beneath it as it moves. Every time I’ve done this project, it’s been lots of fun.
Kids, motors, and pens – what could go wrong? Quite a lot, as it turns out. The first year, we used plastic drinking cups as the platform. These were a little too flimsy, and the tapered shape of the cup often caused the offset weight (a piece of glue stick) to whack the cup’s side with each revolution of the motor. For the second year, we used recycled plastic water bottles, with the motor mounted vertically in the neck of the bottle. This solved the clearance problem, but the motors sometimes fell inside the bottles, and the whole platform wasn’t well-balanced to create pleasing scribbles.
Attaching pens, motor, and battery to the platform is more challenging than it seems. The Make design in the photo shows everything held by tape, but we found this didn’t provide a secure enough mount, especially for the motor. We used rubber bands, which had the added advantage of being removable and reusable, to encourage experimentation. But the tension of the rubber bands sometimes deformed or crushed the cups and water bottles. We also learned that many children this age lack the physical dexterity needed to use rubber bands this way. They’d get a few rubber bands on, but then mess up the first ones as they tried to add more, or even get their fingers stuck.
The biggest challenge for the kids has consistently been making a reliable electrical connection between the motor and battery. We tried taping the wires to the end of a battery or using rubber bands to hold the wires, and it works if you’re careful and patient, but those adjectives don’t describe most third graders. Even when it works, this method doesn’t provide any way to turn the scribbling machine on and off, except by disconnecting the wire again. We saw many frustrated kids that couldn’t get their wires to stay put, or whose machines would repeatedly stop running when a wire wiggled loose.
Electric Scribbling Machine 2.0
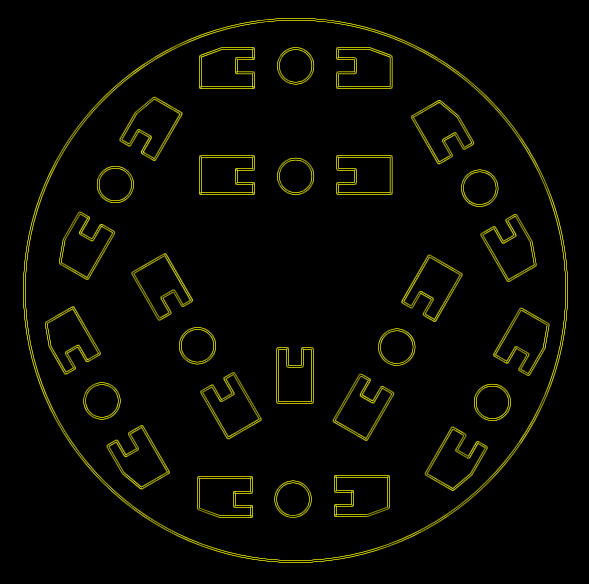
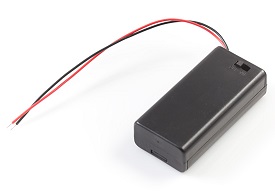
For this year, I decided to create a completely new platform to address all these issues. It will use a real 2xAA battery holder with built-in on/off switch. No more flaky connections! Kids can twist the wire leads onto the motor terminals, and use tape or hot glue to hold them in place. To solve the stability and fragility problems, I’ve designed a laser-cut platform to hold the pens, batteries, and motor firmly in place. The battery holder goes in the center, the motor is mounted lying on its side with the shaft extending beyond the platform’s edge, and three pens are inserted into any of the many pre-cut holes. By changing which holes are used as pen mounts, and moving the battery and motor, the kids can experiment with differently-balanced machines to see how their behaviors differ.
If the platform is cut from wood or another soft material, I can also include various offset weights with tiny pre-cut holes that press on to the motor shaft. These would replace the glue stick offset weight, and enable easy experimentation with different lengths and shapes of weights, including weights cut into strange shapes.
To attach the parts to the board, I plan to use rubber bands again, but in a simpler way than before. Surrounding each hole in the platform are two U-shaped cut-outs, which create two pegs on opposite sides of the hole. A rubber band stretched between these pegs will hold a motor, battery, or anything else mounted flat against the board. To mount pens vertically, two rubber bands can be used, one each around the pen shaft and a single peg. Or the job can be done with one rubber band that’s twisted twice when it passes around the pen shaft. With the right tension, this should hold the pens vertically and prevent them from slipping out.
Scribbling Economics
This all sounds good, but what will it cost? Discovery Day projects have a budget of $50, which works out to about $2 per child. They’re supposed to be quick and easy projects, with no soldering or other skills needed, that can be completed in about 45 minutes including time for experimentation and play. In past years I’ve spent closer to $3.50 per child, and paid the extra out of my own pocket. For this new design, the battery holder with switch adds another $1.00, and because 1xAA holders with a switch don’t seem to exist, I’ve gone to 2 AA batteries and an additional $0.30 expense.
That’s not too bad, but the potential deal-breaker is the laser-cut platform. Even after optimizing the platform design to make it as cheap as possible, it’s still going to cost between $3 and $7 each to make these platforms, depending on the material used. Even if I aggressively seek the cheapest sources for motors, batteries, and pens, and use the cheapest possible platform material (cardboard), I’m looking at a minimum cost of $5.68 per child, or almost 300% of the budget. In absolute terms that’s not a big deal – it’s only about 25 kids, so it would require an extra $75 or $100 from me out of pocket to make a cool project for the school. My real concern is what that would mean to the other projects. In other words, will I cause problems or bad feelings if I provide a $5 or $10 project when the other leaders provide a $2 one?
I’d assumed plywood would be the cheapest and best material for a project like this, for making both the platform and the offset weights. A small hole cut in a 3 mm sheet of plywood should press-fit onto the motor shaft, which testing will confirm. Unfortunately plywood turned out to be the most expensive option of the ones I considered – $6.74 per platform. The material itself isn’t expensive, but the estimated laser cutting time is higher than the alternatives, and that dominates the total cost. Clear acrylic would be cheaper at $5.24 per platform, but because acrylic doesn’t have any give to it, it can’t be used to make press-fit offset weights. Maybe I could cut the platforms from acrylic and the weights separately from plywood.
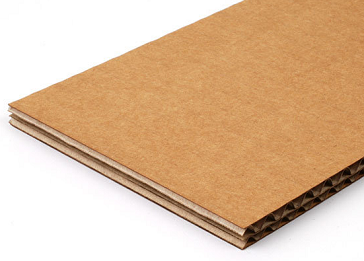
The cheapest option is cardboard. Cardboard, you say? Would that really be strong enough? I’m not sure, but I think it might be. Two-ply 6.7mm cardboard and one-ply 1.5mm cardboard would both be about $3.00 per platform. I have some one-ply 1.5mm sample material, and it’s surprisingly rigid. There’s also a one-ply 4.0mm material available for the same price, but my guess is that won’t work as well for the rubber band mounting pegs.
I also considered making the platform as a printed circuit board, from a PCB service like Seeed. The circuit board probably wouldn’t do anything – it would just be a substrate. The cost for a 150mm diameter circular board would be about $5 each, similar to the laser cut acrylic. But I don’t think PCB material could be used to make press-fit offset weights, and PCB manufacturers don’t usually like to cut internal slots like those U-shaped peg cut-outs.
I’ll get a few sample cardboard platforms made, the next time I place an order for other laser-cut parts. If cardboard is strong enough, that’s probably the least expensive solution. The only lower cost alternative would be scrapping the laser-cut platform idea, and using a 2xAA switched battery holder on some random recycled material as the platform. But that wouldn’t be as cool. 🙂
Read 3 comments and join the conversation3 Comments so far
Leave a reply. For customer support issues, please use the Customer Support link instead of writing comments.
Thanks for the description Steve — this would be fun to do with my Cub Scouts.
What’s the diameter of the platform you’ve designed?
Please post some photos when you do the activity.
I have a CNC router I can use to cut the platforms out of MDF or plywood.
Is there any repository of the Discovery Day projects your school does? I’m always looking for ideas for semi/non-educational fun hands on projects for kids.
It’s about a 150mm diameter (6 inches). CNC routing is a good idea – I hadn’t considered that. I’ll look into some services and see if they might be cheaper than laser cutting for this.
There’s no project repository that I know of, but there’s an old newspaper item. Other past projects have included building a birdhouse, mixing coke and mentos, creating marshmallow shooters, stop motion animation, leatherworking, and dissecting a goat’s eye.
What about instamorph/friendly plastic? It a plastic that melts in hot water, and is hand moldable. You can use hot air to resoften it. Once cool its pretty rigid. It can work for both the stucture and the counterweight.