

Fruit + Electronics = Piano
The human body is electrically conductive. A piece of fruit will also conduct electricity, as will basically anything else that’s organic. We can leverage this fact to create a fun little afternoon project: a digital fruit piano. No soldering is necessary, and the whole thing takes less than an hour, even for a total beginner like my 9-year-old daughter. What sound does a banana make? Let’s fine out.
While humans and fruit do conduct electricity, they’re pretty bad at it. Both typically have an electrical resistance that’s in the 1-megaohm range, depending on how moist your skin or nectarine is. This design uses your body and the fruit as part of the circuit, flowing current through the human-fruit “wire”, but the high resistance means that the currents involved are tiny. The piano player isn’t going to feel a shock, or even feel anything at all. She’ll just lightly touch different bits of fruit to play a song, almost as if by magic.
This isn’t my original design. The idea of controlling a digital device by using the human body as part of the circuit has been around for quite a while, and the Makey Makey has popularized it with a nice little kit. If you like this type of project, definitely check out the Makey Makey! But if you’re lazy and cheap like me, you can build a similar device yourself with only an Arduino and some hookup wire, a few resistors, an audio speaker, and a selection of bananas, pears, and peaches.
How does it Work?
The basic concept is simple. Each piano key is a voltage divider circuit involving two resistors: one 1-megaohm resistor and one piece of fruit. Touching the fruit will change the resistance in the circuit, resulting in a change to the voltage at the junction between the two resistors. The Arduino can measure this changing voltage with an analog input, and use it to control an audio speaker.
To complete the circuit, one hand should be connected to the Arduino’s ground pin, while the other touches the fruit. Current will flow through one hand, up the arm, across the chest, down the other arm, and back to Arduino GND. For convenience’s sake I connected GND to a metal ruler, but a plain jumper wire also works fine. For the fruit connection, just stab a wire straight into the fruit. Soldering a banana works poorly…
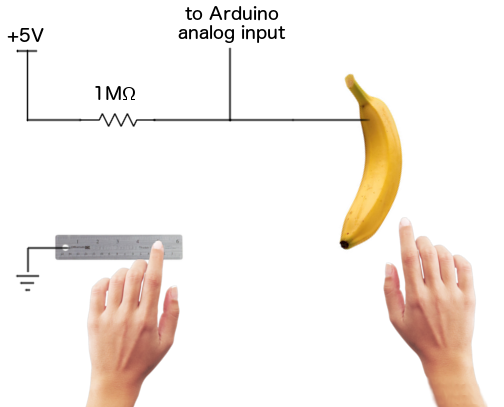
If the hand isn’t touching the fruit, then the whole fruit-hand-body section becomes an open circuit with infinite resistance. In this case, the circuit simplifies to just +5V connected through a 1 meg resistor to the analog input. Because the analog input draws virtually zero current by itself, there will be no current flowing in the circuit and no voltage drop across the 1 meg resistor (remember Ohm’s law V = iR, so when i = 0 then V = 0). The voltage measured at the analog input will still be +5V, and Arduino’s analogRead(A0) function will return 1023, the maximum possible value for its 10-bit resolution.
When the hand touches the fruit, the fruit-hand-body section forms an organic resistor of about 1 megaohm. Current will flow from +5V through the real 1 megaohm resistor, then through the fruit-hand-body 1 megaohm resistor and down to ground. The total resistance between +5V and GND is 2 megaohms, and with two equal value resistors, the voltage at the point midway between them will be half the total voltage drop. That means the Arduino’s analog input will see 2.5V, and the analogRead(A0) function will return a value around 512.
To make a piano, a simple Arduino program is needed to continuously poll each analog input, and play a tone if the analog value is below an appropriate threshold. I used a threshold of 800, but you’ll need to experiment to find the value that works best for you. The sample program uses tone frequencies corresponding to the notes CDEFGA of a C major scale, making it easy to bang out favorites like Mary Has a Little Lamb, Hot Cross Buns, and I Ate the G Key.
Each of the six fruits is connected to one of the six Arduino analog inputs A0 to A5. If you’re wiring this up at home, duplicate the pictured banana circuit six times, connecting the first to A0, the second to A1, and so on up to A5. Then connect your speaker’s black wire to GND and red wire to Arduino pin 8. Happy fruit playing!
void setup() {
}

void loop() {
  if (analogRead(A0) < 800)
  {
    tone(8, 523, 130);
    delay(80);
  }
  else if (analogRead(A1) < 800)
  {
    tone(8, 587, 130);
    delay(80);
  }
  else if (analogRead(A2) < 800)
  {
    tone(8, 659, 130);
    delay(80);
  }
  else if (analogRead(A3) < 800)
  {
    tone(8, 699, 130);
    delay(80);
  }
  else if (analogRead(A4) < 800)
  {
    tone(8, 784, 130);
    delay(80);
  }
  else if (analogRead(A5) < 800)
  {
    tone(8, 880, 130);
    delay(80);
  }
}
2 Comments so far
Leave a reply. For customer support issues, please use the Customer Support link instead of writing comments.
Hi,
nice Project!
I try to use your example with a Arduino Micro (and 1 meg resistor to the analog inputs) so it works like a Makey Makey (code: https://gist.github.com/cbmainz/7c77b41c6888747cf5f2ecf9ab8ac4d8).
But at the moment it will react regardless of touching GND or not by touching a fruit. I try do set a slightly different threshold, but this has no big effect. This happened also when I used your code and a speaker on a Arduino Micro.
Do you have any idea on how do solve this?
Cheers
cbmainz
Hi.
Thanks for putting this up.
@cbmainz, the issue with your code is likely the idea of \’Active High\’ vs \’Active Low.\’
Your code is essentially looking for a value above 800, because of a number of factors, your pin could, in fact, have a reading of above 800 without any interaction. On my Arduino Uno board, without even touching it, it was reading values in the range of 850- 980.
Touching it with one hand drops the reading a bit to around 500. When I touch GND with my other hand while still touching the \’fruit\’, this drops the value down to 0-50.
You can see the exact values being read on your pin using Serial.println(analogRead(A0));