

WordPress, https, and Canonical URLs

About a week ago, I added an SSL certificate to the BMOW web site, in preparation for some improved shopping cart features. With an SSL certificate signed by a certificate authority (free from Let’s Encrypt), the site can serve pages using the encrypted https protocol as well as the standard non-encrypted http. Pages encrypted with https will show a padlock icon or something similar in the address bar of most web browsers, and are normally used for handling sensitive content like payment info for a web store. My plan was to continue serving the existing blog pages using http, and use https for the new shopping cart pages. But it’s technically possible to serve any page from the site using https – try it! Just manually edit the URL of this post in your address bar, and change http to https.
The main blog pages aren’t designed to be served with https, however, and they contain embedded non-secure content like images and comment forms that use the http protocol. If you view this post as https, it will work, but your browser will probably display a warning about insecure content. If you try to post a comment, you’ll see a warning about a non-secure form, and if you persist in posting the comment you’ll see an error 403: forbidden message.
Since nobody ever visits the BMOW site using https, I thought those security warning didn’t matter, until I discovered that Google has started replacing all of the BMOW links in its search results with https versions of those same links. Someone who searches Google for “KiCad vs Eagle” might see a result with an https link to my post on that topic. Following the link, they’ll get a bunch of security warnings from their browser. And after commenting on the post, they’ll get the dreaded error 403. Oops.
I learned that Google prefers to index pages as https rather than http, if it discovers that a web server supports both. After doing more research I considered a few paths out of this mess:
- Go full blown https everywhere on the site. Fix images, comment forms, and other content that use http.
- Redirect https requests to http versions of the same URL.
- Use canonical URLs to instruct search engines to index the http versions of pages, not https.
Switching everything to https would be lots of work, and wasn’t the end result I wanted anyway. Redirecting all https requests to http would probably be OK, but seems a little bit drastic, and I’d need to carve out exceptions for the shopping cart and admin pages.
Canonical URLs
Canonical URLs are a nice feature, and I decided to use them to solve this problem. In the header section of any HTML document, you can include a link like this one:
<link rel="canonical" href="http://www.example.com/mypage/" />
and search engines will index the page as http://www.example.com/mypage/, regardless of whether they reached the page as
http://www.example.com/mypage/
https://www.example.com/mypage/
https://www.example.com/mypage/?q=vegemite
WordPress automatically adds canonical URLs to some pages, but not all, so I installed the Yoast SEO plugin to gain more control over canonical URL generation. Yoast added the canonical URLs as expected, but not in the way I needed. If I visited a page on the site using http, then Yoast would generate a canonical URL link beginning with http://. But if I visited a page on the site using https, Yoast would generate a canonical URL link beginning with https://, which was exactly what I didn’t want. I was finally able to force canonical URLs to always start with http:// by inserting this code snippet into my WordPress install’s functions.php:
function design_canonical() {
  global $post;
  if(isset($_SERVER['HTTPS']) && $_SERVER['HTTPS'] == "on") {
    $find = 'https://www.exampledomain.com';
    $replace = '';
    $theurl = str_replace($find,$replace,get_permalink($post->ID));
    return site_url( $theurl , 'http' );
  } else {
    // Leave blank and Yoast SEO will use default canonical for posts/pages
  }
}

add_filter( 'wpseo_canonical', 'design_canonical' );
Fixed?
This should be all that’s needed to make Google, Bing, and other search engines use http for indexing all my content. It may take a few days for the Google index to be updated with the new links, but eventually everything will be http. And that should be enough to prevent visitors from accidentally viewing the site content as https, right? Well, maybe not. I had forgotten about the existence of browser plugins like HTTPS Everywhere that attempt to force use https wherever they can. Even if Google’s no longer sending traffic to https versions of my pages, then, other sources of https traffic still exist. And those visitors will have all the security warning and error problems I described.
I’m scratching my head, wondering how to proceed. Redirect all https traffic to http, as I’d originally considered? Or leave everything as is, and let HTTPS Everywhere visitors deal with the problems that extension creates? Maybe there’s another simpler solution. It all makes me appreciate how complex the job of a web site admin can really be.
Read 12 comments and join the conversationApple IIc+ is Weird

It’s time for more Apple II love from Floppy Emu! The newest Apple II compatible firmware, apple-II-0.1M, adds a few small but important improvements:
- Fixed Smartport hard disk timing problem when starting from a cold boot (Apple IIgs, IIc, IIc+)
- 3.5 inch disk emulation is now supported on the Apple IIc+
- Floppy Emu Model B can now be connected internally on the IIc+
For hardware Model B: apple-II-0.1M-F8
For hardware Model A: apple-II-0.1M-F6
Floppy Emu is a floppy and hard disk emulator for classic Apple computers. Read more about it at the product page.
The Quirky Apple IIc+
3.5 inch disk support for the Apple IIc+ was something that had eluded me for many months. Thanks to Jeremy Moskowitz for lending me a IIc+ machine, so I could finally do the necessary troubleshooting.
If you’re curious why 3.5 inch disk emulation didn’t previously work on the IIc+, the reason is probably not what you would have guessed. The IIc+ was originally conceived as a 1 MHz machine, like the IIc. The CPU wasn’t fast enough to handle the data transfer speeds of 3.5 inch disks, so a new coprocessor chip called the MIG was added, along with some high-speed cache memory. Later the design was revised, boosting the CPU speed to 4 MHz, and eliminating the need for the unique MIG and cache system. Yet the MIG and cache remained in the final product anyway. I was virtually certain the IIc+ issues with 3.5 inch disk emulation and Floppy Emu were related to the MIG and cache, but it turns out I was wrong.
The problem was actually a limitation of the Floppy Emu design that hadn’t caused trouble previously. In 3.5 inch emulation mode, there are four control lines from the computer. These lines determine which one of 16 state parameters is being read from the drive at any given moment – info like what kind of drive it is and whether it’s at track zero, as well as the instantaneous data bits flying by the drive head on sides 0 and 1 of the disk as it rotates.
There’s no clocking or synchronization on these control lines, so Floppy Emu doesn’t really know when the computer is reading a parameter, versus when it’s transitioning to a different set of control line states. Typically the control lines don’t all change state at precisely the same time, so if the computer was reading parameter 0000 and then wanted to read parameter 1111, the Emu might observe the control lines changing in quick succession in a series like 0000 -> 0100 -> 0110 -> 1110 -> 1111. Normally this doesn’t cause any problems. The Emu briefly emits the info for the phantom states 0100, 0110, and 1110, but the computer isn’t reading these values and ignores them.
The trouble arises with parameters 1000 and 1001, which are the instantaneous data from the disk read head on sides 0 and 1 of the disk respectively. If the Emu observes a read of parameter 1001, it tries to provide data from the sectors on side 1 of the emulated disk. If the side 0 sector data is currently loaded in the Emu’s memory, it dumps it and fetches the side 1 sector data from the SD card. This takes a few milliseconds, and interrupts the flow of data from the emulated disk.
Phantom Reads
As you can imagine, an accidental phantom read of the side 1 parameter during I/O on side 0 would cause major problems, and this is exactly what was happening on the IIc+ in 3.5 inch emulation mode. The computer was repeatedly switching between parameter 1000 (side 0 data) and parameter 1101 (drive ready flag), brushing past 1001 (side 1 data) every time and causing an unnecessary load of side 1 data from the SD card, followed by another load of side 0. The Emu was caught in a perpetual cycle of reloading data from the SD card, and could never get anything else done.
How do you fix a problem like this? If the Emu had enough on-board RAM to load the side 0 and side 1 data at the same time, then there would be no penalty for phantom side switching. This is theoretically possible on the Emu hardware, but only for some disk types, and it would require some big changes to the firmware design. Another approach would be to filter control line states in hardware, and only react to a side 0 or side 1 transition after the control lines had remained at 1000 or 1001 for a while without further changes. This could easily be done in the Emu’s CPLD chip, if there were any space left to implement additional logic. Sadly the CPLD is already near 100% full with the existing disk emulation logic.
The solution I settled on was to poll the CPLD for which side is active, after handling each sector, instead of treating side changes as an interrupt. It’s not the ideal way to handle the issue, but it works. The phantom transition through parameter 1001 still happens on the IIc+, but the Emu ignores it unless it happens to fall right at the moment of polling. This happens very rarely, and when it does happen the computer treats it as a glitchy read, and simply tries the sector again.
Interestingly, I wrote another post titled Phantom Reads here seven years ago, for totally unrelated hardware that shared a similar conceptual problem.
Read 7 comments and join the conversationKit Biz Profit and Loss
Have you ever wondered what life is like in the “kit biz”, with a part-time business selling electronic gizmos to hobbyists? Maybe you’ve thought about selling one of your own creations, or were just curious if it’s possible to make any money this way. In the spirit of helping the hobbyist community, I’m sharing the 2015 BMOW profit and loss breakdown here. My hope is that others might provide some helpful insights, or learn something that can help their own efforts. Normally I would keep this type of information private, but I decided there’s no harm in sharing, and more knowledge can only help.
BMOW began as a place to document my personal electronics projects and musings, and remains primarily an electronics blog. But along the way, it accidentally grew into a small business too, as some of the projects generated interest from readers wanting to buy hardware for themselves. Chief among these is the Floppy Emu disk emulator for vintage Apple computers, and its related accessories. The Mac ROM-inator replacement ROM for early Macintoshes also has a small but devoted following. Today BMOW is a part-time 1-man business, to which I devote an average of about 10-20 hours per week for R&D, hardware assembly, customer support, and order fulfillment.
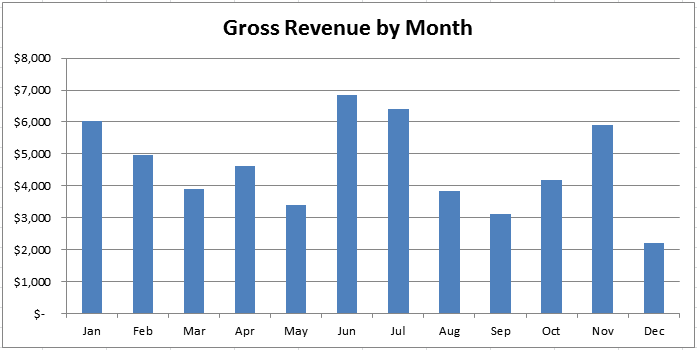
Total BMOW gross revenue in 2015 was $55,097. As you can see in the graph, month-to-month revenue varied more than 2x. There was an obvious bump in June and July, when the addition of Apple II emulation features boosted Floppy Emu sales. Sales also jumped in November for no discernible reason, and inexplicably slumped in December during what should have been the year’s strongest period (but recovered in January 2016).
The gross revenue figure includes all the money I collected: that’s money from product sales, California sales taxes collected, and shipping fees. I don’t really consider the latter two as income, because they go to the state or the post office, and not into my pocket, and their inclusion here makes the “revenue” figure look more impressive than it is. Accounting experts might argue whether sales tax and shipping fees should be included as revenue, or dealt with some other way. I’ve chosen to list them as revenue, with an offsetting expense listed later.
Expenses
Of course that money isn’t all profit. Let’s look at the expenses for the year:
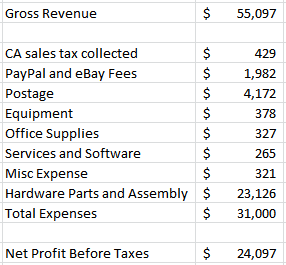
I rang up $31,000 in total expenses for 2015, resulting in a net profit of $24,097. Assuming I worked an average of 15 hours per week, that’s $31/hour before paying income taxes. That’s a lot better than the federal minimum wage, which is one test not every kit biz passes. But it’s a lot less than my typical hourly rate for consulting work, or the rate I could likely earn at a full-time electronics engineering job. One of my big goals for 2016 is to reduce the amount of time spent on things like support and order fulfillment, by searching for efficiency improvements. Much of what I do now is very labor-intensive, and there’s lots of opportunity to make more effective use of time.
I collected $429 on behalf of the state of California, which is an extra hassle that involves a special tax return filed each January. PayPal and eBay took $1982, or about a 3.6% cut of gross revenue. Given how frustrating and awkward PayPal is to work with, I don’t enjoy giving them anything, but it’s about the same rate that I’d pay if I accepted credit card payments directly. I made only a couple of eBay sales in 2015, which is fortunate because they charge 10% commission on top of PayPal’s 3% fee. Ouch.
The post office must really love me: $4172 in postage fees! Sometimes I wonder how eBay sellers in Asia can ship to the USA for a dollar or two, when I can’t even send a package within the USA for less than $6. International postage for small packages to most countries except Canada starts at $13, and (as of rate increases a few weeks ago) is over $20 for the weight of a typical BMOW order. My customers pay the shipping costs, so it doesn’t directly affect me, but I wish I could offer lower shipping rates.
The $378 for equipment represents hardware development tools and machines used for testing. Office supplies like shipping boxes, paper, address labels, ink, and bubble wrap were a $327 expense. The cost for web hosting fees and a few commercial software programs totaled $265, and my city business license was $321.
Hardware is Expensive
The biggest BMOW expense by far was the $23,126 cost of hardware and assembly. Unlike a software publishing business, selling hardware gizmos requires spending a lot of money upfront on hardware parts first. These parts must be purchased in large quantities to get the best prices, so it’s necessary to go into debt temporarily, and make up the debt later from product sales income. In my case I didn’t literally go into debt, but for a while my year-to-date expenses exceeded revenue by several thousand dollars. I have a lingering fear that demand will suddenly evaporate just after I make a big hardware purchase, or something will happen to make my products instantly obsolete, and I’ll be left with thousands of dollars in useless inventory.
$23,126 for hardware and assembly is a big number, so let’s break it down:
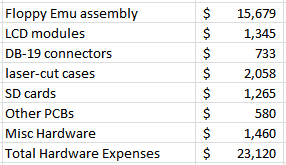
Floppy Emu boards are built by Microsystems Development Technologies in San Jose, CA. The cost for parts and assembly of the “core” Emu modules came to a whopping $15,679. This doesn’t include the LCD displays and the ever-elusive DB-19 connectors, which were purchased separately for $1345 and $733, respectively. The clear acrylic case for Floppy Emu is a popular option, and I spent $2058 on materials and laser cutting services for those. A further expense of $1265 was for the SD cards used in the Vintage Software Collection. I buy a lot of SD cards.
$580 went towards making PCBs for hand-built Floppy Emu accessories: the Universal Adapter and the A/B Drive Switch. This amount also included other non-Emu projects like the ROM-inator, Sonic Bow Tie, 68 Katy, and various prototypes and experimental hardware. The chips and other components needed to populate all those PCBs ran to $1460.
Room for Improvement?
This was a good result for 2015, so I’m not complaining. Still, there’s always room for improvement. While I’d love to boost sales volume or drive down costs, the area that’s most ripe for improvement isn’t money but time. There’s a tremendous amount of manual labor involved in most of what I do, and some weeks it cuts into my spare time so much that I deeply resent it. And even during weeks when the labor effort is more manageable, I’d rather spend an extra hour developing a new feature, or researching a new project, than bubble wrapping and boxing. Going forward, I’m going to look for opportunities where I can pay someone else to offload some of the manual work. Even if my costs go up as a result, and my net profit goes down, I’ll still consider it a success if the profit per hour of time spent improves. After all, it’s not my goal to spend every last waking hour of my life devoted to weird electronic gizmos – there are other things.

Here are some of the time-saving ideas I’m looking at for 2016.
Testing – During assembly, Microsystems Development Technologies verifies that each Floppy Emu passes its built-in self-test. Once I get the hardware, I do further testing myself: adjusting each unit’s LCD contrast, assigning a serial number, and actually running an emulated disk on a Mac or Apple II system. That all takes time. Initially it seemed unthinkable to send Microsystems an old Mac Plus and instructions for booting up System 3.2, but now I’m considering doing exactly that. They’re smart guys, they can figure it out.
Low-Volume Assembly – The items with lower sales volumes, like the Universal Adapter and A/B switch, are hand-built one at a time by me. They don’t take more than 10 or 15 minutes at most, but sometimes I just want to ship an order without hauling out the soldering iron first. Even when I build a few at a time to keep a small stock on hand, it turns into a few hours of work here and there that I’d rather spend on something else. Microsystems might not be the right people to build these for me, but there are plenty of other low-volume assembly services like Smart Prototyping. I need to find the time to research them and make an order.
Fulfillment – The most manual of the manual labor I face is order fulfillment. That means printing invoices, picking hardware out of boxes, sorting things into little piles, bubble wrapping, boxing, and taping. I once had a summer job as a shipping clerk, and this is pretty much exactly the same thing. And it still sucks. I could improve on this a little if I had a dedicated shipping area, with big rolls of tape and bubble wrap and boxes neatly stacked and ready to go. At times I’ve paid my daughter to do this work, but she doesn’t like it much either. Maybe a part-time helper from a temp agency? The need for this help is irregular, so I’m not sure how well a temp employee would work anyway.
PayPal and Postage – In an ideal world, I would log into a web site, and click a button to fetch all my new orders. This would automatically update my sales history, print a bunch of invoice slips, calculate the weight of each outgoing package, purchase the necessary postage, and print it. But in reality this process requires a crazy combination of the PayPal site, US Post Office site, and custom software. It’s an orgy of clicking, cutting and pasting, and manual steps. PayPal requires purchasing and printing postage for each order, One. At. A. Time. The post office web site lacks a way to import shipment details, so information must be manually pasted into forms and drop-down boxes stretched across several pages of the site. And don’t get me started again about their abysmal handling of international package addressing, which I’ve discussed here before (1, 2).
For postage there are alternatives like Endicia and Stamps.com, which should allow importing shipment details and combining purchases of all postage for a set of orders. Both services have fairly poor reviews, so I’ve resisted making the switch, but they can hardly be worse than the system I’m using now. On the payments end, unfortunately I don’t see any simple alternative to PayPal. It’s often clumsy and frustrating, but it provides a basic shopping cart system and handles a wide variety of payment types from nearly every country. Square seems more geared towards physical storefronts and swiping a credit card. Amazon Payments may be the most similar to PayPal, though I don’t know much about it.
Did you ever sell a product online? What was it?
What’s your favorite maker-friendly electronic gizmo?
Have a good post office story to share? I once received a coconut mailed from Hawaii. Just the coconut, with my address written on the shell.
Read 14 comments and join the conversationSD Card SPI Initialization
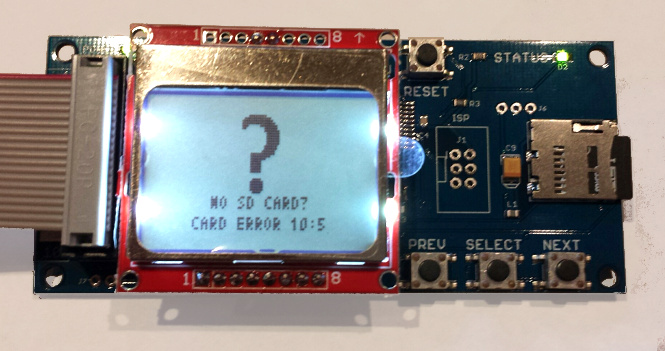
What happens when two devices share the same SPI bus? With a good design, each device is enabled one at a time for use of the bus, and they coexist without problems. With a bad design, SPI communication that’s intended for one device is sent to the other, leading to confusion and buggy behavior. In the Floppy Emu disk emulator, the SPI bus is shared between an SD card and an LCD display. As it turns out, it had a bug like this that escaped notice for almost two years, with the occasionally flaky behavior wrongly attributed to bad SD cards, faulty boards, or the phase of the moon. Doh!
The symptom was a “No SD card” message, with error code 10:5, when using a few specific models of SD card. During startup, the Floppy Emu firmware was sending SPI commands to the LCD to draw an image, then sending SPI commands to the SD card to initialize it. In rare circumstances, the initial communication with the LCD was confusing the SD card, leaving it in a state where it refused to respond to any further commands until the power was turned off and on. This caused the Emu to think no card was present. The problem didn’t always happen 100% of the time, and it appeared to depend on the electrical characteristics of each board and anything attached to it. But for certain models of SD card, it happened so consistently that the only remedy was to use a different SD card.
My solution was simple: initialize the SD card before doing any LCD communication. Grab the new firmware with the fix here:
floppy-emu-1.0R-F13 – Mac Floppy
hd20-0.7E-F14.5 – Mac Floppy + Hard Disk and Lisa Floppy
apple-II-0.1K-F7 – Apple II, for Model B
apple-II-0.1K-F6 – Apple II, for Model A
SPI Mysteries
You might wonder how a problem like this could have gone unnoticed for so long. Looking back over two years of support emails, I only found four problem reports that could be retroactively attributed to this issue. In each case, the person was able to get things working by trying a different SD card, so we chalked up the problem as a damaged or flakey card. It was only recently that I received two reports from people who’d tried multiple cards, all of which failed with the “No SD Card” message and error 10:5. Following up on their hardware, I bought two suspect 16 GB cards (1, 2), and confirmed that they both just plain didn’t work. Ouch. I’ve now verified that the new firmware gets both these SD cards working, and also received confirmation from some other users that the new firmware gets their troublesome cards working too.
So what exactly was the problem? The frustrating answer is that I don’t really know, and my description of the issue intentionally glossed over some important details. It’s true that the LCD communication somehow confused certain SD cards, but I can’t explain why.
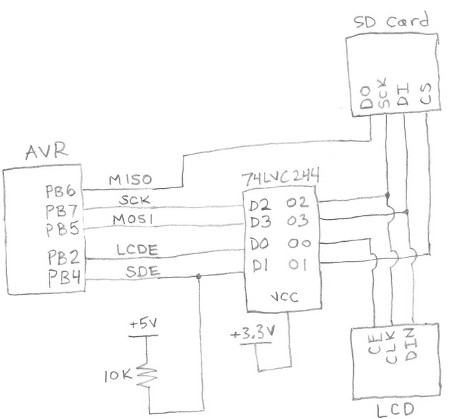
Here’s a simplified diagram of Floppy Emu’s SPI bus. The LCD and SD card are independently enabled by separate, active low signals LCDE and SDE. Because the AVR microcontroller operates at 5V, all its outputs are passed through a 74LVC244 buffer to step them down to 3.3V for the LCD and SD card (the 3.3V signal MISO is an output from the SD card, and doesn’t need level conversion). SDE also has a 10K ohm pull-up resistor to +5V, to ensure that the SD card is disabled when the AVR isn’t actively driving the signal, during reset and microcontroller startup.
The only way it should be possible for the SD card to be confused by LCD communication traffic is if SDE were asserted at the wrong time. Looking at the schematic and the firmware code, I just don’t see how that’s possible. The pull-up resistor ensures that the SD card will be enabled if the AVR isn’t actively driving it. And once the AVR does begin actively driving it, it drives SDE high (unasserted) until it’s ready to begin communication with the SD card. So the card should be disabled during the initial LCD communication, and should ignore whatever is happening on the SPI bus.
If I weren’t so lazy, I would put a scope on the SPI bus, and verify that SDE is truly unasserted during LCD communication. But I’m lazy, and didn’t do that.
A few hints point to an electrical problem. With some cards, the 10:5 error occurred more often when I had an AVR programmer attached to the SPI bus, even if the programmer wasn’t active. And with those same cards, seemingly trivial firmware changes would cause the error to appear and disappear. Sometimes I’d only get the error on half my attempts, so it wasn’t a deterministic problem.
Maybe poor circuit design causes a momentary noise spike on SDE, during startup and LCD communication. Ringing, ground bounce, or cross-coupling of signals might cause SDE to briefly appear asserted when it shouldn’t be, causing the SD card to try to interpret communications meant for the LCD. But if that were the case, I’d expect to see all kinds of similar communication errors with the SD card during normal operation.
Another possibility is that there’s something fishy going on with AVR pin PB4, which is also the SPI SS (slave select) pin. The datasheet mentions that there’s some special behavior related to this pin. But after reading that section of the datasheet, I don’t think that’s the cause.
My last theory is that the problem is caused by accidentally switching the SD card into 4-bit mode. SD cards can operate in three different modes: SPI, 1-bit SDIO, or 4-bit SDIO. The latter two modes use the card’s pins like a conventional data bus. I believe the details of 1-bit and 4-bit SDIO may be proprietary and require an NDA, and every hobbyist-made microcontroller project I’ve seen has used SPI instead.
The catch is that SD cards initially power on into 1-bit SDIO mode, and part of the SD card initialization process is to switch to SPI mode, which will remain active until power off. With the old firmware, during the Floppy Emu’s initial LCD communication, the SD card was still in 1-bit SDIO mode rather than SPI mode. I don’t know anything about 1-bit SDIO mode, but maybe the chip select input is used differently in that mode, and my LCD communication was accidentally triggering a switch to 4-bit SDIO mode. As I understand it, once switched to another mode, that mode will remain active until power off, which is consistent with the “zombie SD card” behavior I observed with certain cards under the old firmware. Hmmm…
Read 3 comments and join the conversationStandby Current of a USB Car Charger
How much current does a typical USB car charger consume, when nothing is charging? Zero? Microamps? Milliamps? Is it enough to be concerned about draining the car’s battery? There’s no better way to find the answer than direct measurement, so let’s go!
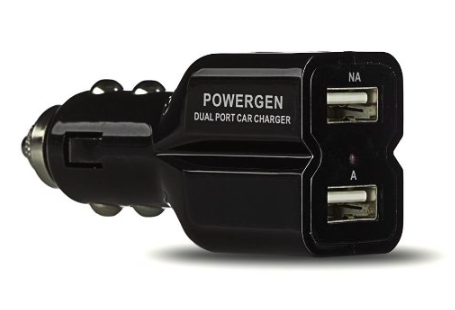
My 2016 Mazda CX-5 has two built-in USB ports, which can theoretically recharge my mobile phone while I’m driving around, but the rate of charge is so slow as to be nearly useless. In an hour of driving, it might raise the phone’s charge level by 15%. To get faster charging, I purchased a USB car charger that fits in the 12V jack in the car’s center console: the ubiquitous jack that was once the cigarette lighter in years gone by, but has now been repurposed as a place to plug in dash cams, DVD players, and other car accessories.
The new USB car charger works fine, and can recharge my phone from zero in about an hour, but it leaves me with a lingering worry. The 12V jack in the 2016 Mazda is not switched by the ignition, but is powered all the time regardless of whether the car is on or off. That means when the car is sitting parked, with the engine off, the USB charger is still drawing current. If I were foolish enough to leave some power-hungry appliance connected, it could quickly drain the car’s battery. But even with nothing connected, the USB charger will still draw some standby current. To measure it, I put together a quick test involving a 12V wall supply, the USB charger, a multimeter, and lots of alligator clips.
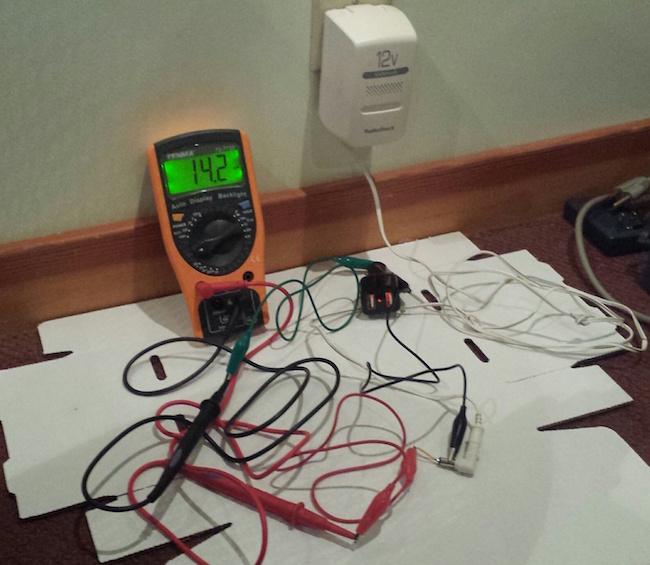
The answer: the USB charger’s standby current is 14.2 mA. I would have guessed microamps, so I was way off. It doesn’t help that the charger has an LED that’s continuously illuminated whenever it’s powered.
Is a constant 14.2 mA draw enough to worry about discharging the car’s battery? Probably not. From a few quick searches, I learned that a typical car battery has a capacity of around 40 ampere hours. At 14.2 mA, it would take 2817 hours or 117 days to completely discharge the car’s battery. Assuming I drive the car every day, then, it’s not a concern. Even parking the car for a week or two should be fine. But if I ever need to leave the car in storage for an extended period of time, that 14.2 mA could add up. Of course the car itself has its own standby current draw for the anti-theft system and keyless entry, so the USB charger may not even be the largest concern. For typical driving, at least, it appears the USB charger’s standby current draw won’t be a problem.
Read 11 comments and join the conversationClearance Sale: $79 Floppy Emu Model A
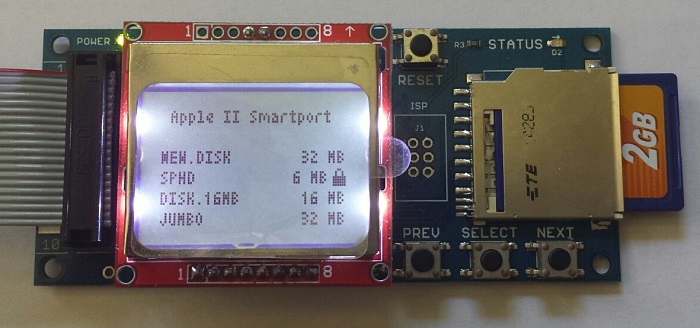
While supplies last, the Floppy Emu Model A is on sale at a clearance price of just $79. If you’ve been waiting to add one of these hard disk / floppy disk emulators to your Apple computer collection, now is your chance. The response to the new Model B has been great – maybe a little too great, and I need to close out the remaining inventory of Model A hardware. If you’re a Macintosh or Lisa user, or an Apple IIgs/IIc/IIc+ user looking for a Smartport hard disk, this is a great value! See the compatibility table on the order page and the Model B announcement for more details on Model A vs B differences.
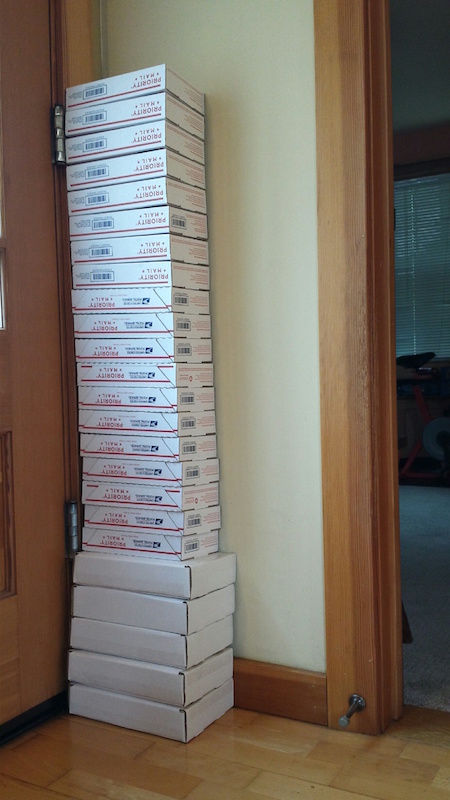
If I were a savvier businessman, I might have waited to introduce the Model B until my inventory of Model A hardware was gone. It’s not quite the Osborne Effect, but introducing a new model that kills demand for the old model may not have been the smartest move. Fortunately for you, my loss is your gain! The good news is that interest in the Model B has been strong. In the past I typically made about one sale per day, but recently it’s been much busier. This was the scene heading to the post office after the 3-day MLK Day weekend:
The Model A is the original Floppy Emu design that’s been featured here at BMOW for over a year. It emulates a classic Macintosh HD20 hard disk or 3.5 inch floppy disk, or a Lisa 3.5 inch floppy disk, or an Apple IIgs/IIc/IIc+ Smartport hard disk, or an Apple IIgs/IIc/IIc+ 5.25 inch floppy disk. Many people have purchased both a Model A and a Model B, to get a dedicated drive for each Apple computer in their collection. Don’t miss this chance to pick up a Model A at a great price!
Read 3 comments and join the conversation